Якорь Top Top
| CSS Stylesheet |
|---|
.top-button { background-image: url(https://confluence.twin24.ai/download/thumbnails/23986188/baseline_keyboard_arrow_up_white_18dp.png) !important; background-position: center; background-color: #47a7f5 !important; background-repeat: no-repeat; box-shadow: -1px 1.5px 3px #999; color: #47a7f5 !important; border-radius:50px !important; position: fixed; bottom: 45px; left: 93.5%; width: 50px; height: 50px !important; font-size: 12px !important; padding: 14.5px !important; z-index: 2; } .top-button:hover{ background-color: #65b9ff !important; color: #65b9ff !important; } .page-header{ background-color: #232838; background-repeat: no-repeat; background-position: center; width: auto; height: 100px; background-image: url(https://confluence.twin24.ai/download/attachments/23986188/logo_twin-02.png); background-size: 10em; color: #fff; font-size: 20px; padding: 20px; } .page-footer{ background-color: #232838; background-image: url(https://confluence.twin24.ai/download/thumbnails/23986188/decorated-pattern-dark.png); width: auto; height: 10px; color: #fff; text-align: end; font: small-caption; padding-inline-end: 30px; padding-top: 200px; padding-bottom: 30px; } .page-headline{ background-image: url(https://confluence.twin24.ai/download/thumbnails/23986188/Solid256dot8_2changed.png); background-repeat: no-repeat; background-position-x: -227px; background-position-y: center; padding: 20px; background-color: #007bff; width: auto; height: 10px; color: #fff; text-align: center; font: caption; font-weight: 600; } .tabs-menu{ padding-left: 85% !important; } |
In the Notifications section you can send automated texts and advertisement messages to your clients using different communication channels.
| Message Box | ||||||
|---|---|---|---|---|---|---|
| ||||||
|
Working with notification templates
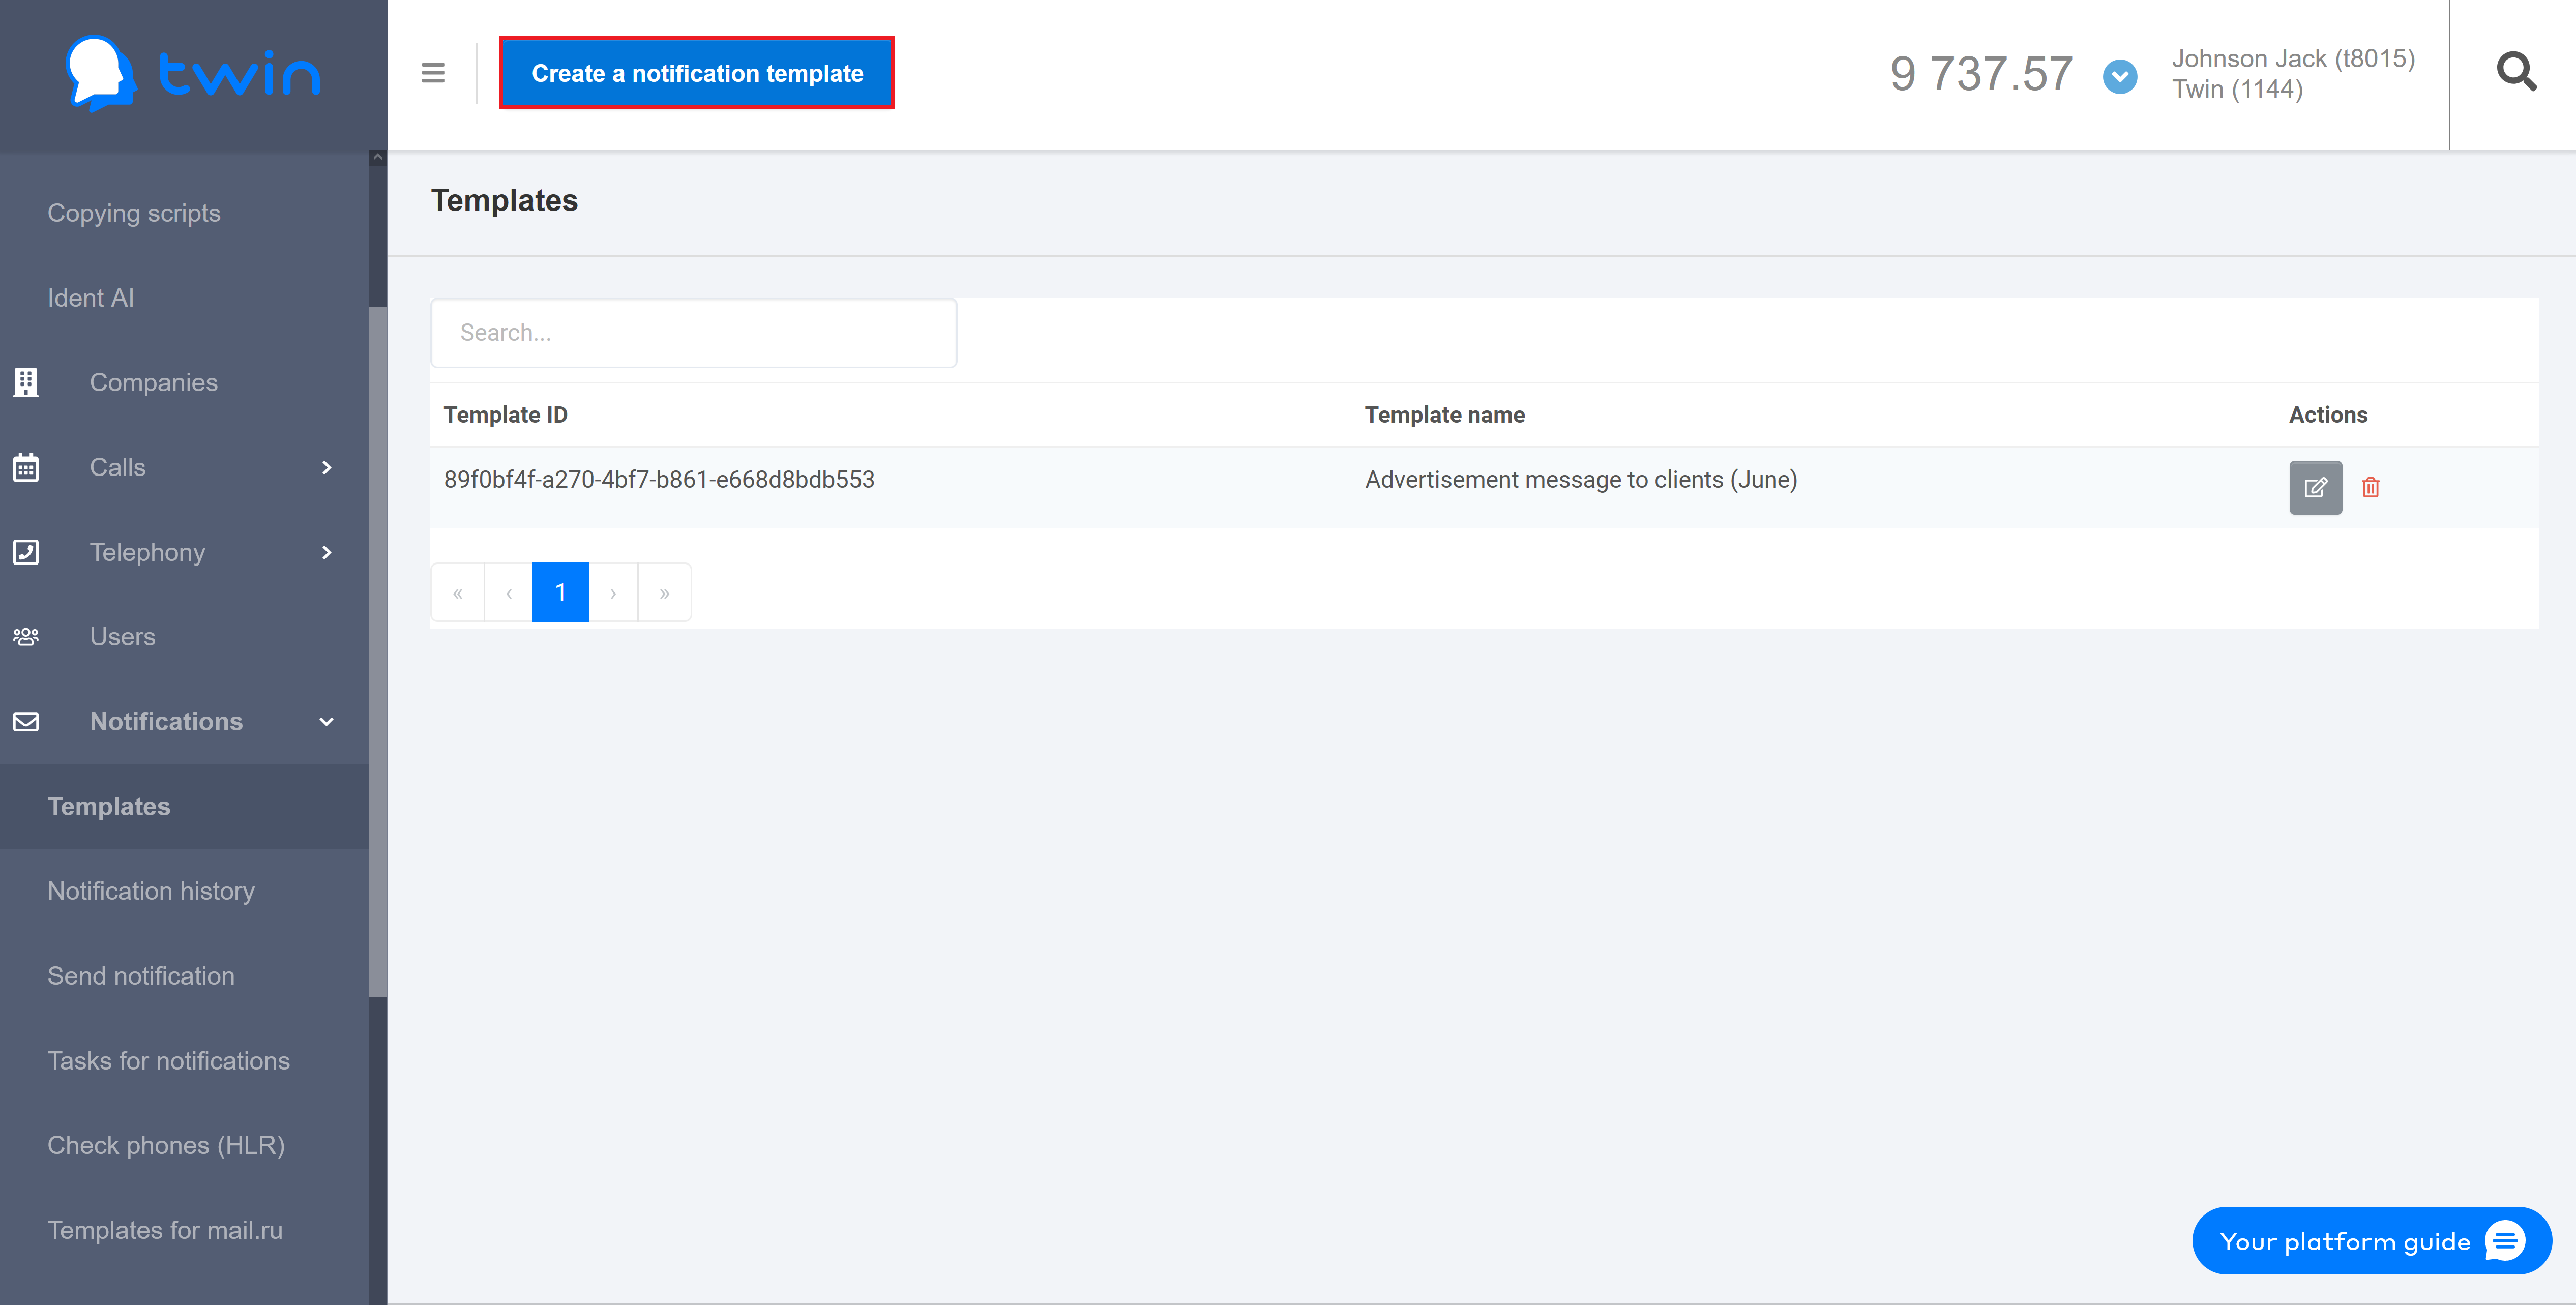
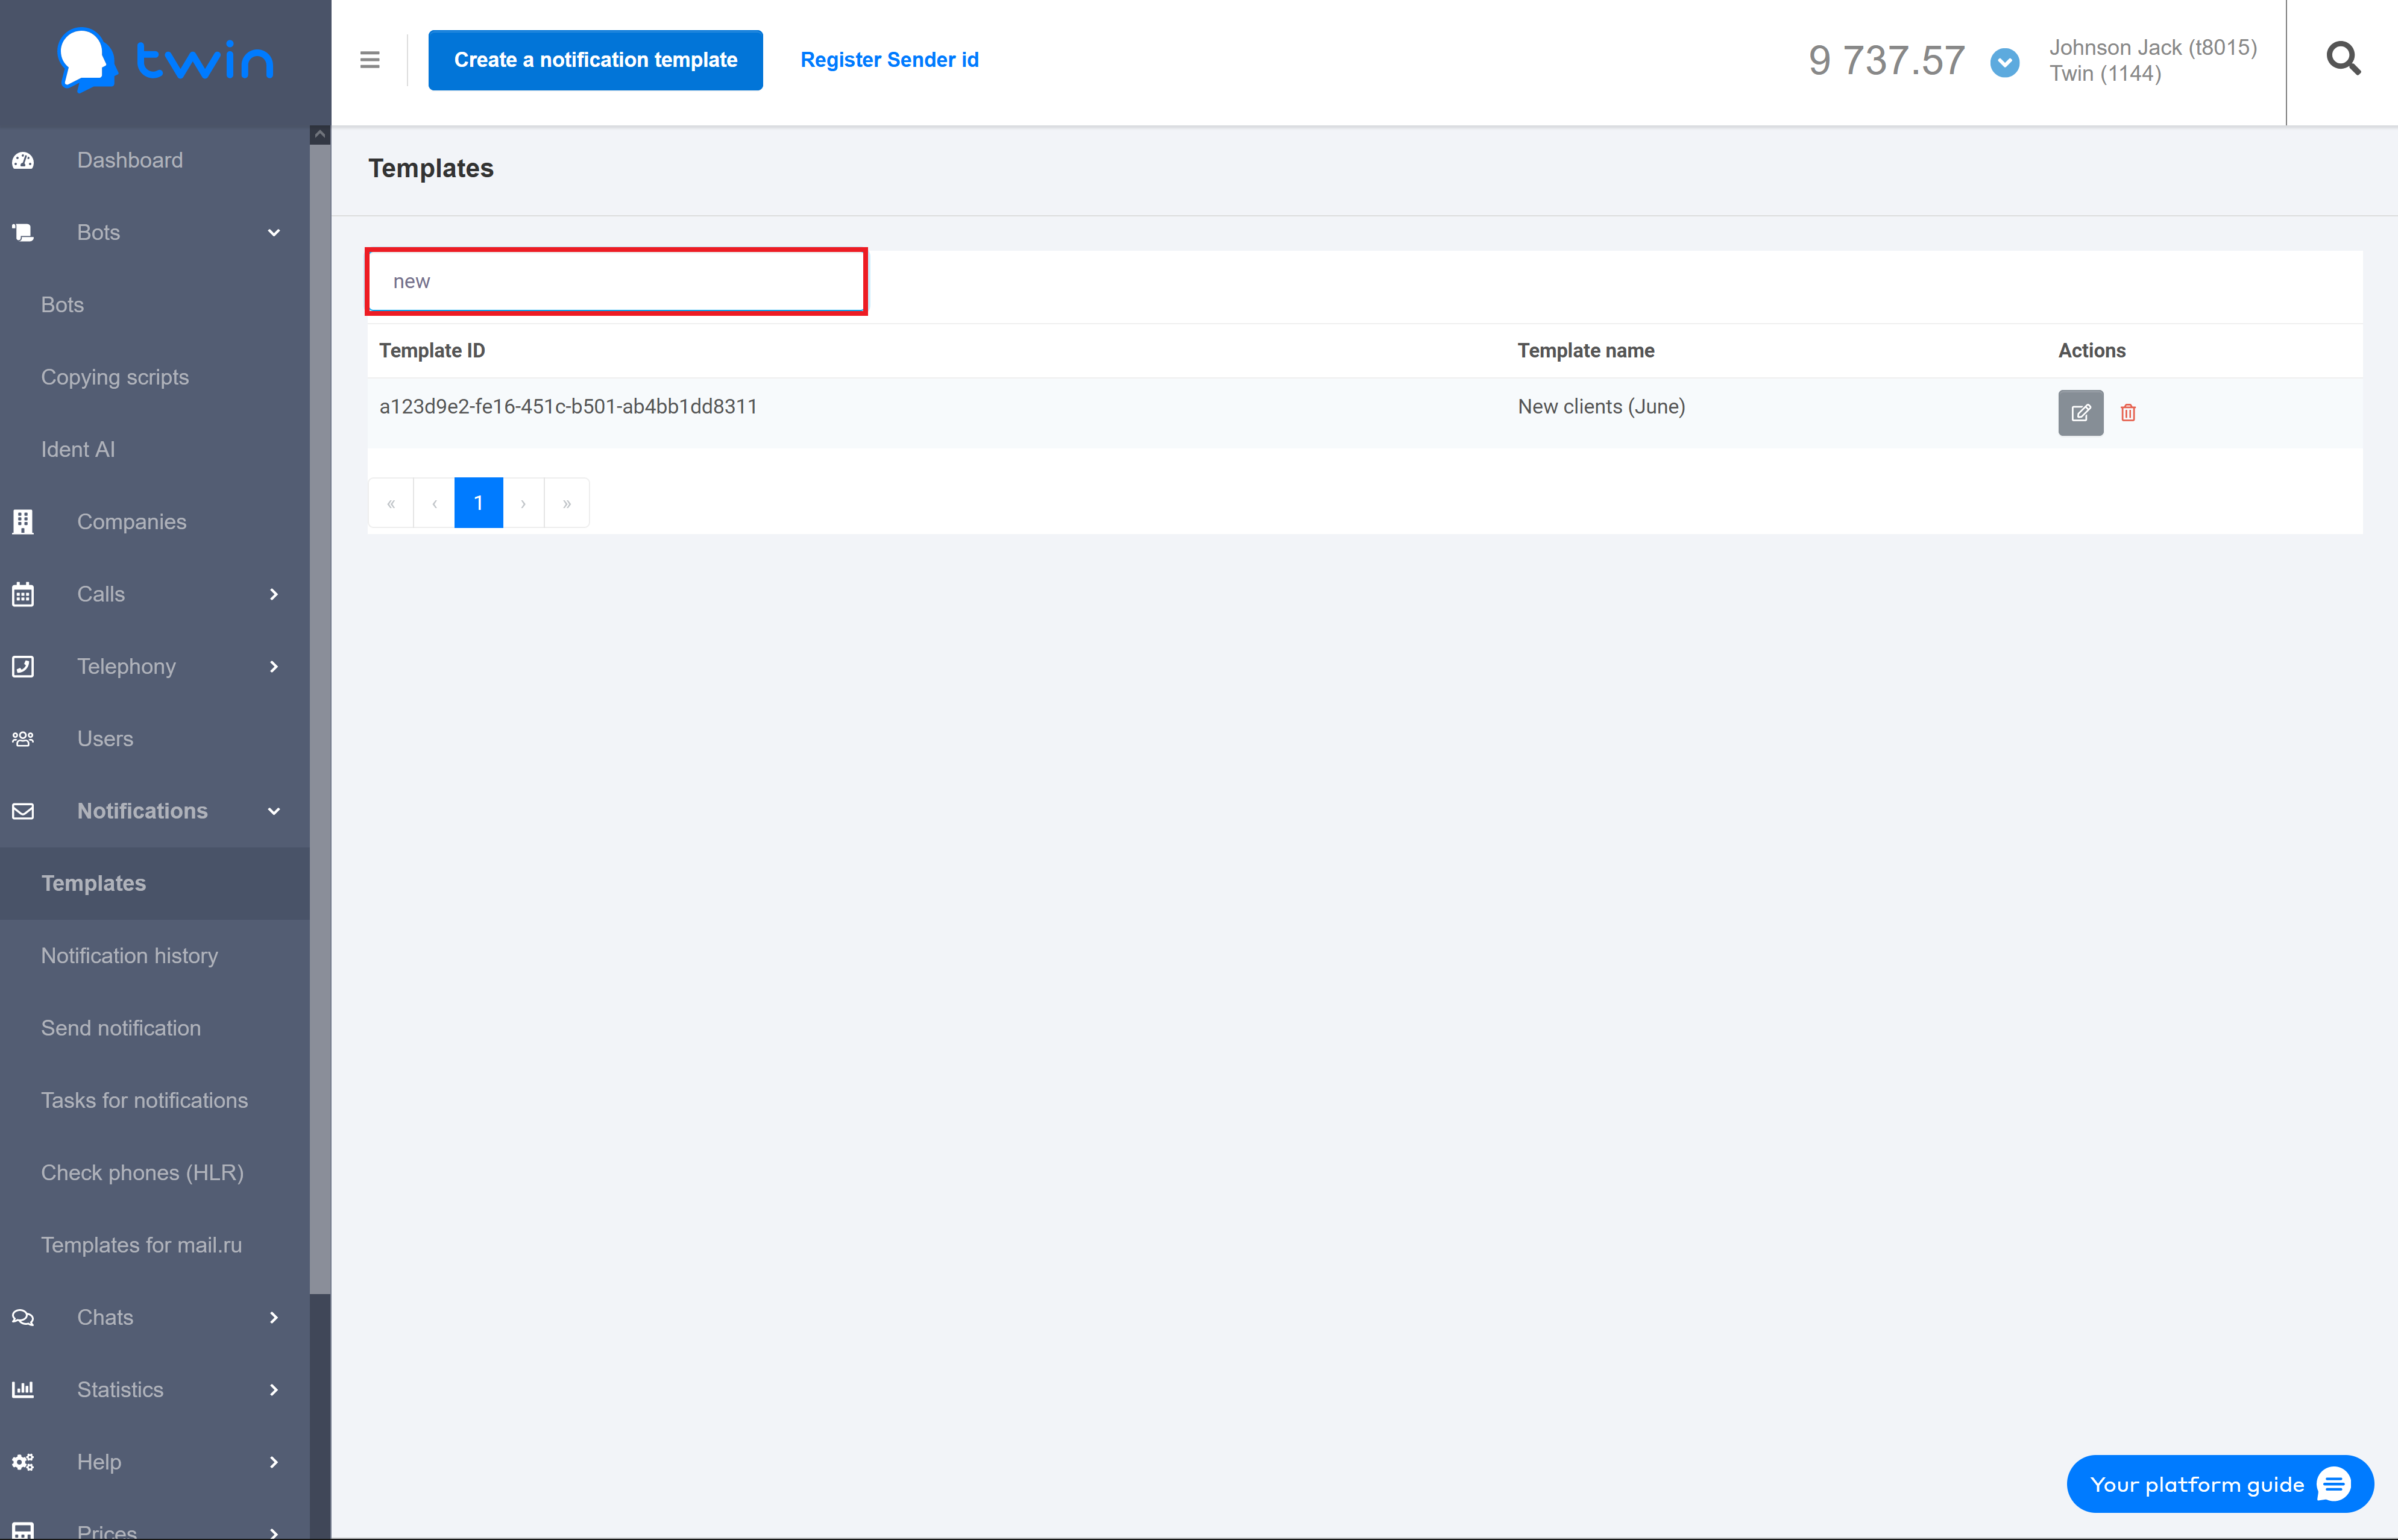
On the side menu click Notifications – templates. As a result the Templates page will open.

The Templates page contains a list of all notification templates that you can use to send automated texts and advertisement messages to your clients.
| Подсказка |
|---|
Each notification template contains the sender name, message text, and other parameters. |
| Примечание |
|---|
To send automated texts and advertisement messages to your clients you must register the sender name with your mobile network carrier. The sender name that you plan to use must match the name of your company or your website. After that you need to create a request to the technical support so that you can use the registered sender name with your account. |
Creating notification templates
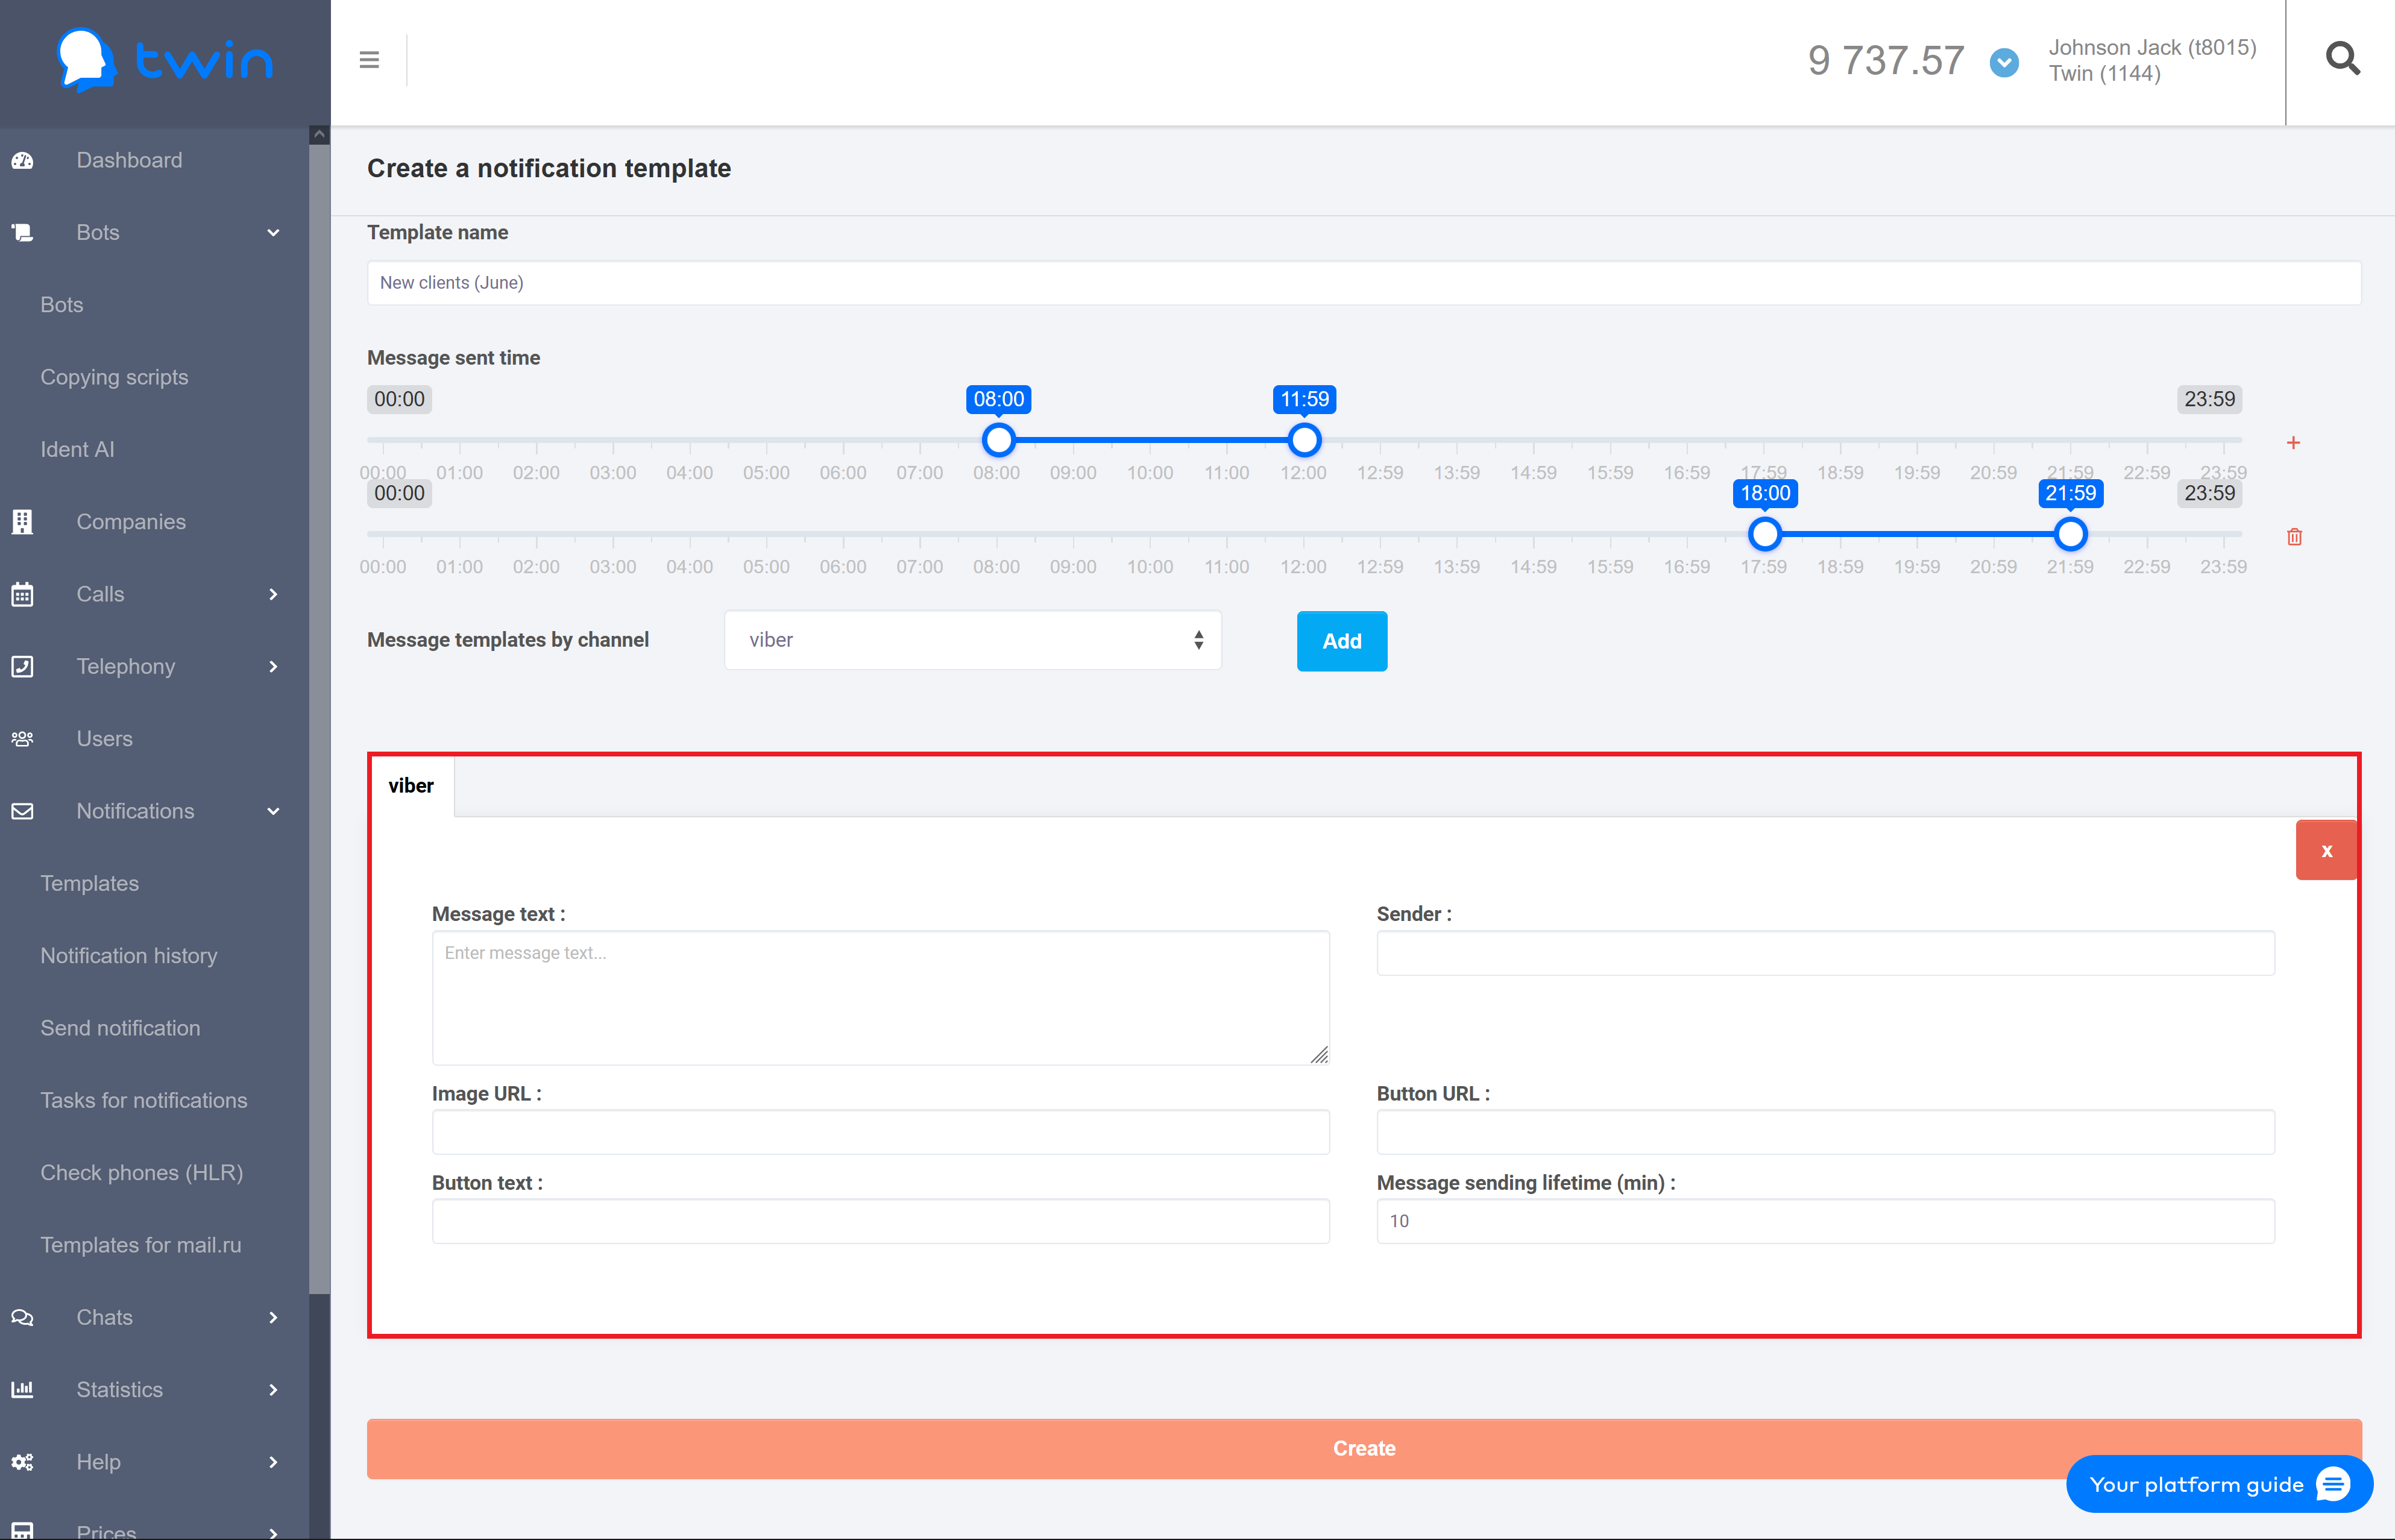
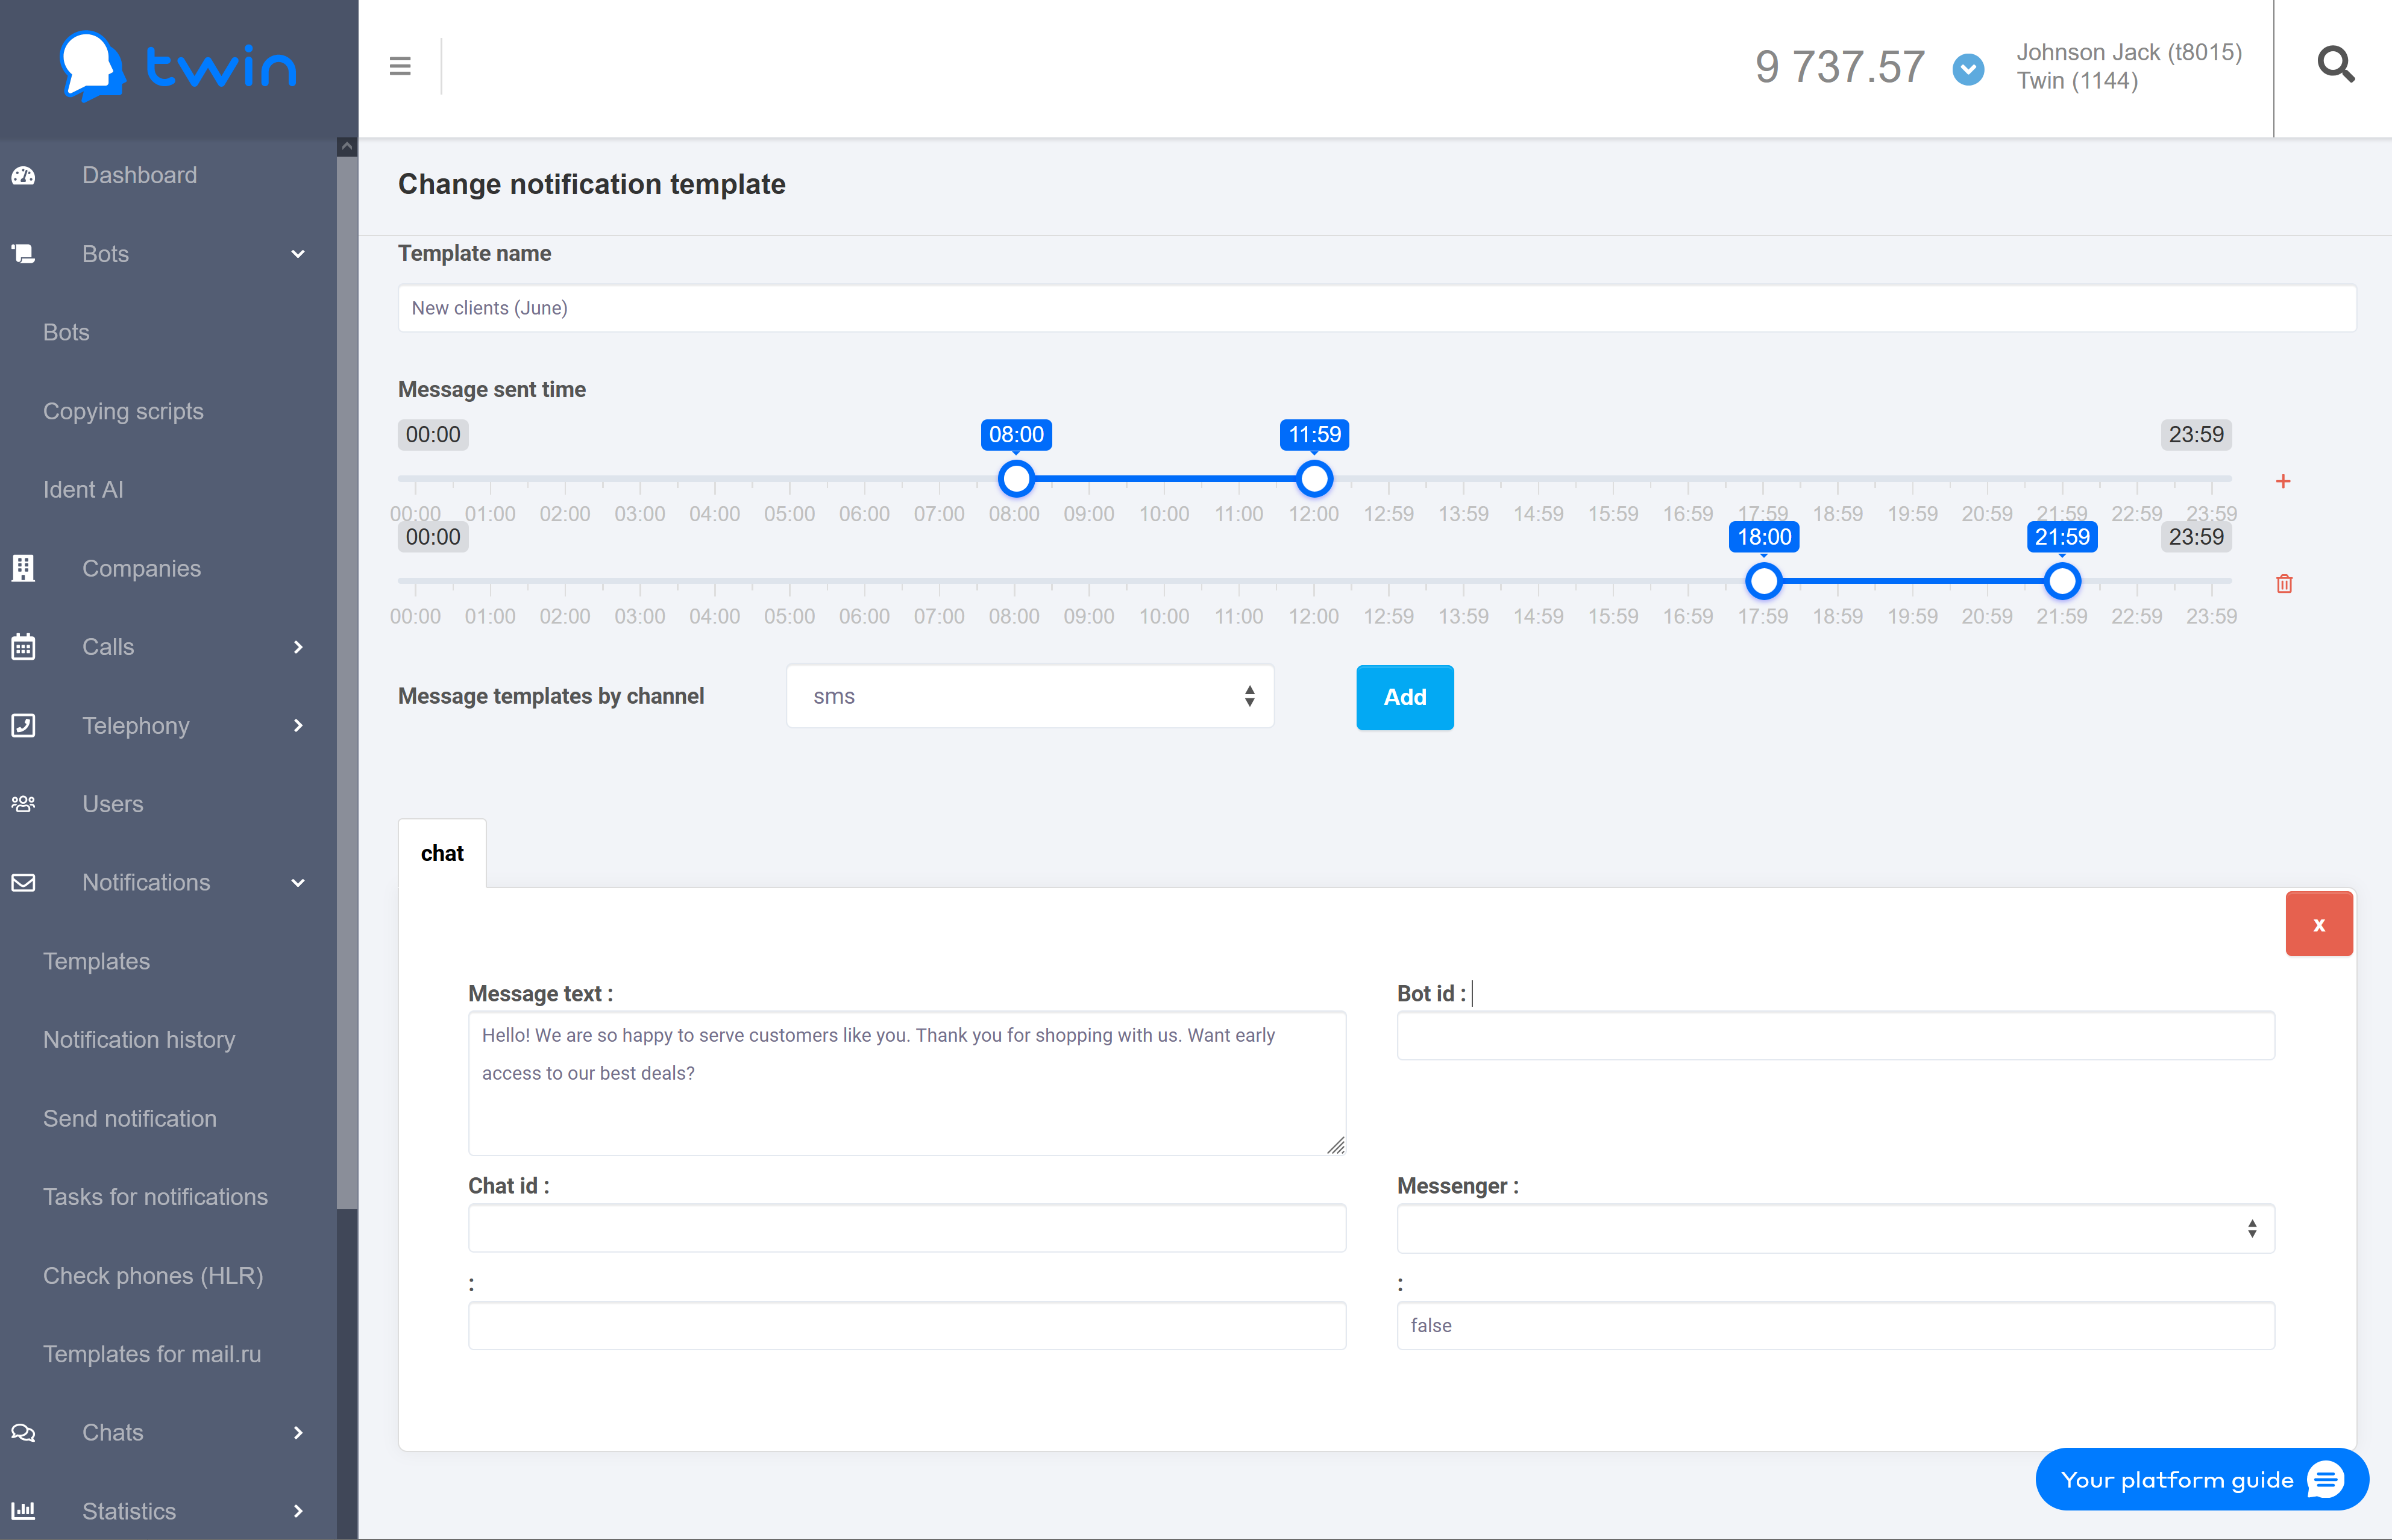
Click Create a notification template at the top of the page.
As a result a new page will open as shown in the image below.

To create a new notification template, do the following:
1. In the Template name field enter the name of a new template.
| Информация |
|---|
It is recommended to use simple and concise names for notification templates. Later these names will help you remember why you created a certain notification template. |
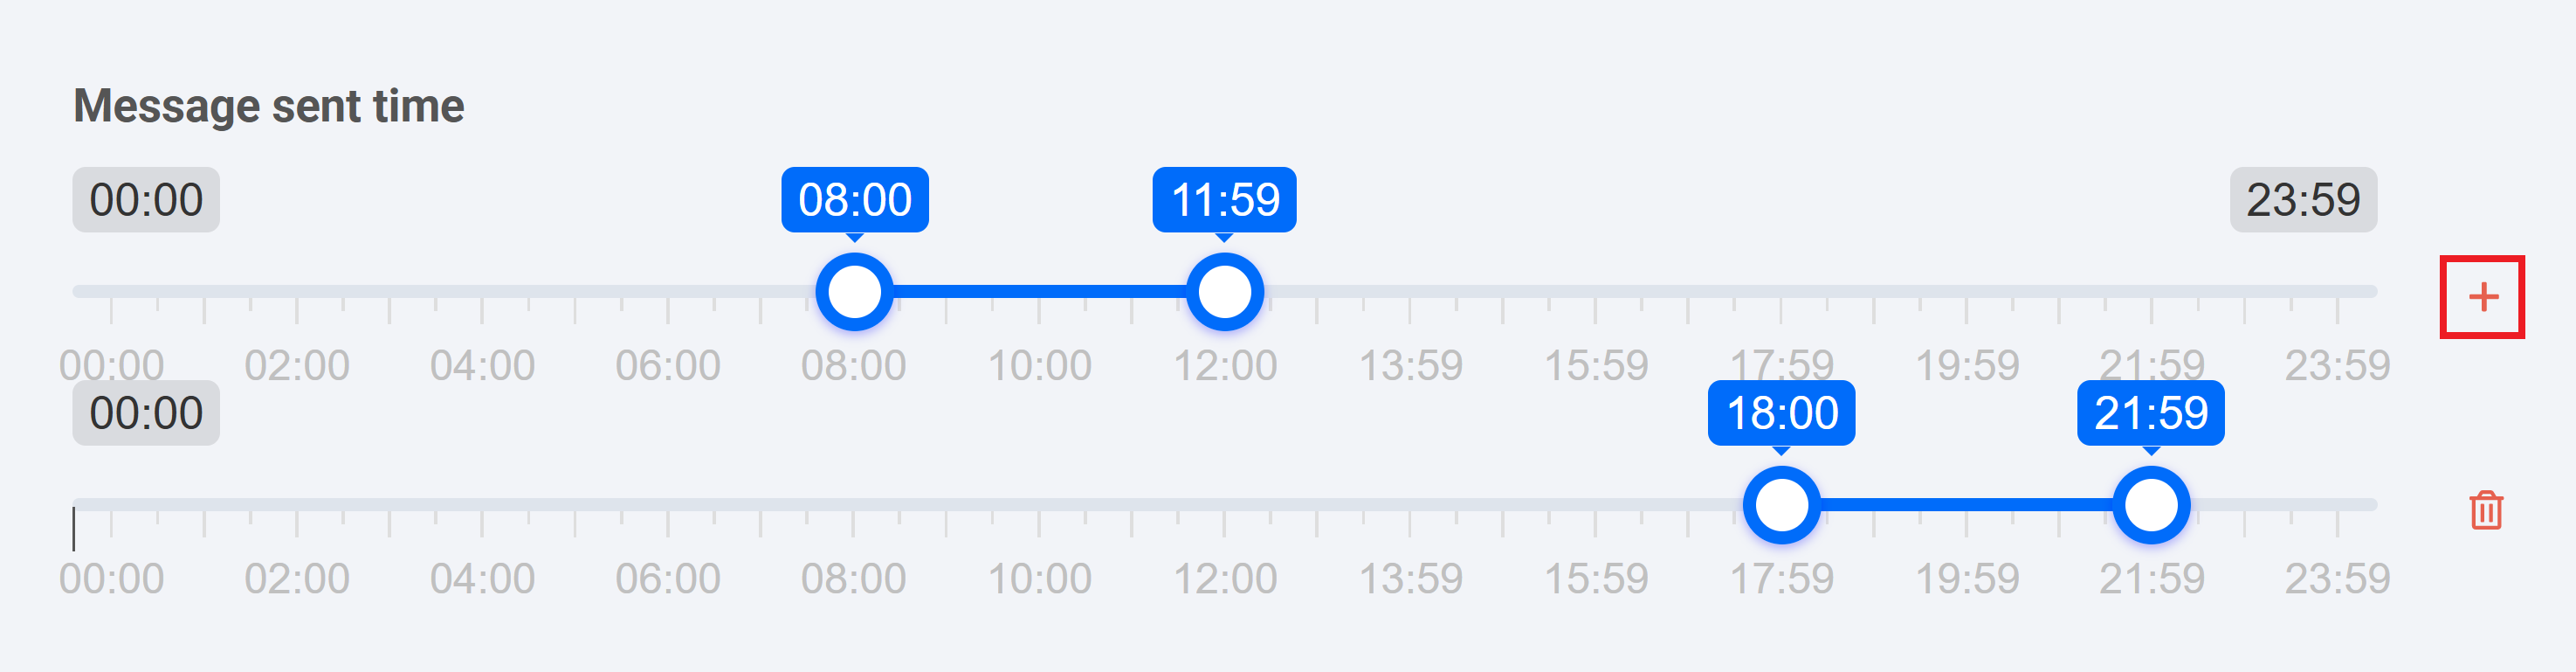
2. In the Message sent time section select a period of time for the system to send automated texts or advertisement messages to your clients.
| Подсказка |
|---|
If necessary you can click the + button and select an additional time period. If you send notifications after the first selected time period is over, then the system will send them within the second selected time period.
|
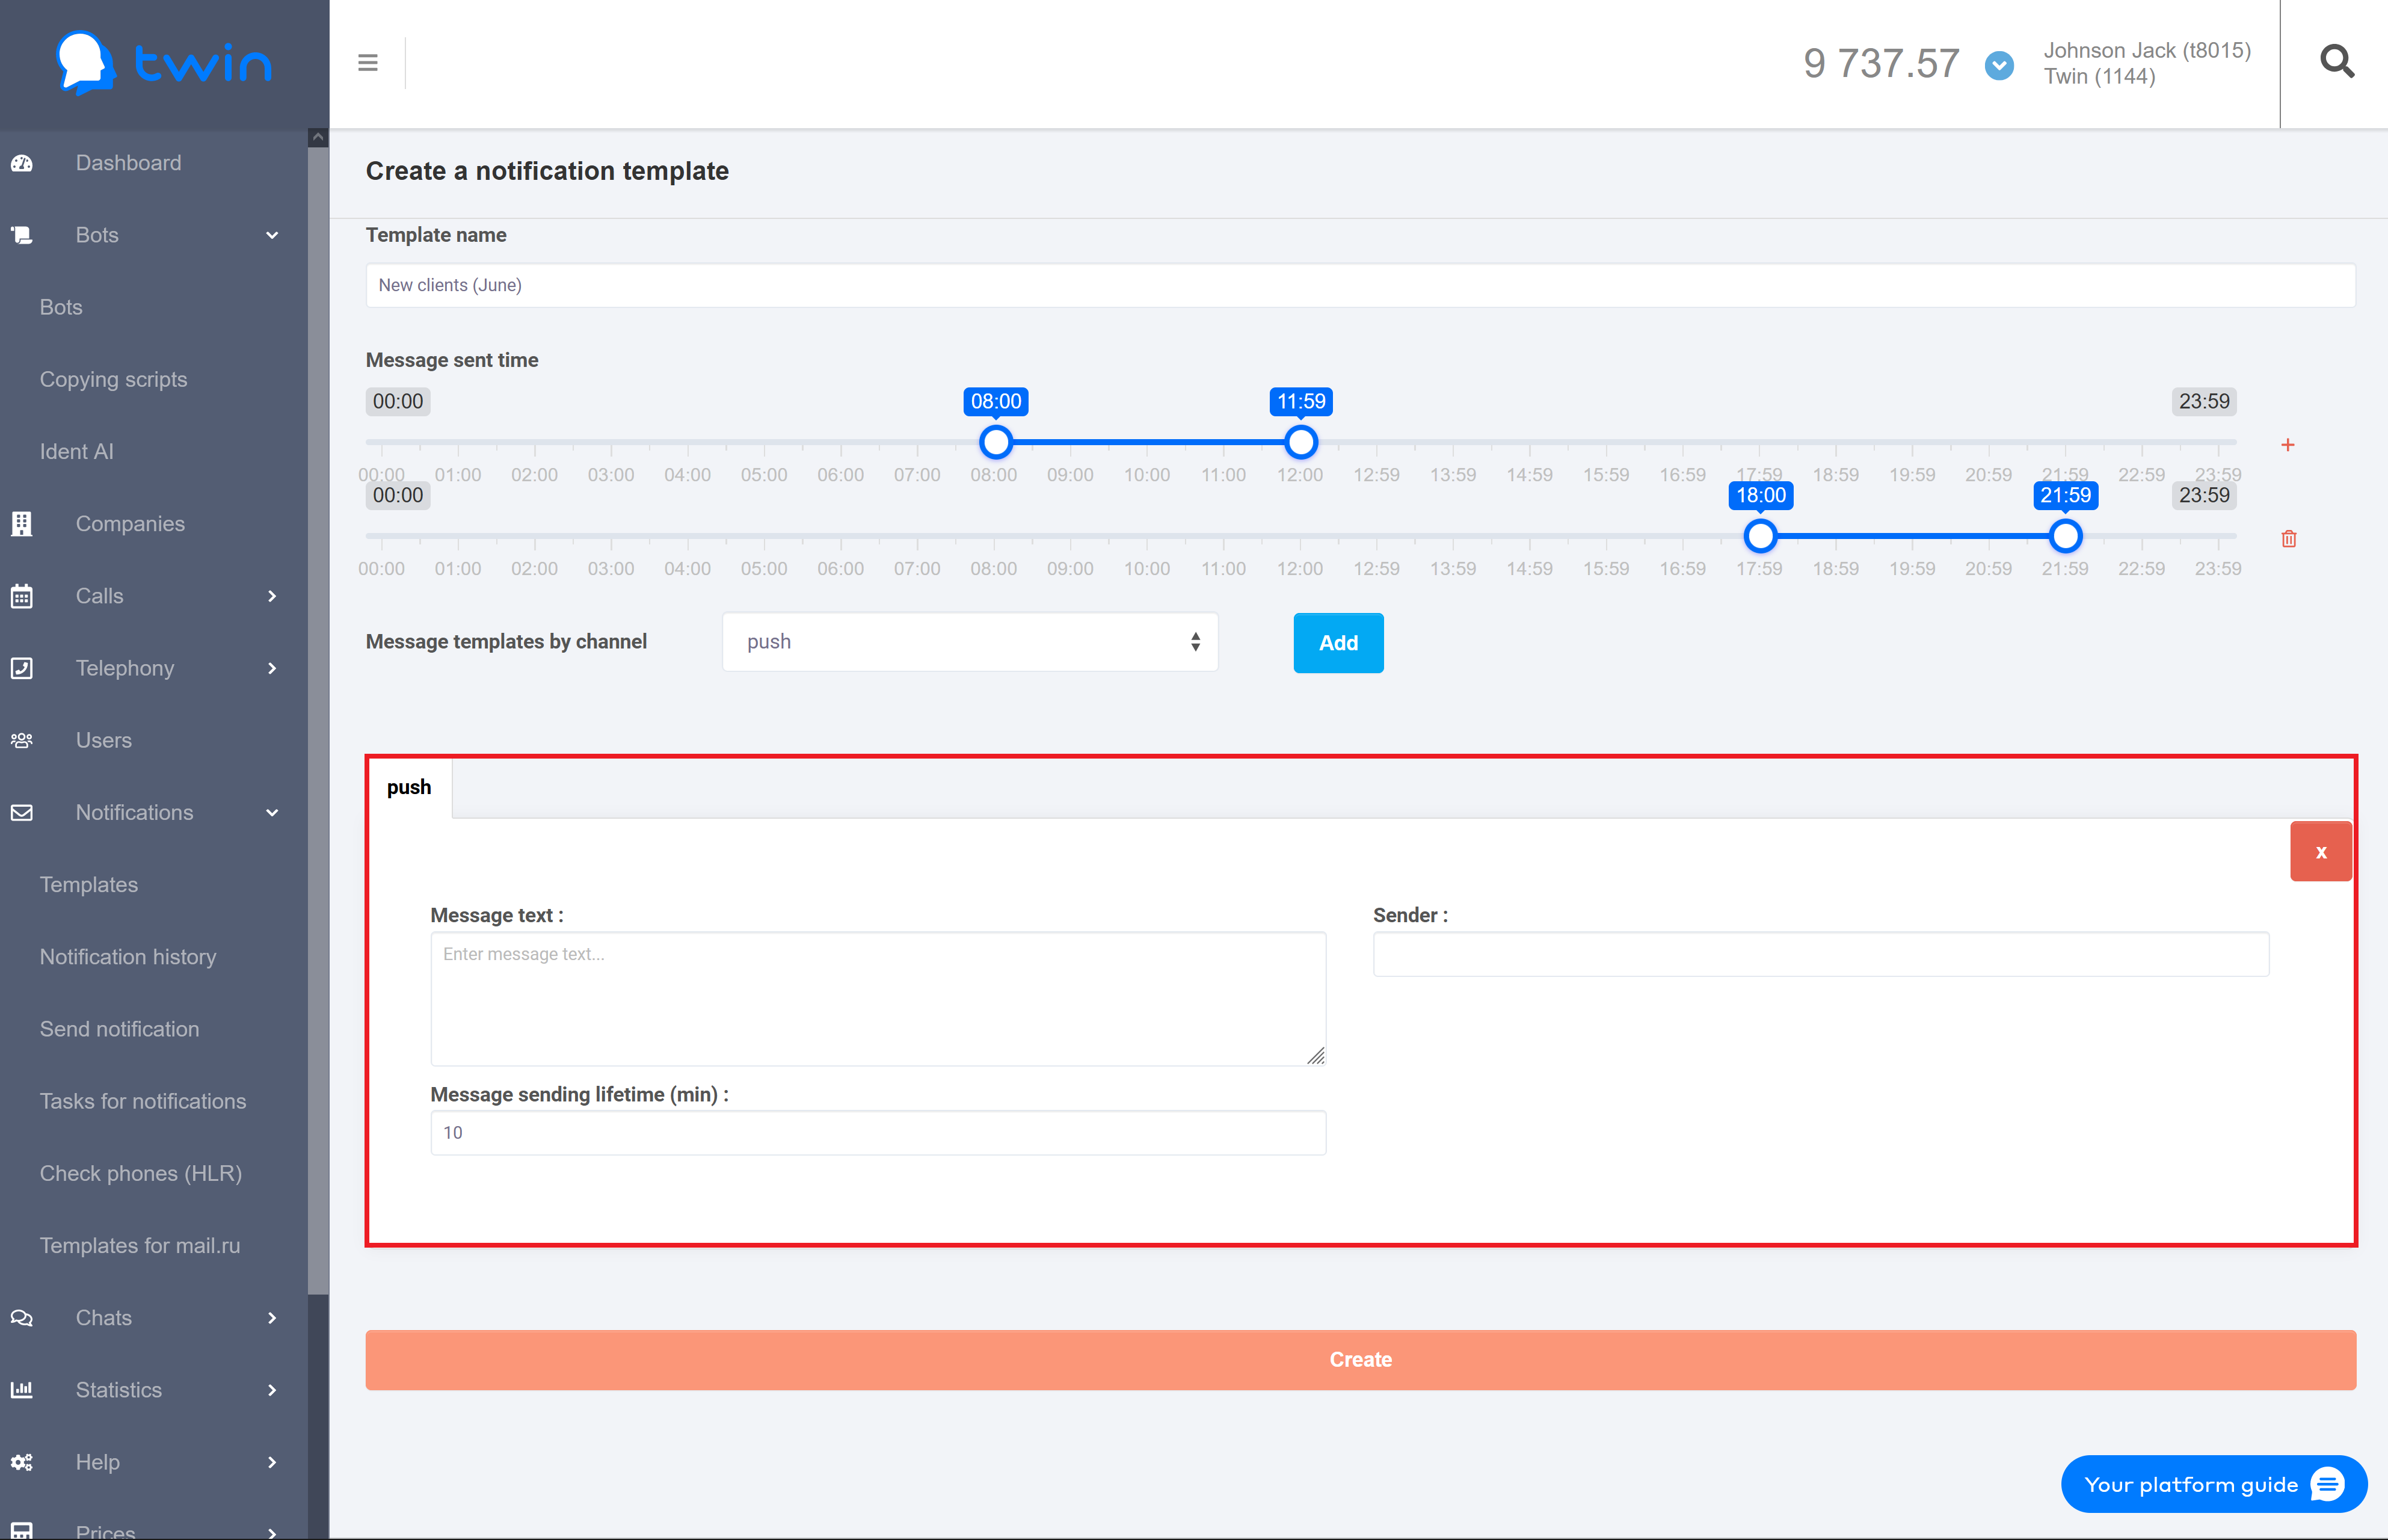
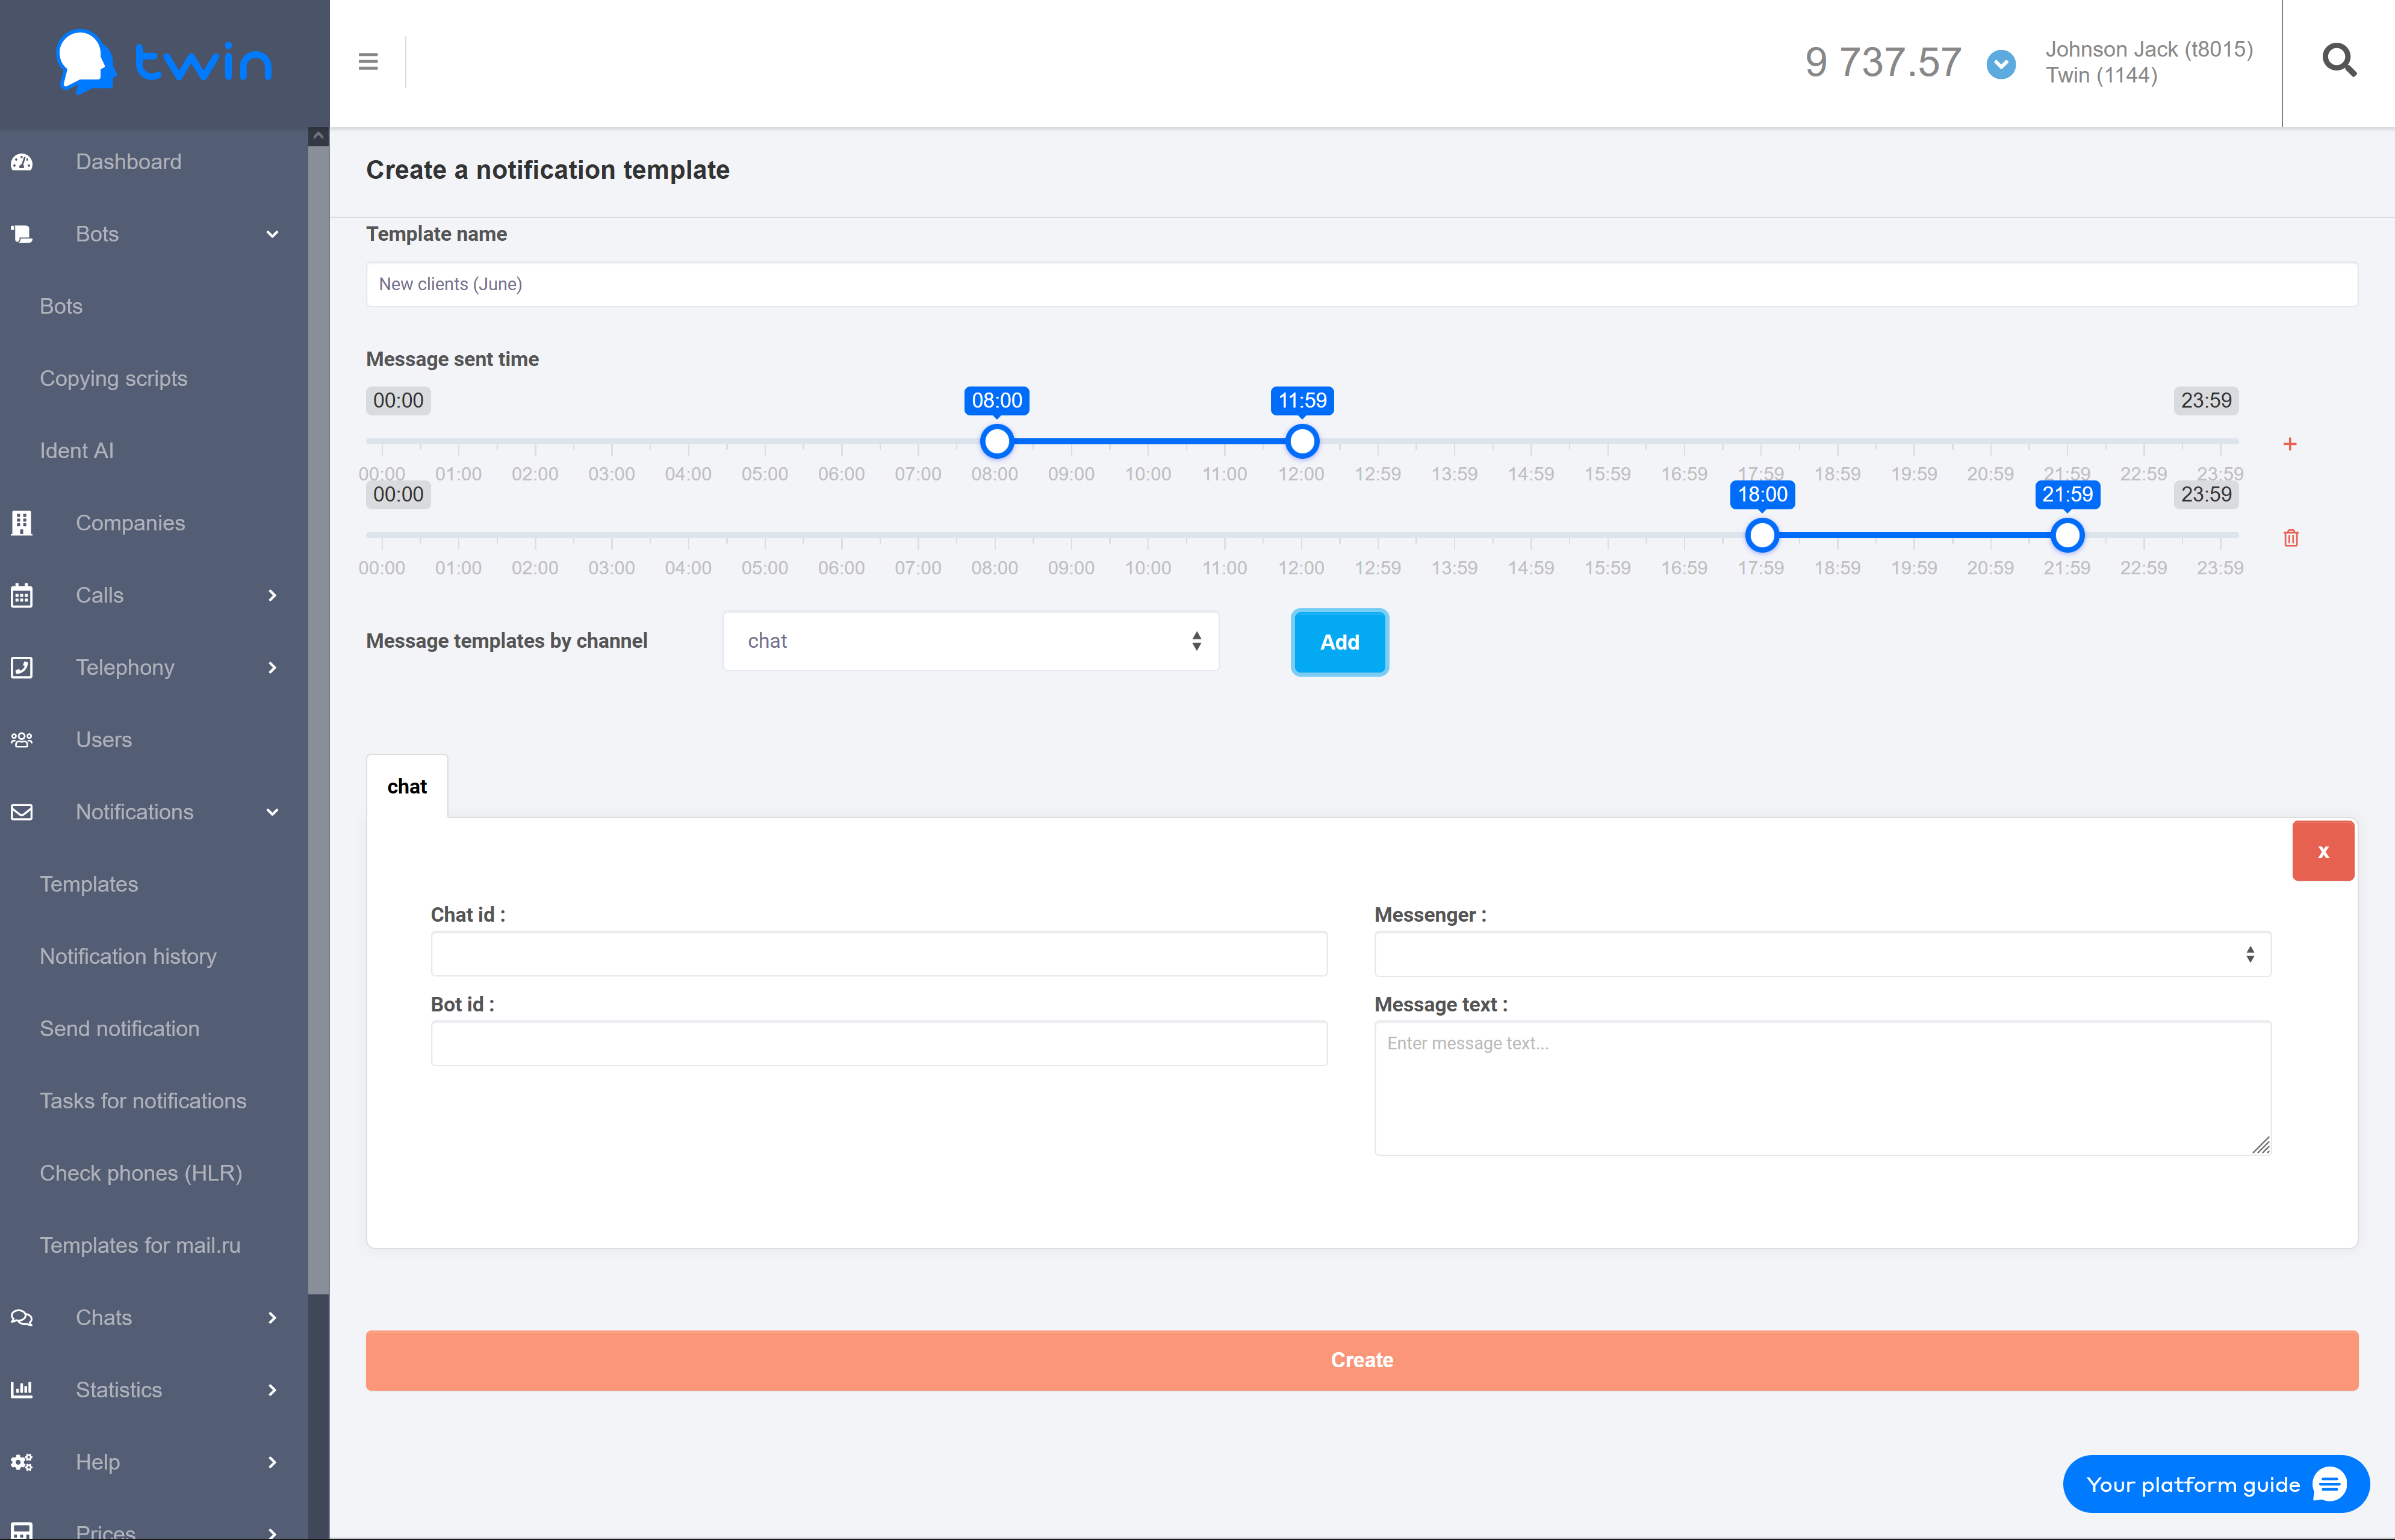
3. In the Message templates by channel field select the necessary communication channel and click Add. The system will use this communication channel to send notifications to your clients. As a result the section with parameters of the selected communication channel will open.
| Подсказка |
|---|
You can set up one or multiple communication channels at the same time. |
| Информация | ||||||||||||||||||||||||||||||||||||||
|---|---|---|---|---|---|---|---|---|---|---|---|---|---|---|---|---|---|---|---|---|---|---|---|---|---|---|---|---|---|---|---|---|---|---|---|---|---|---|
| ||||||||||||||||||||||||||||||||||||||
|
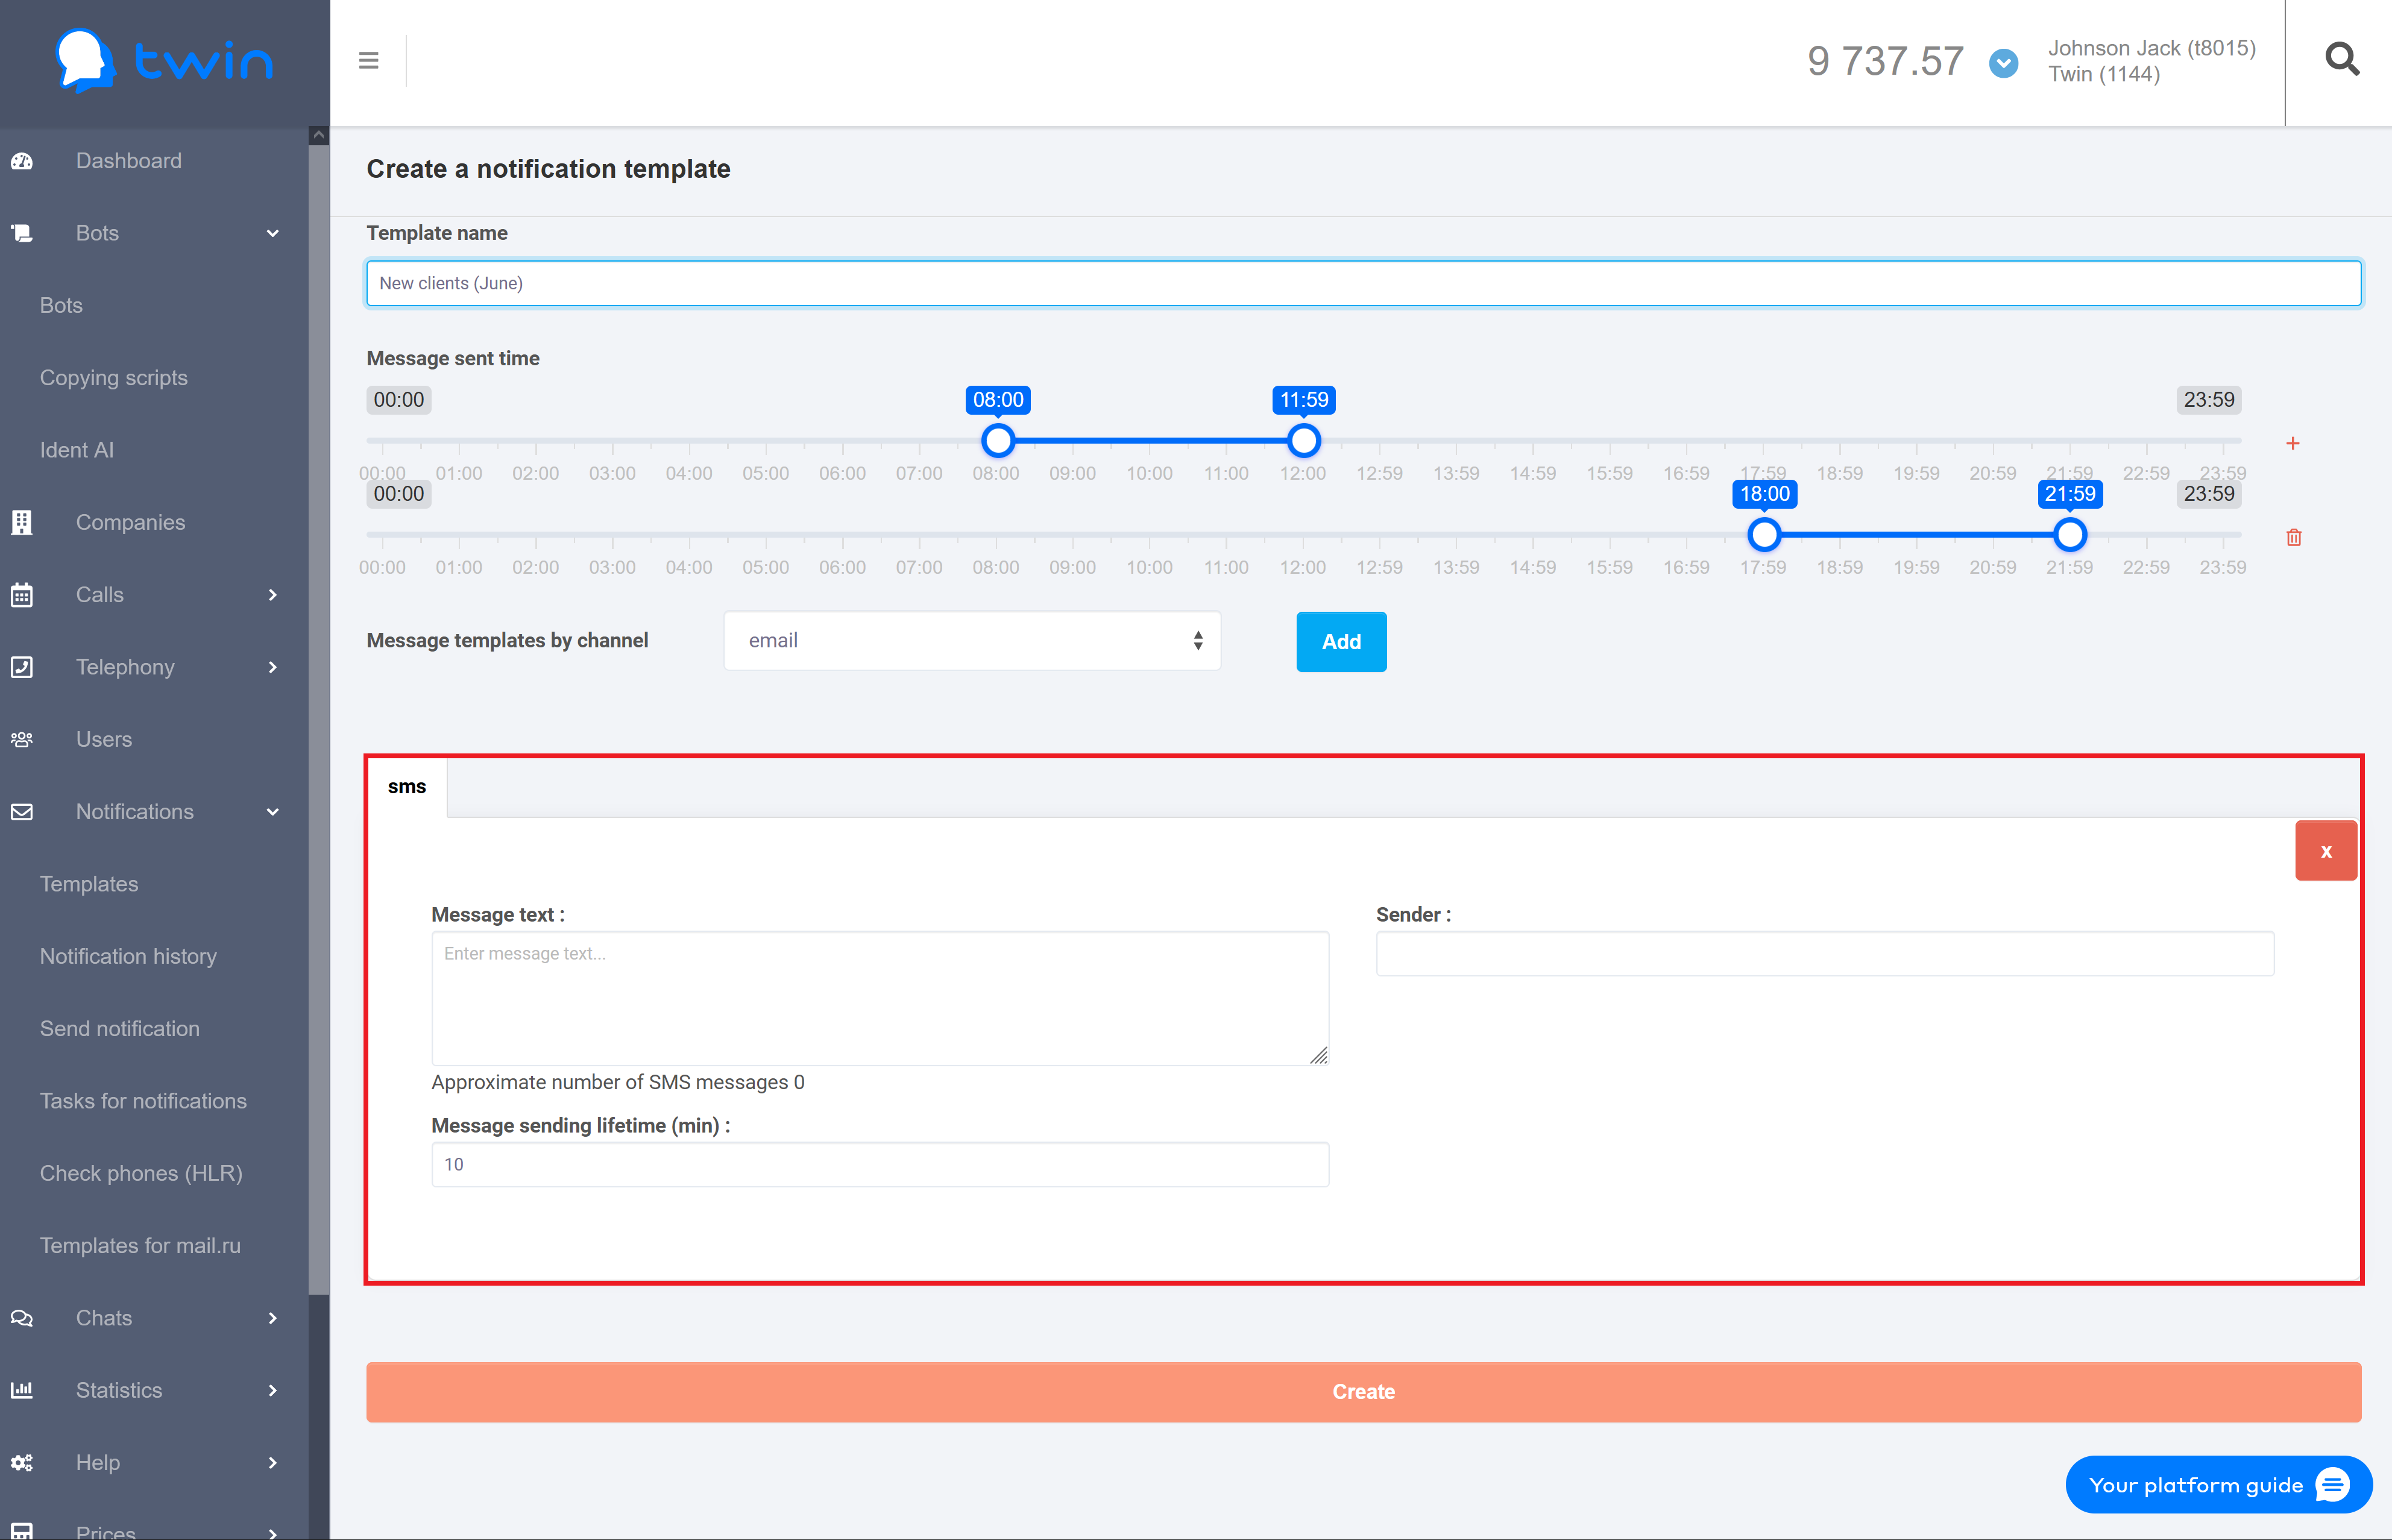


4) To save changes click Create.
Searching for notification templates
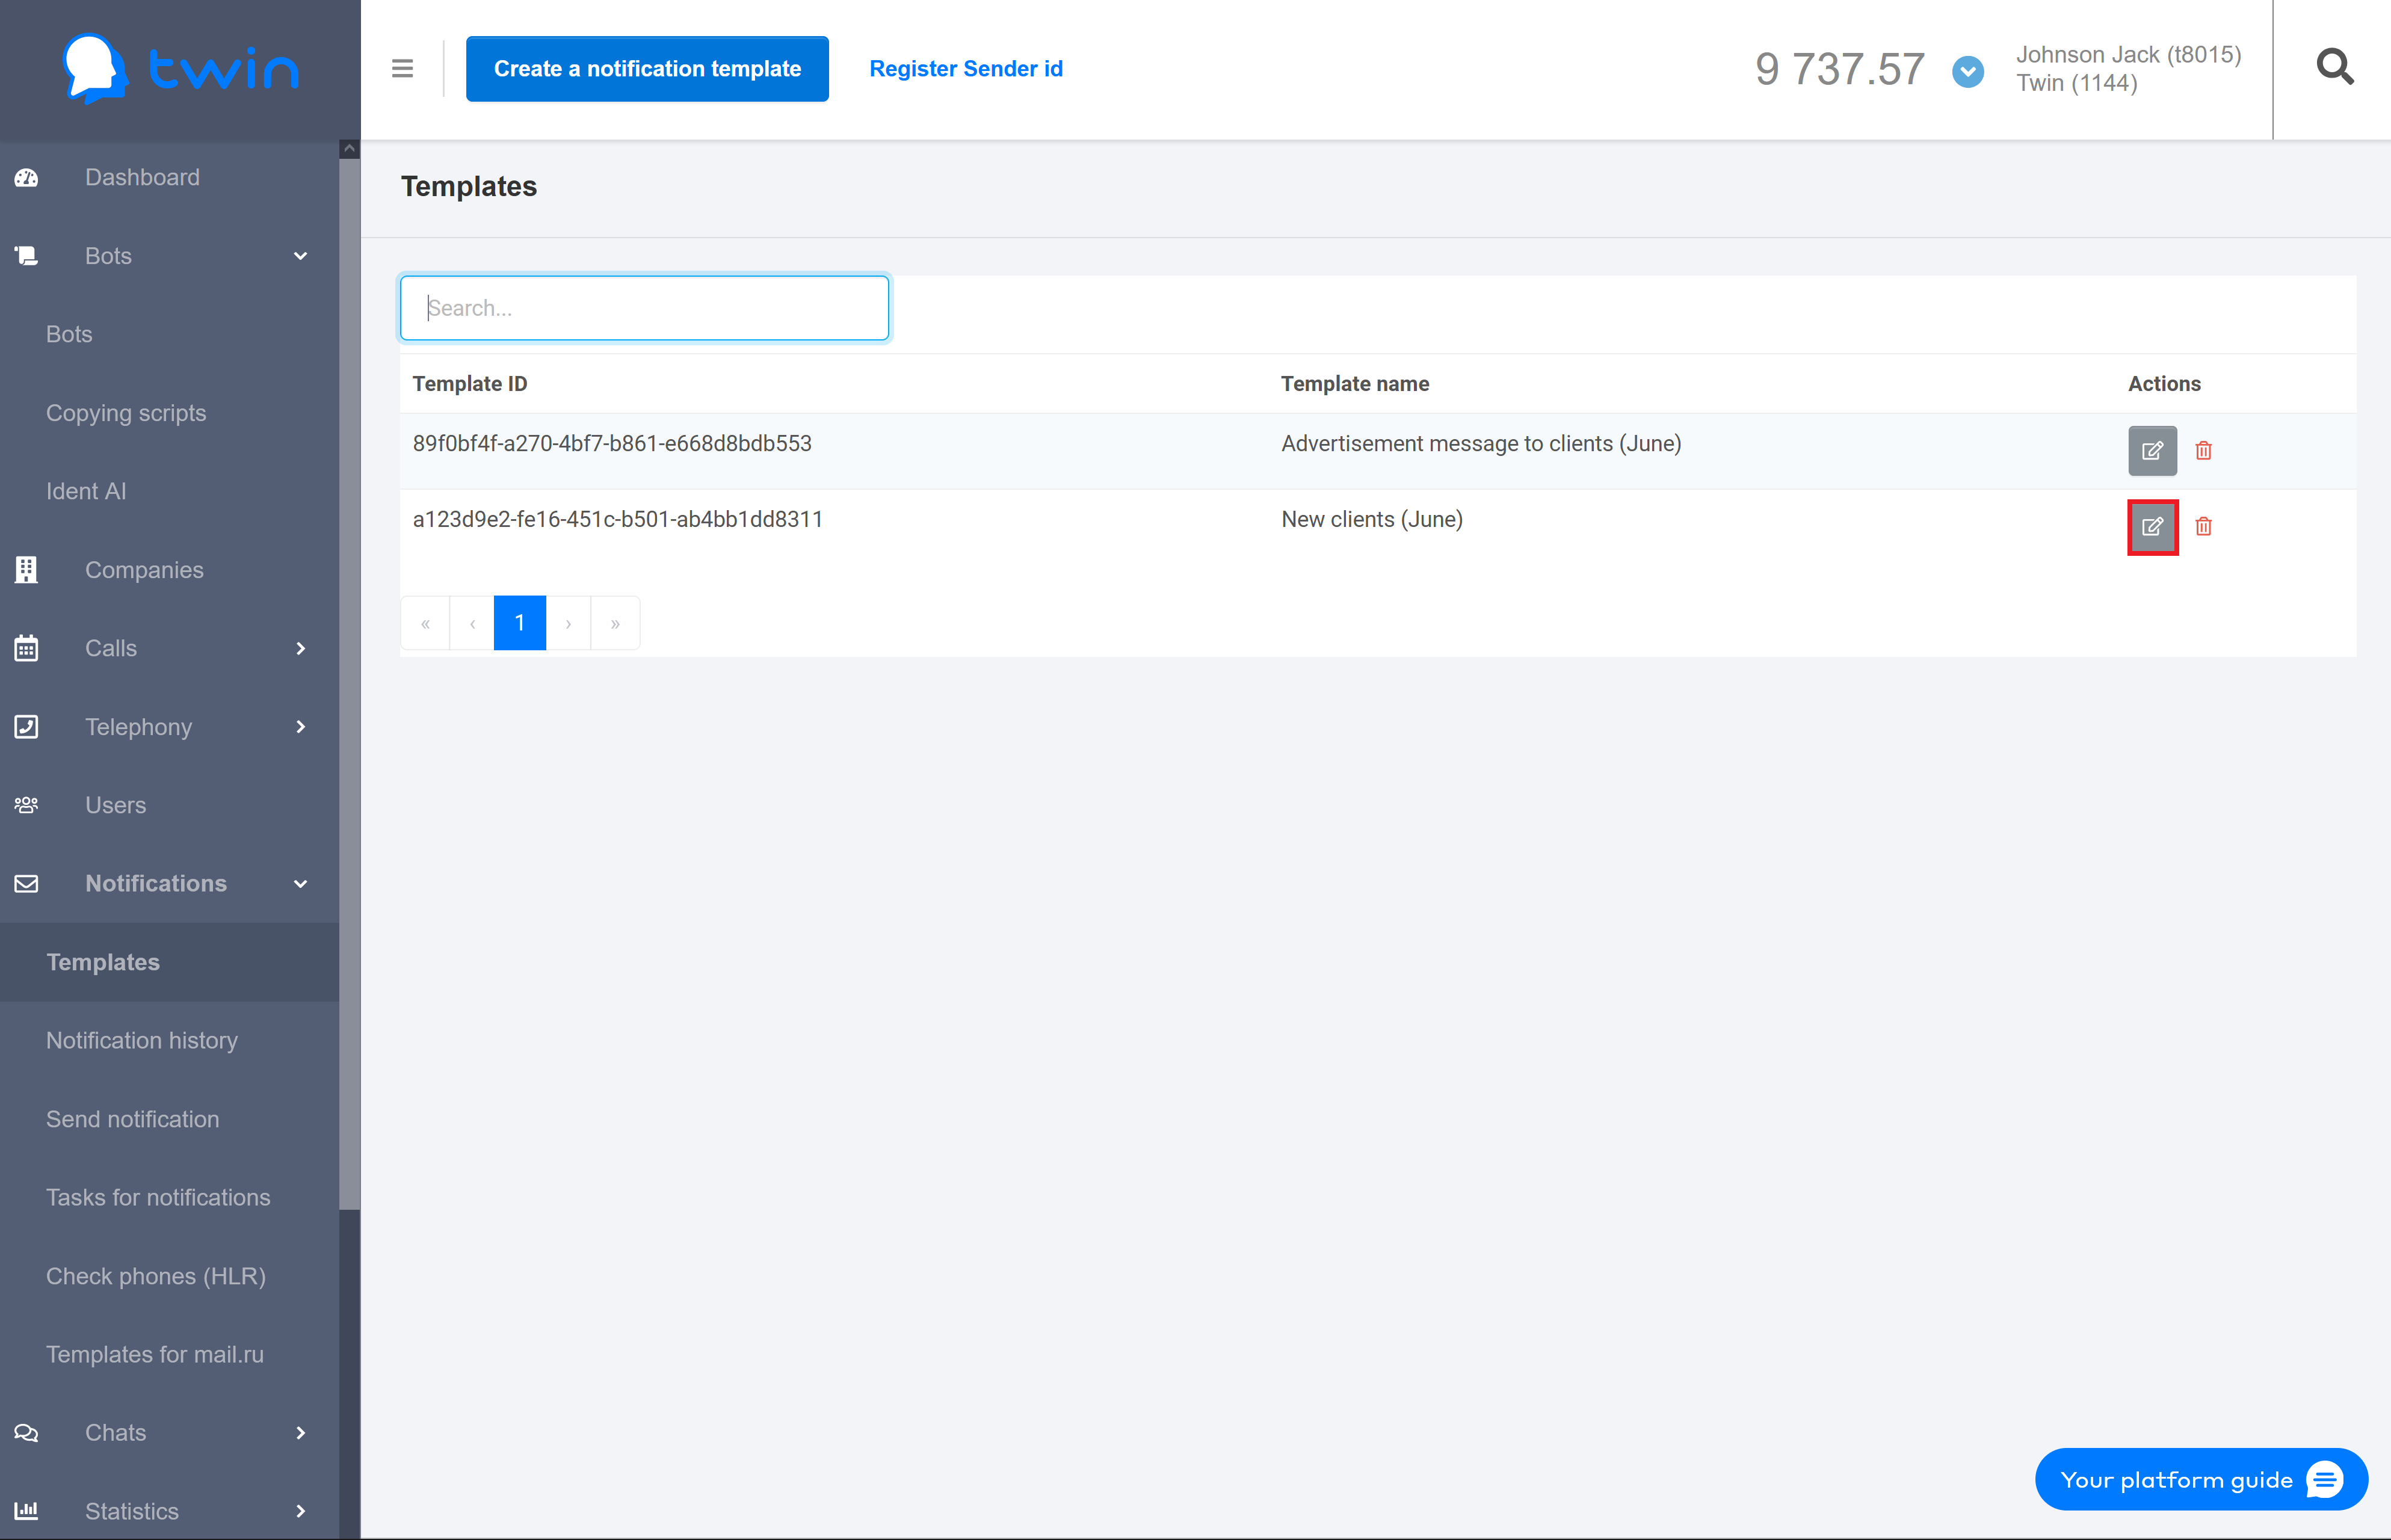
If there are a lot of templates on the list, you can filter records you need or search for the necessary record by a template ID or template name.
For this enter the necessary value in the search field at the top of the page.
| Подсказка |
|---|
When you are searching by ID, enter the full template ID in the search field. When you are searching by name, you can enter the full template name or its part in the search field. |
The search results will be displayed automatically.
To delete the specified values use the Clear button.
Editing notification template
If you need to change notification parameters (for example, change the message text or add an additional communication channel), you can edit the notification template.
For this select the necessary template on the list and click ![]() .
.
As a result a new page for editing the template will open.
Steps for editing a notification template are similar to those described in this section.
Deleting notification templates
If you do not use a certain notification template, you can delete it.
For this select the necessary template on the list and click ![]() .
.
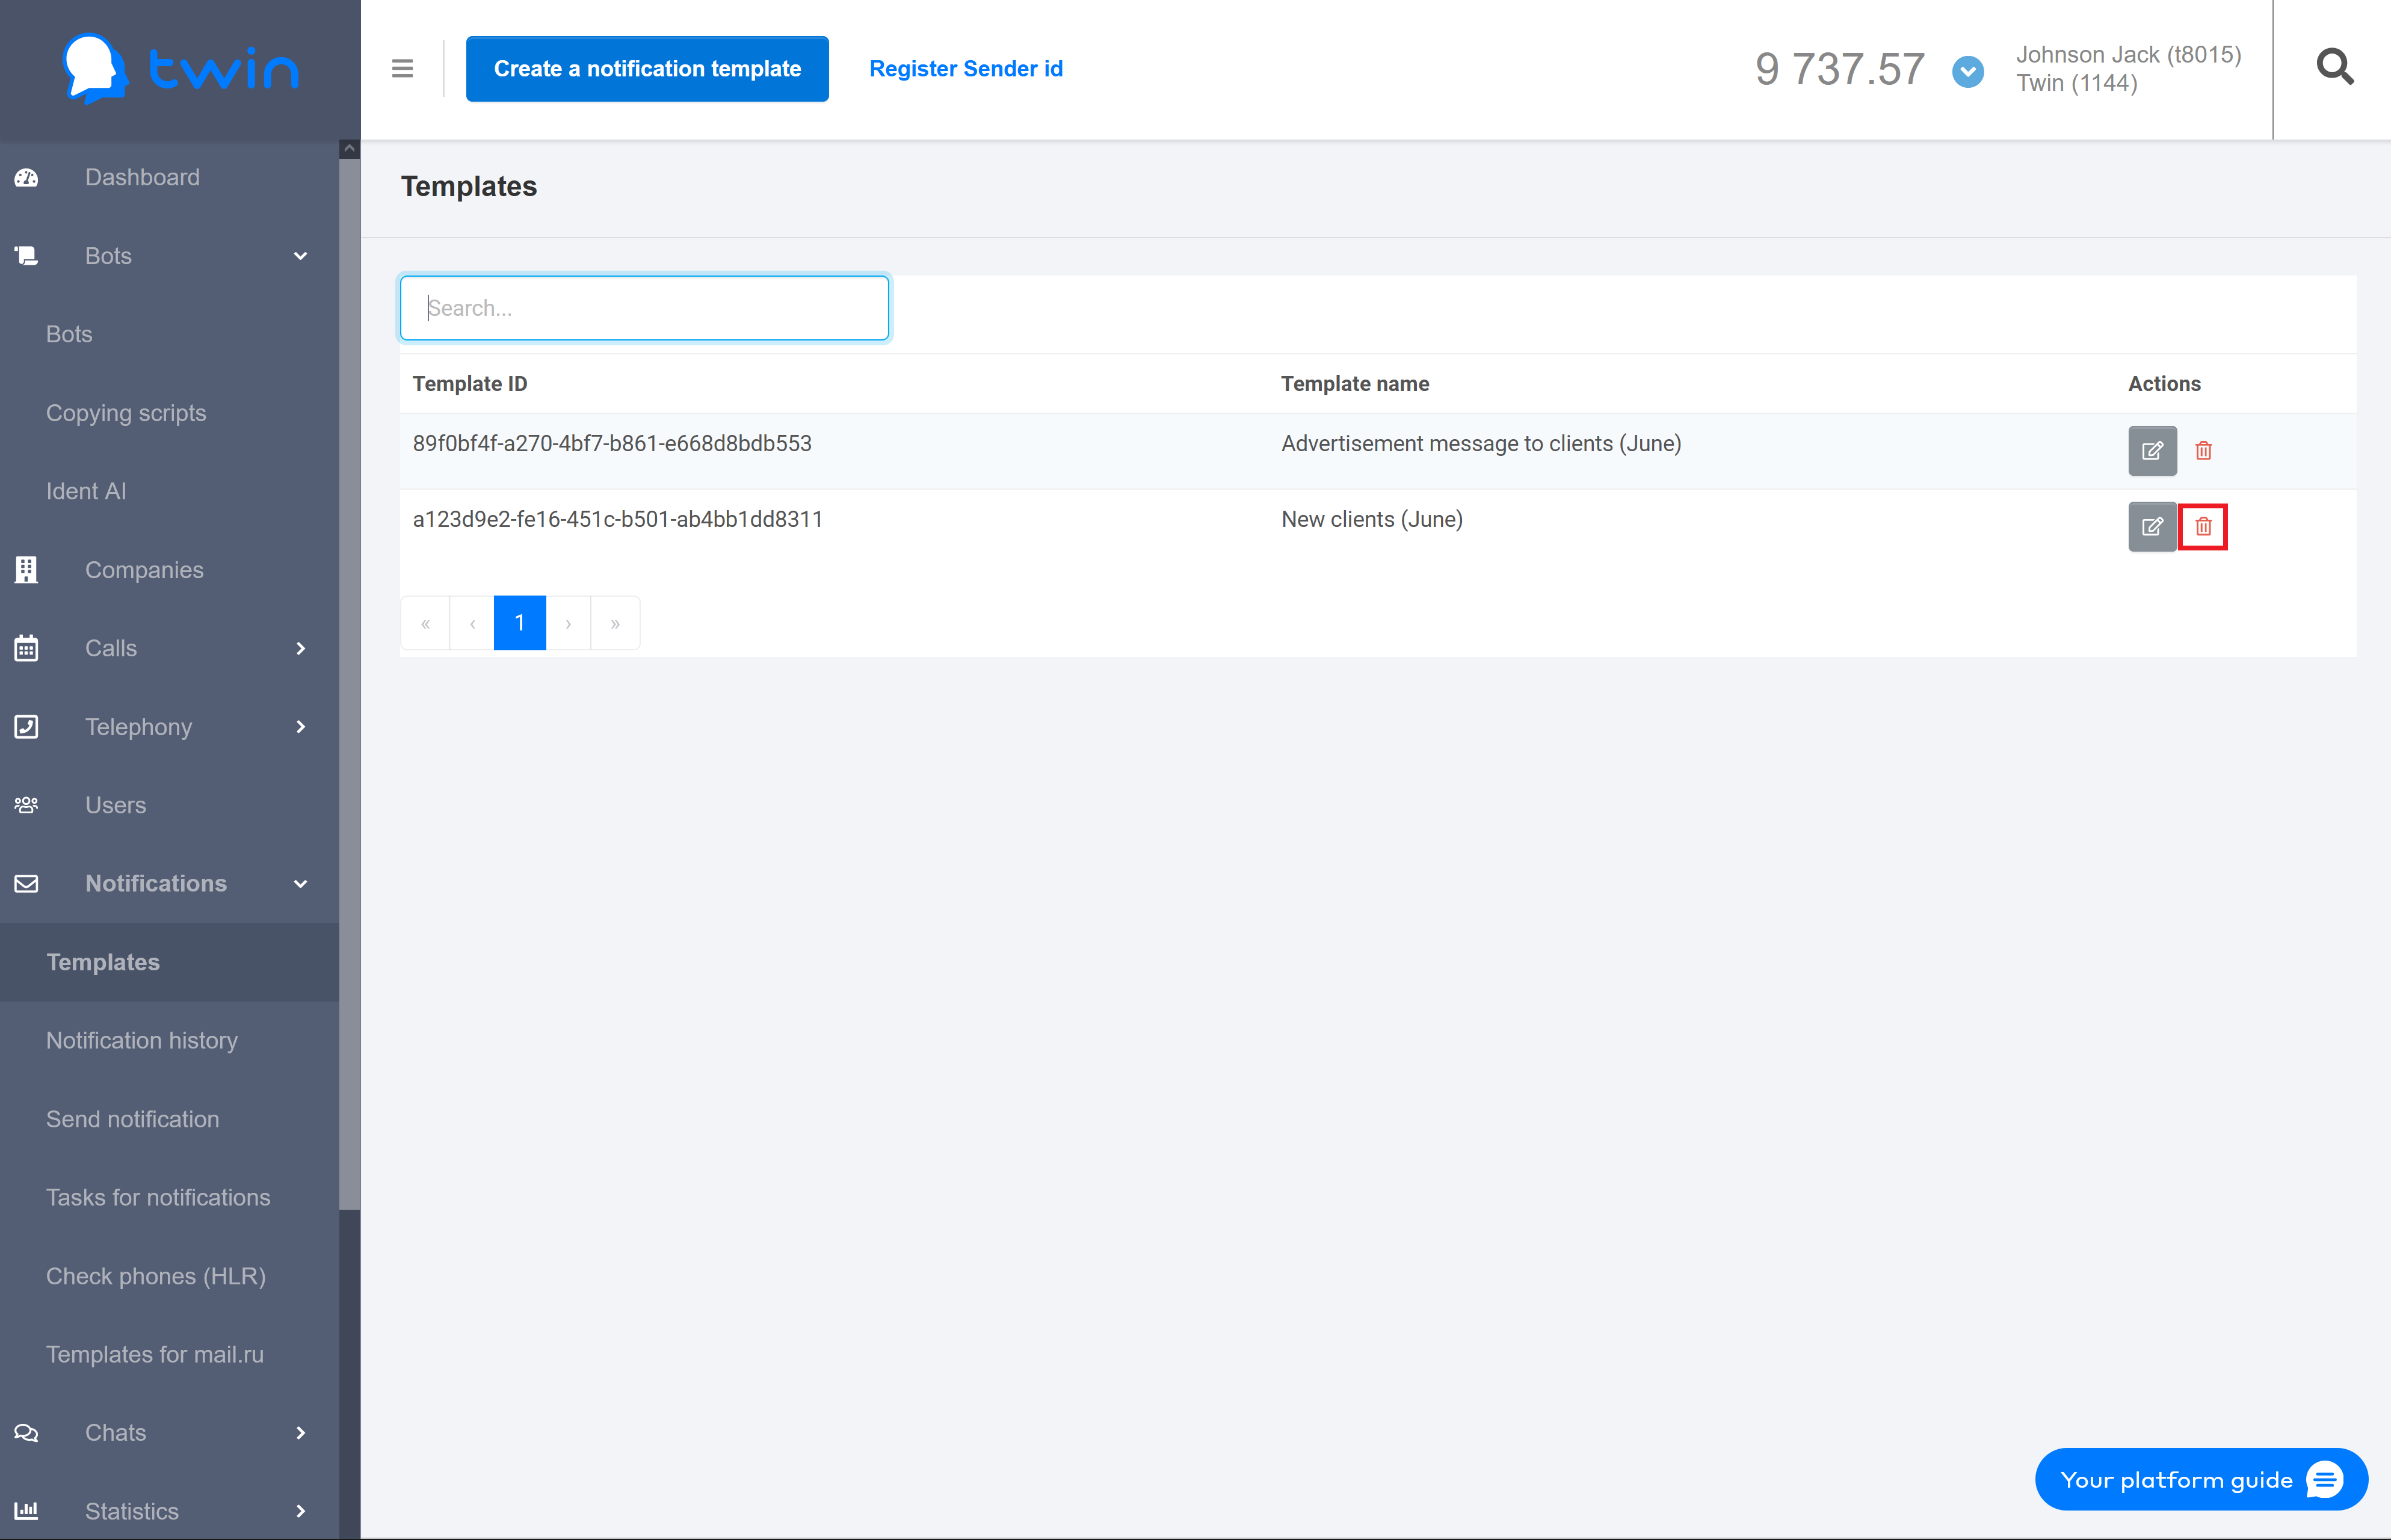
As a result the selected notification will be deleted.
Sending notifications
On the side menu select Notifications – Send notification. As a result the Send notification page will open.
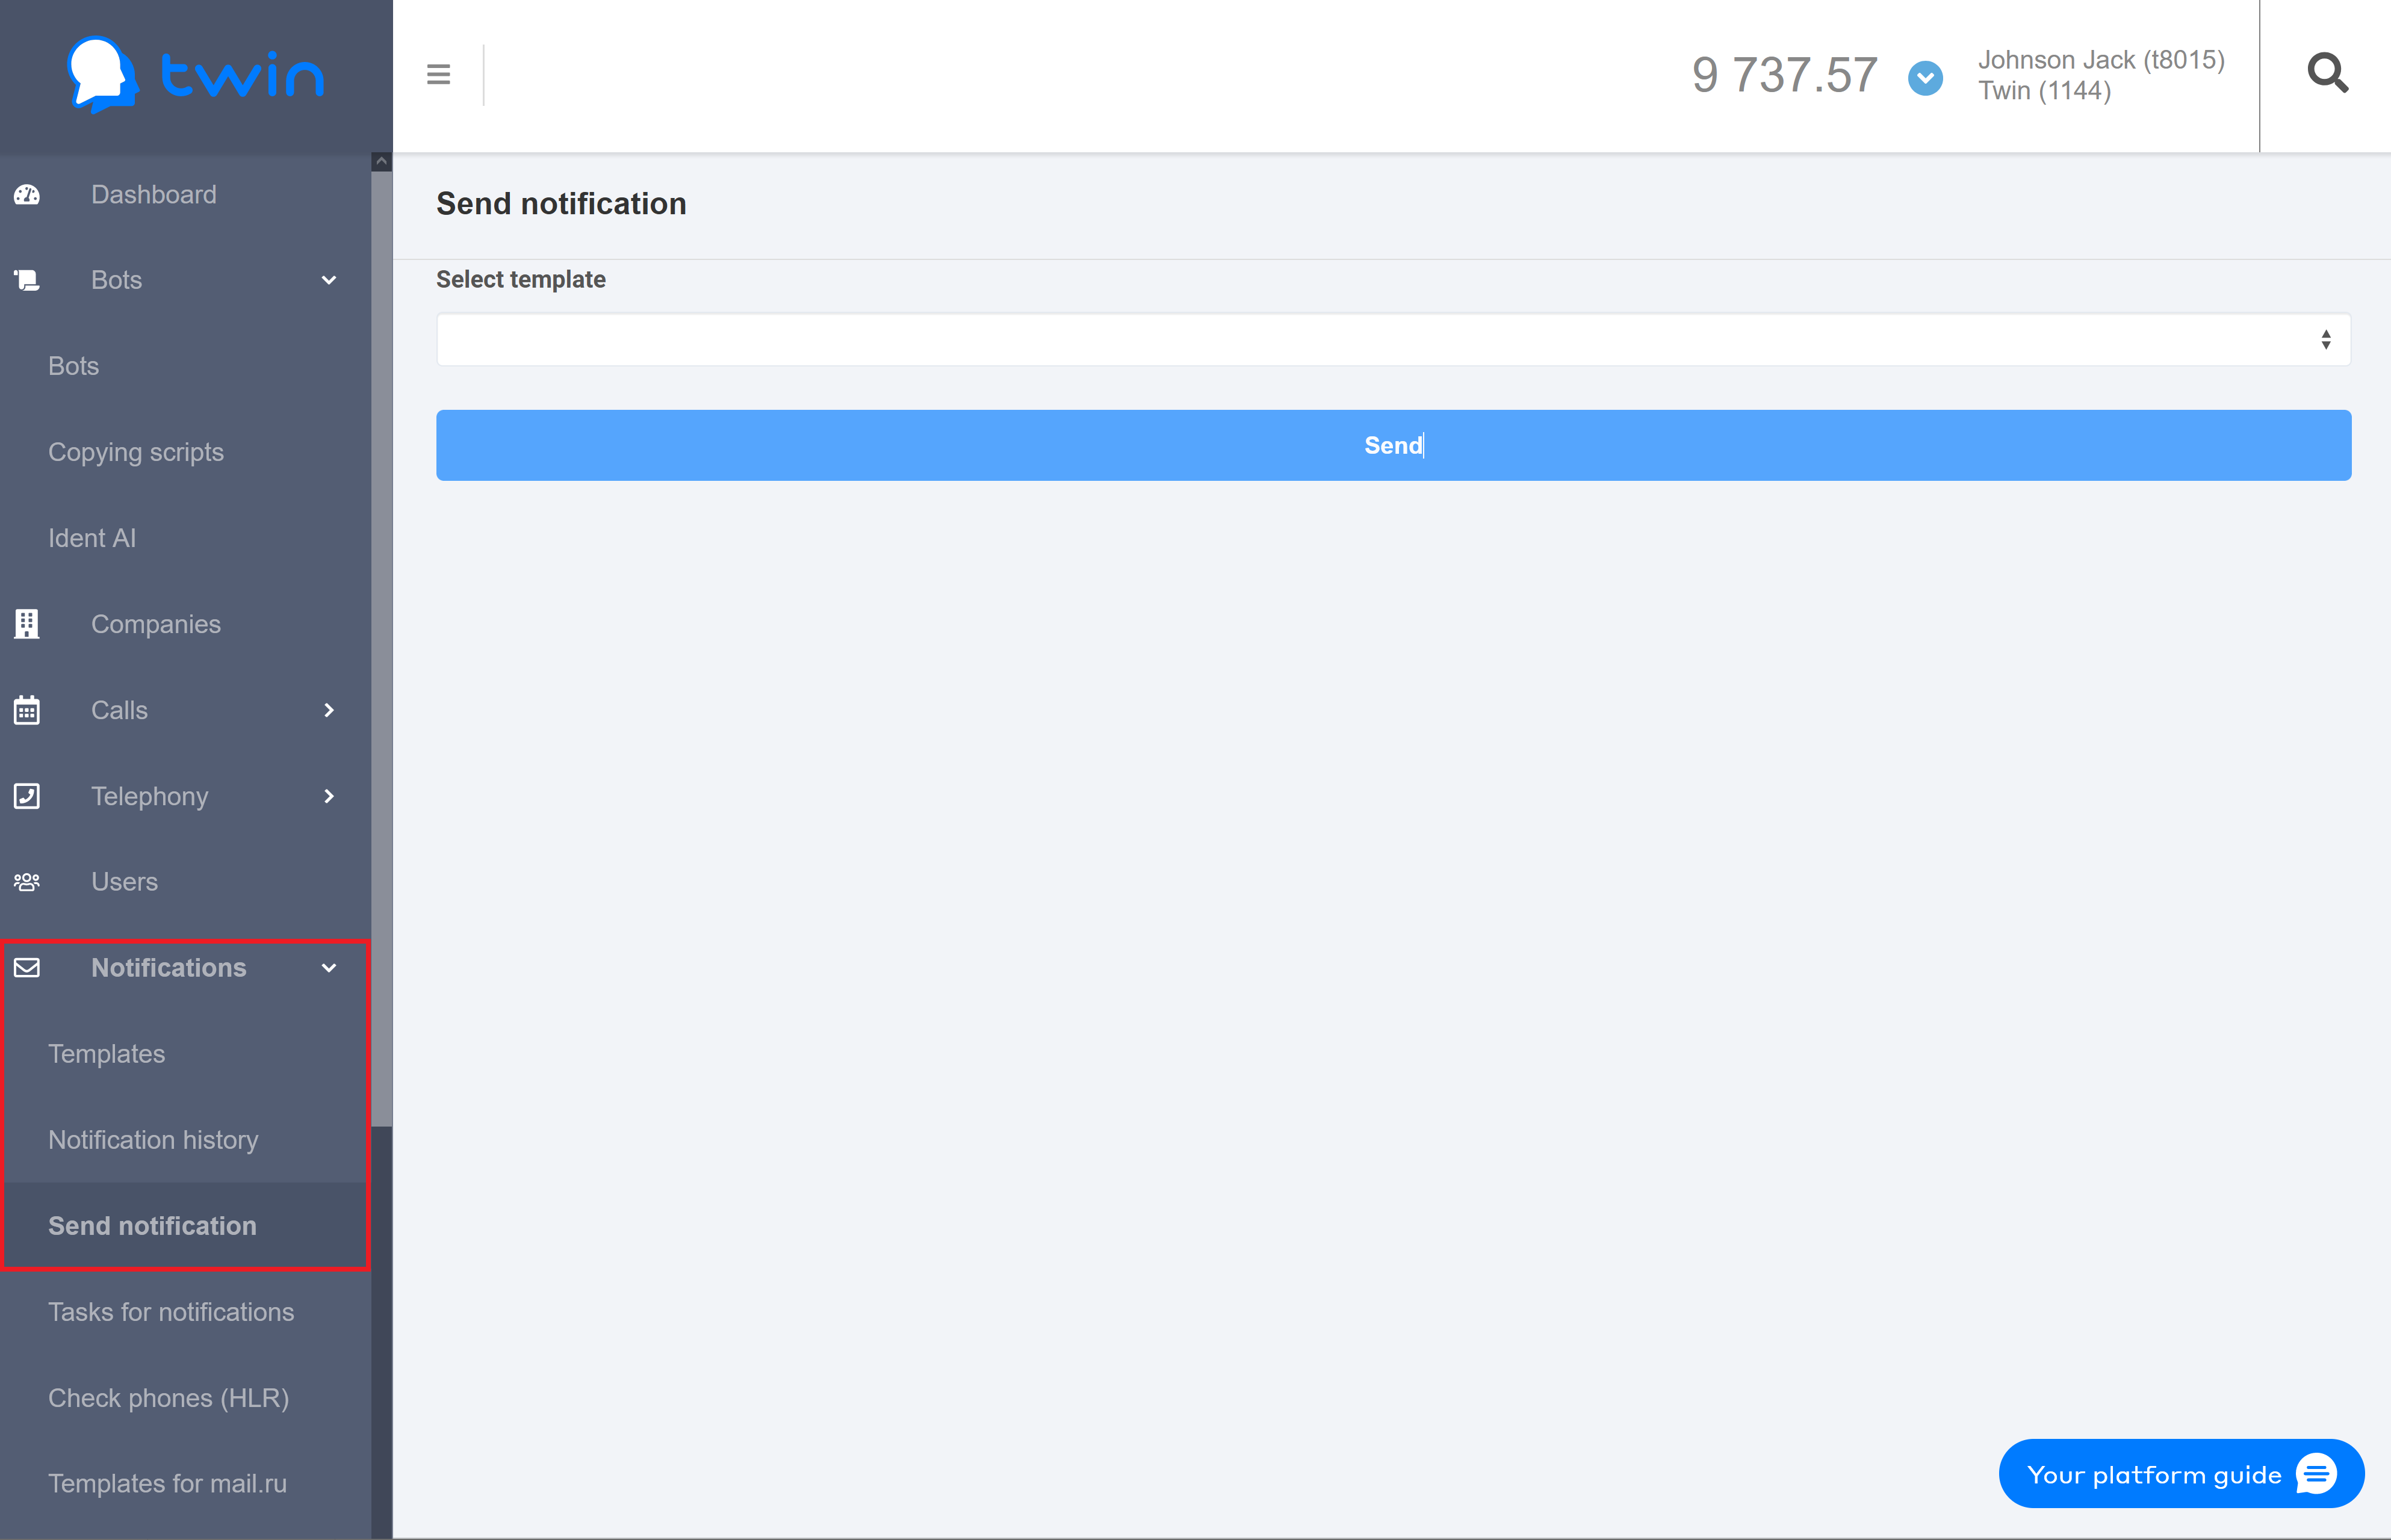
To send notifications to clients, do the following:
- In the Select template field select the necessary notification template that the system will use to send notifications to your clients.
- Click New recipient and enter the following contact information:
- External ID – recipient ID used in an external CRM system.
- Phone – recipient's phone number. The system will use this phone number to send notifications via all communication channels except for email.
- Email – recipient's email address for sending notifications by email

3. In the Variables section enter variable names and their values that are used in the message text. Variables can only be used when you send notifications in Viber and as SMS.
| Подсказка |
|---|
You will need to enter variable names and their values only in case variables are specified in the message text. Otherwise this section is not displayed. |
4. To send notifications click Send.
Working with notification tasks
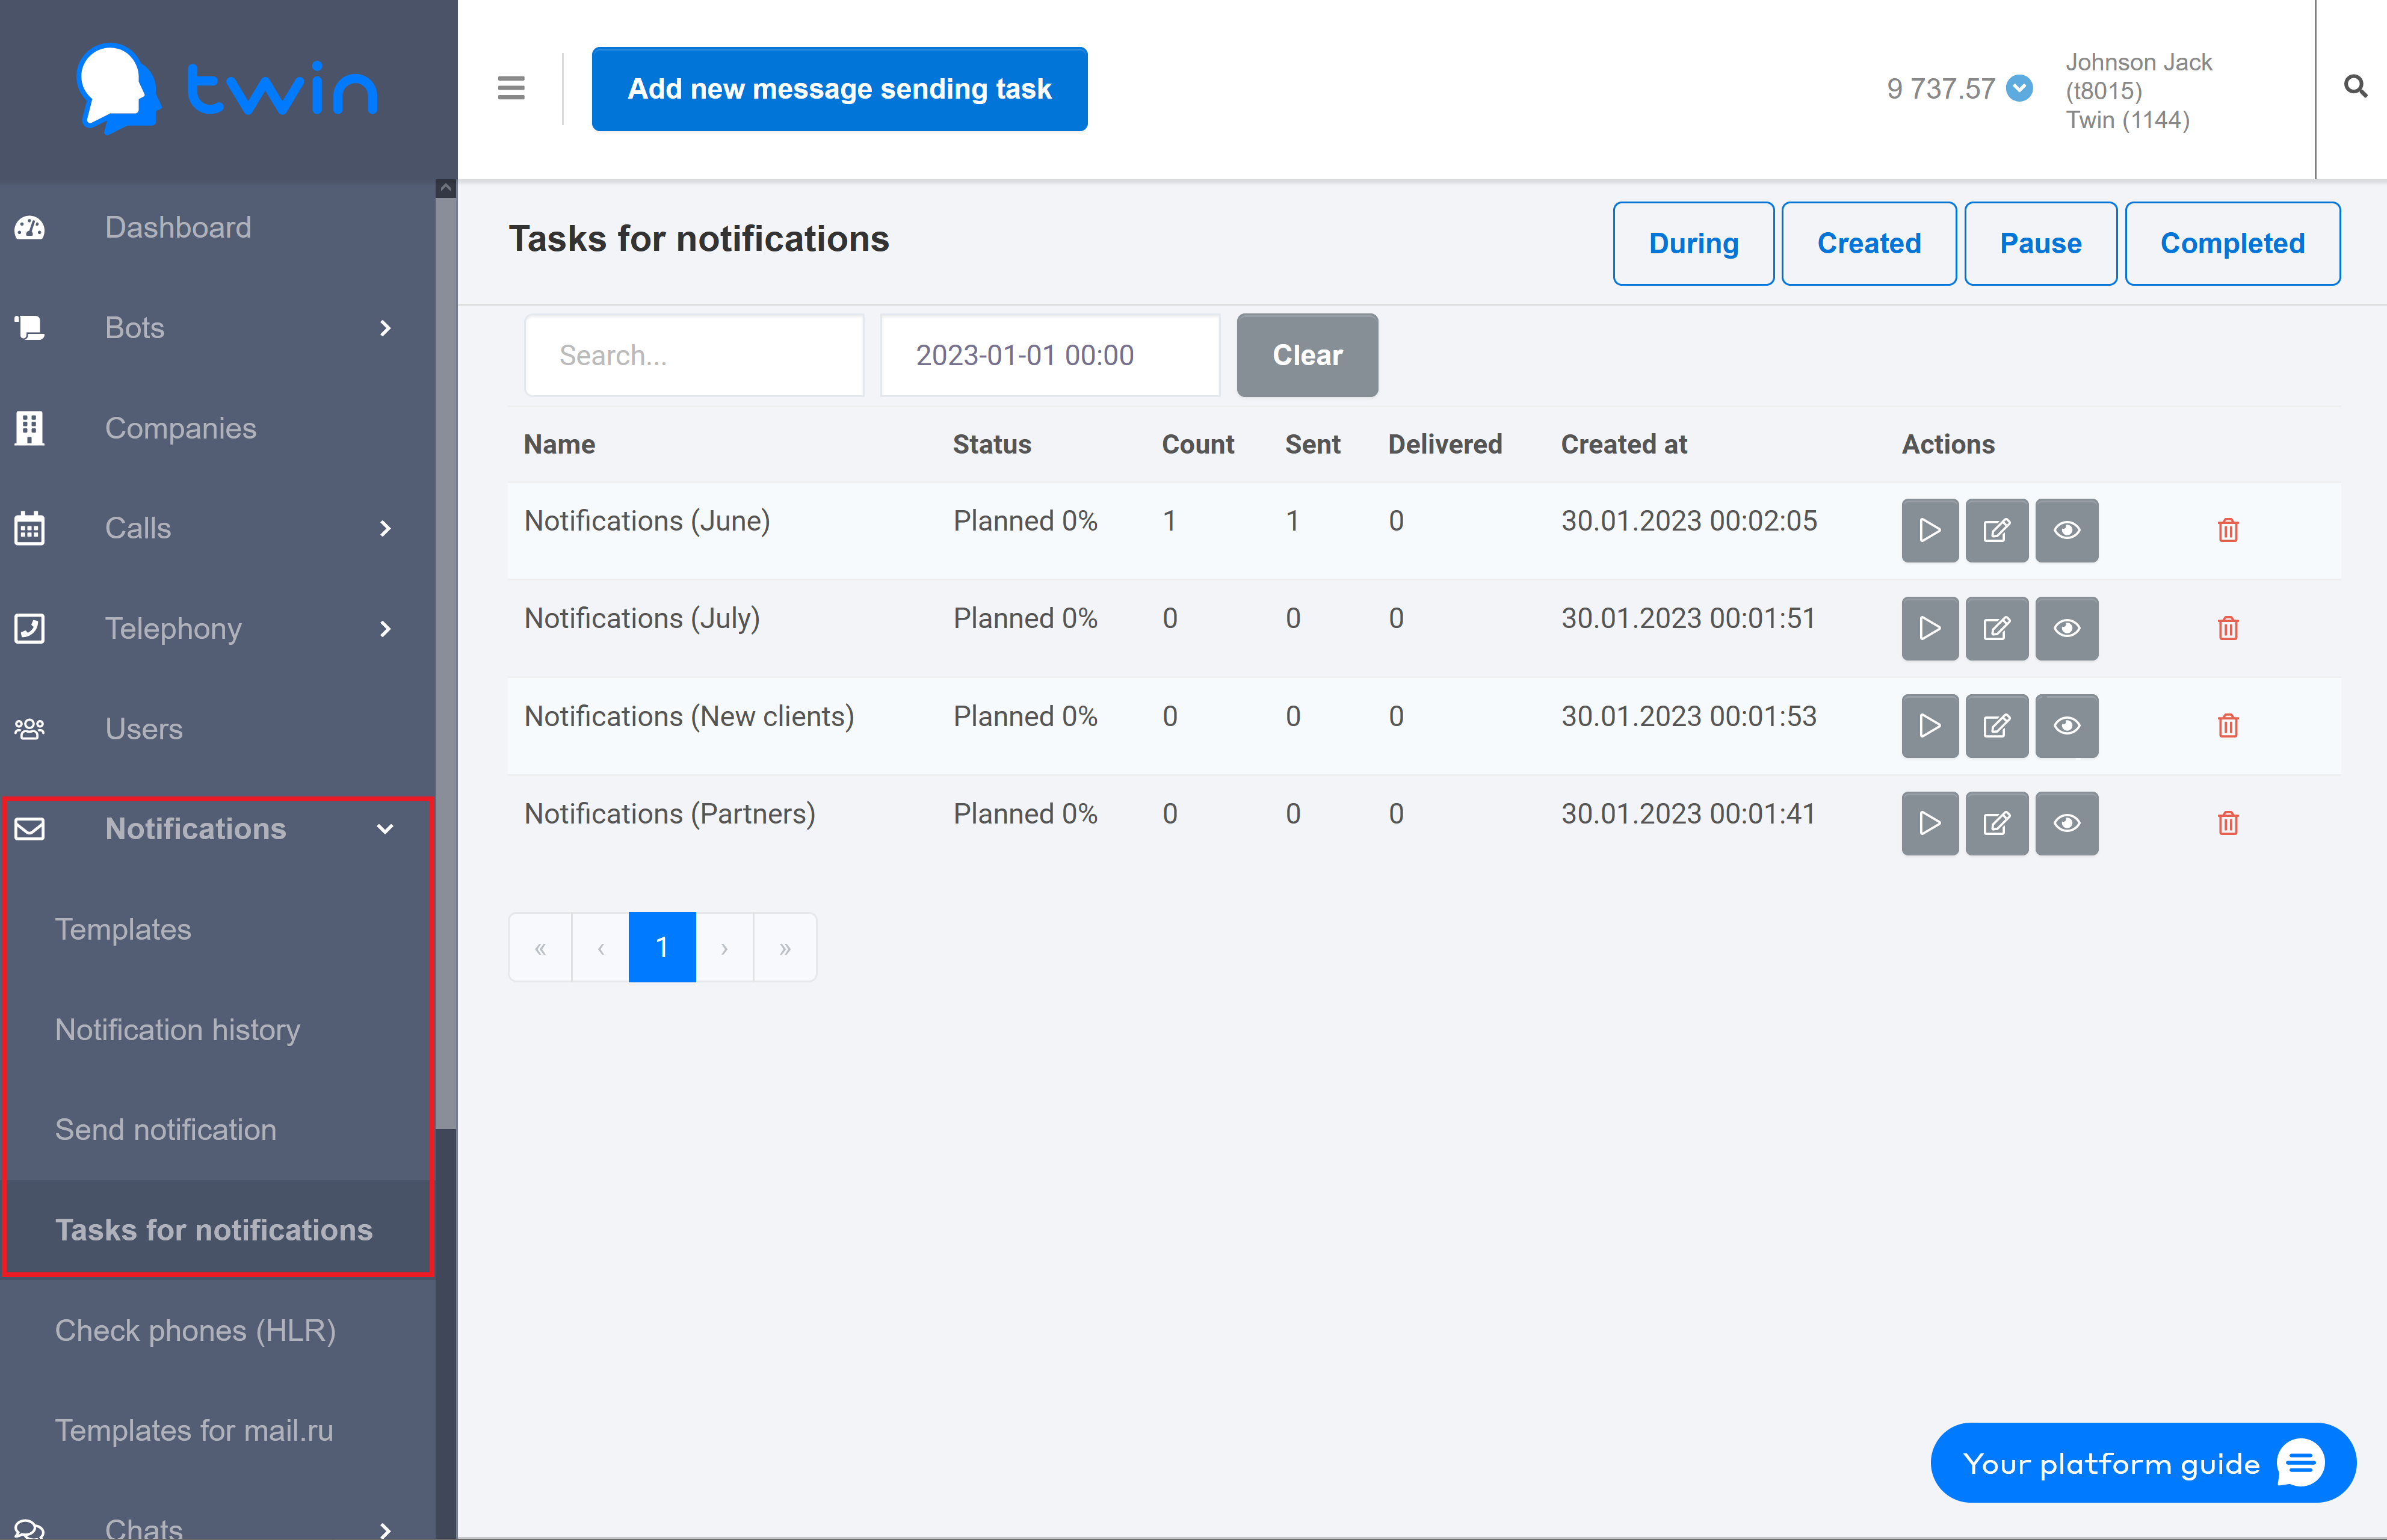
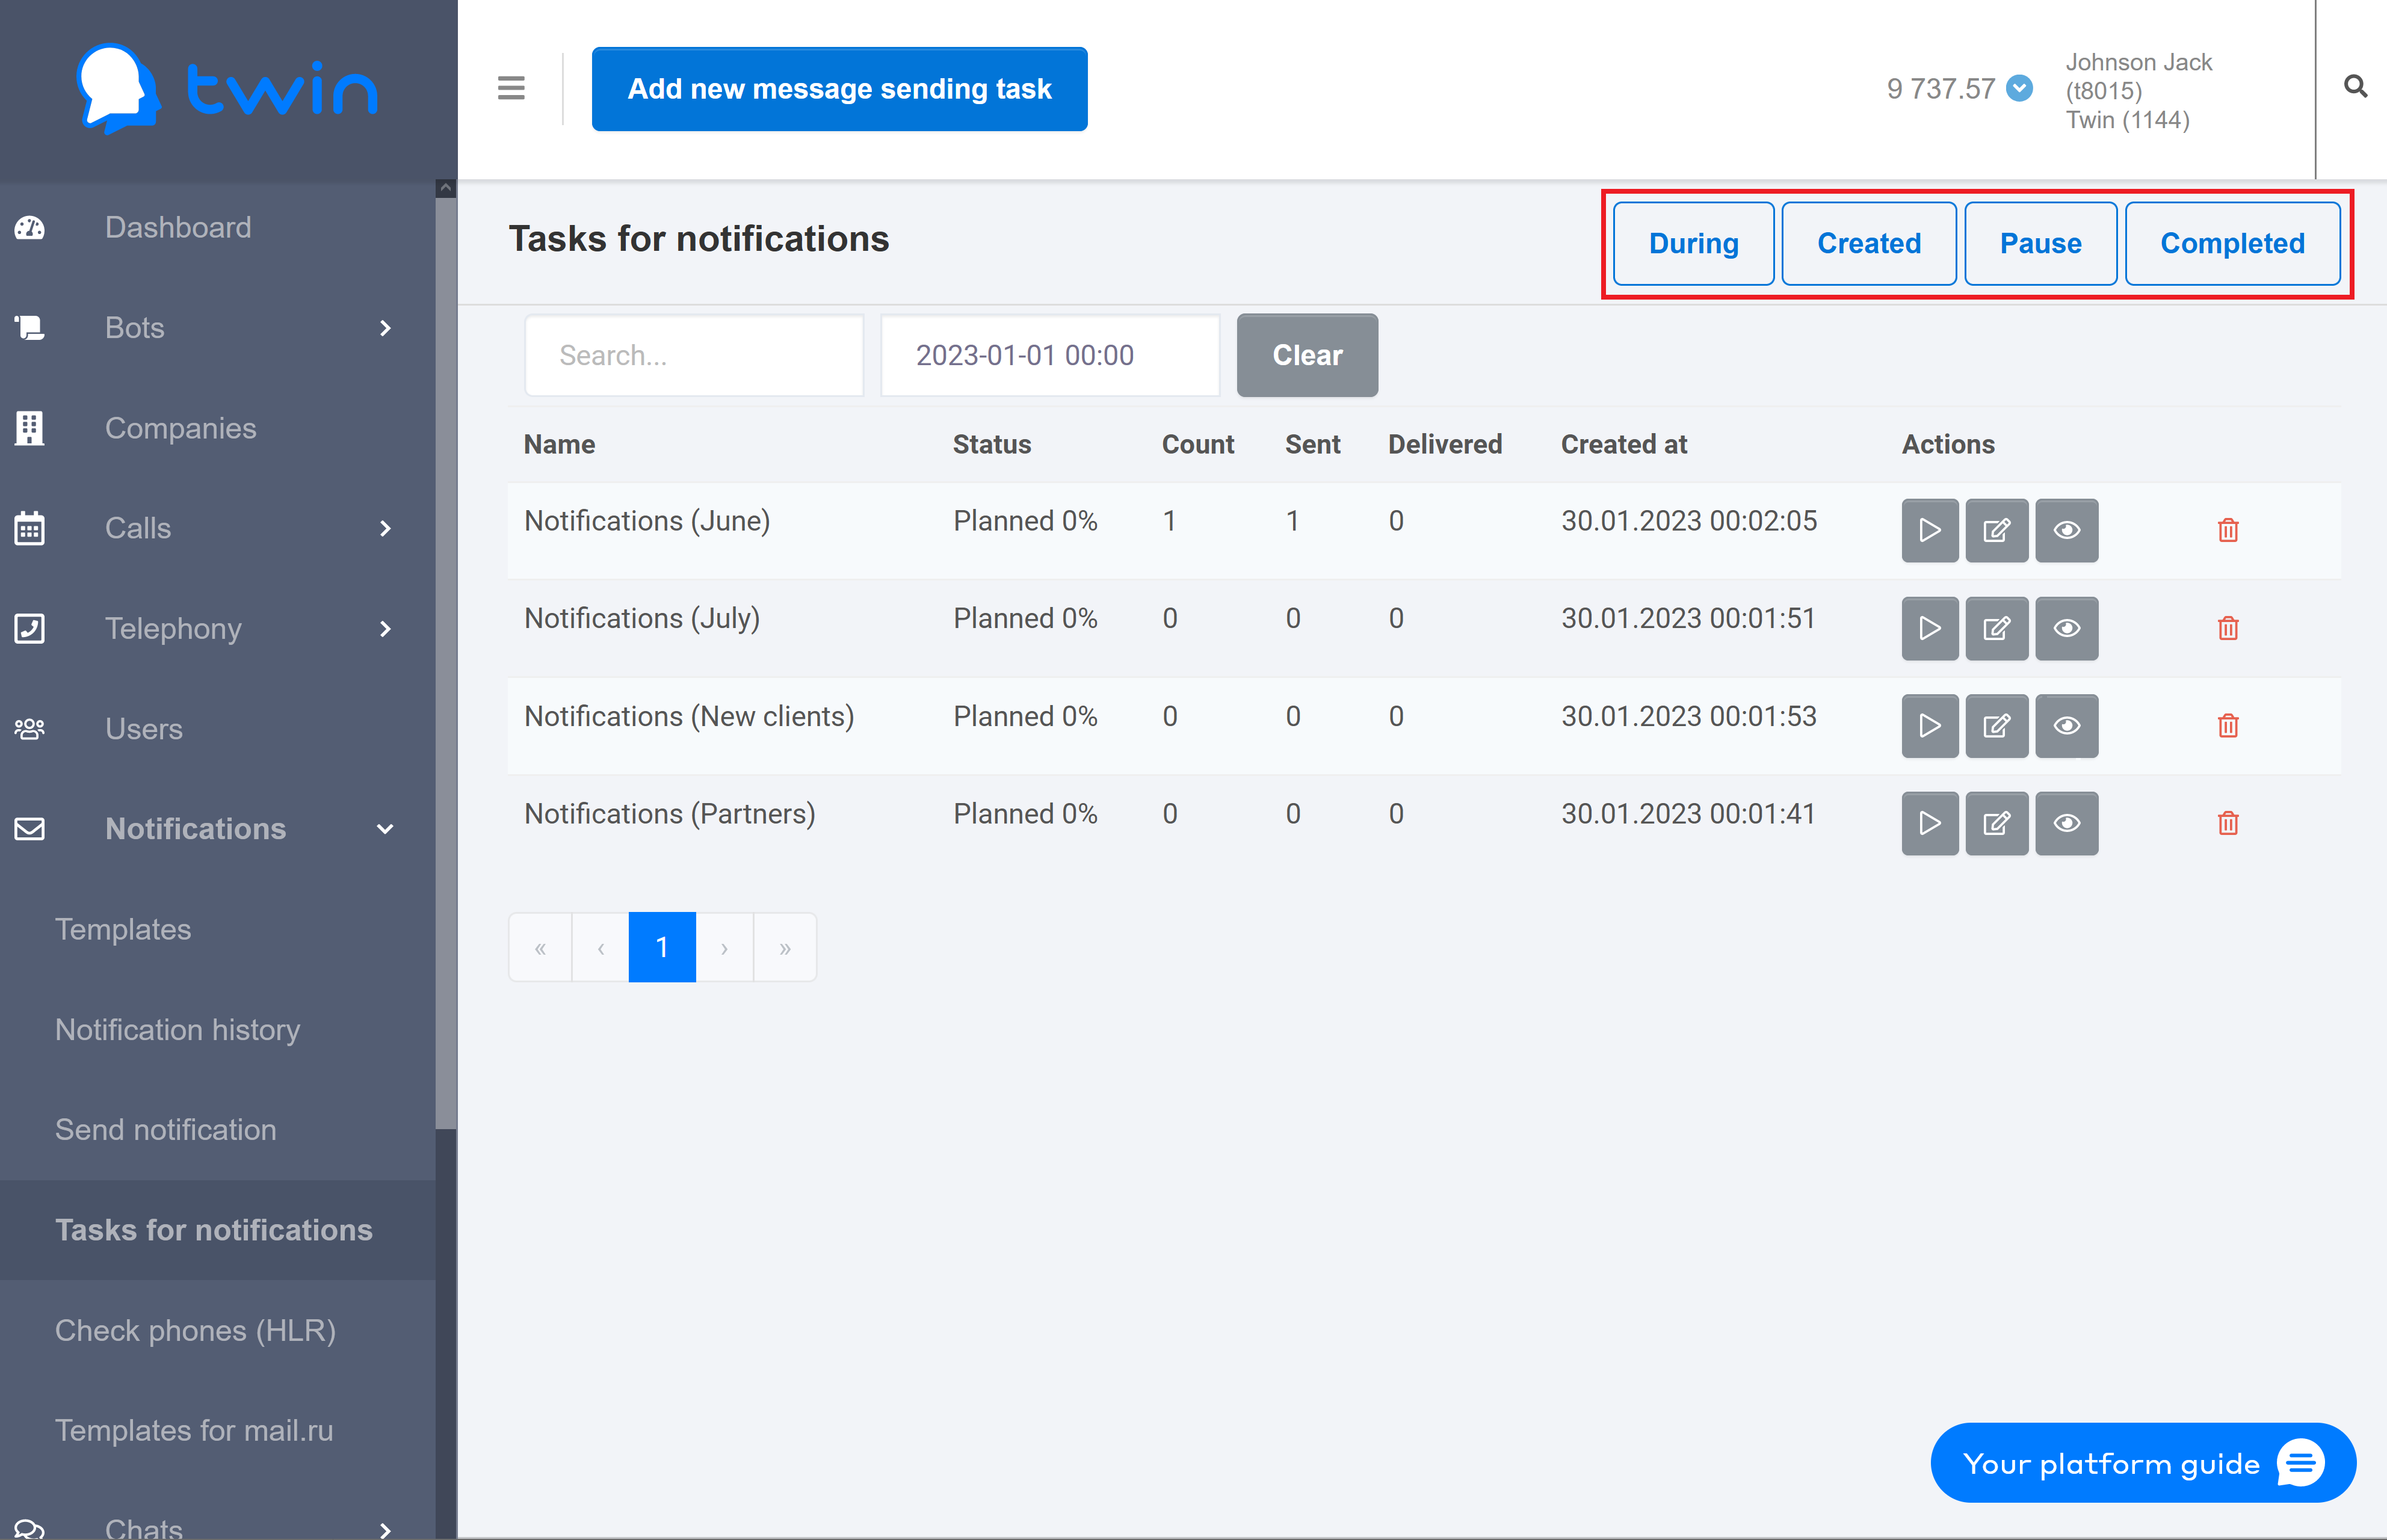
On the side menu click Notifications – Tasks for notifications. As a result a page will open with a list of notification tasks.
| Информация |
|---|
Notifications are sent using Twin API. |
Searching for notification tasks
If there are a lot of notification tasks on the list, you can filter records you need or search for the necessary record by a task name or creation date.
For this use the search fields at the top of the page.

To search for notification tasks by name enter the necessary value in the first field.
To search for notification tasks by creation date enter the necessary value in the second field.
Results are displayed automatically.
To delete specified values use the Clear button.
Filtering notification tasks by category
On the Task for notifications page you can filter notification tasks by the following categories:
- During – notification tasks that are currently in progress
- Created – all created notification tasks that are scheduled for execution
- Paused – notification tasks that are on pause
- Completed – all completed notification tasks
To filter notification tasks by category use the buttons located at the top right corner of the page.
Creating a new notification task
On the Task for notifications page click Add new message sending task.
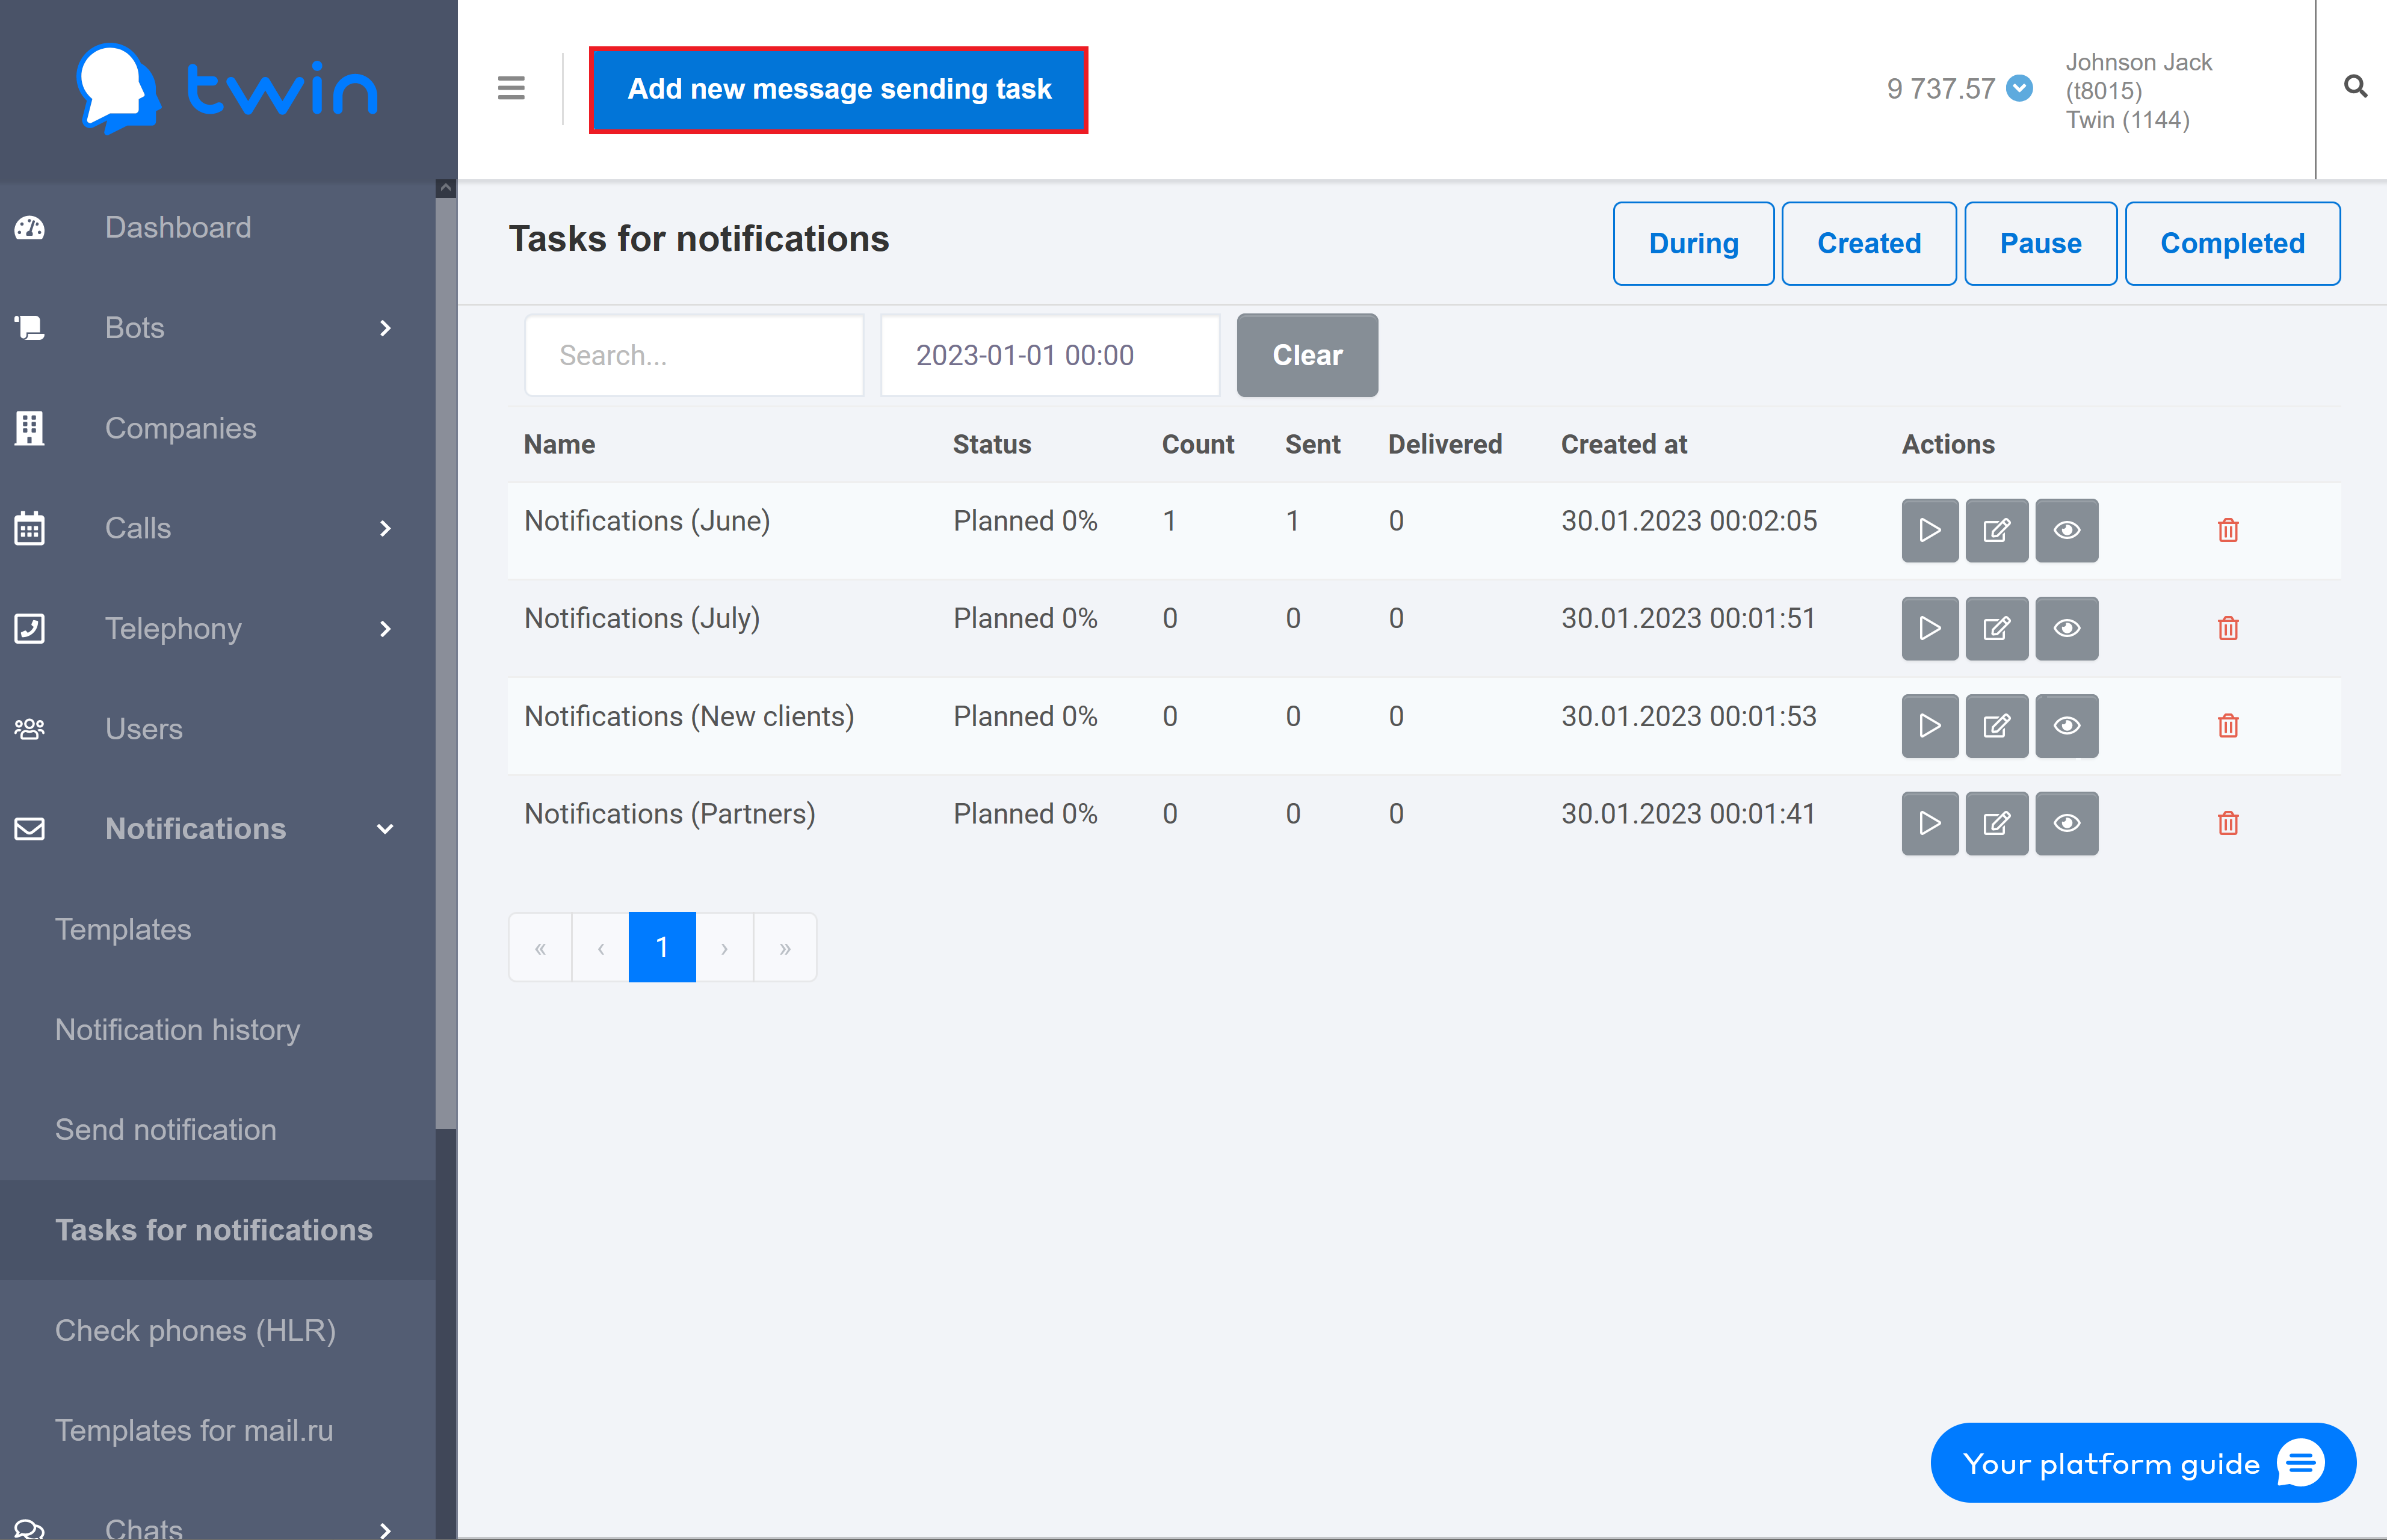
As a result the Add new message sending task dialog window will open.
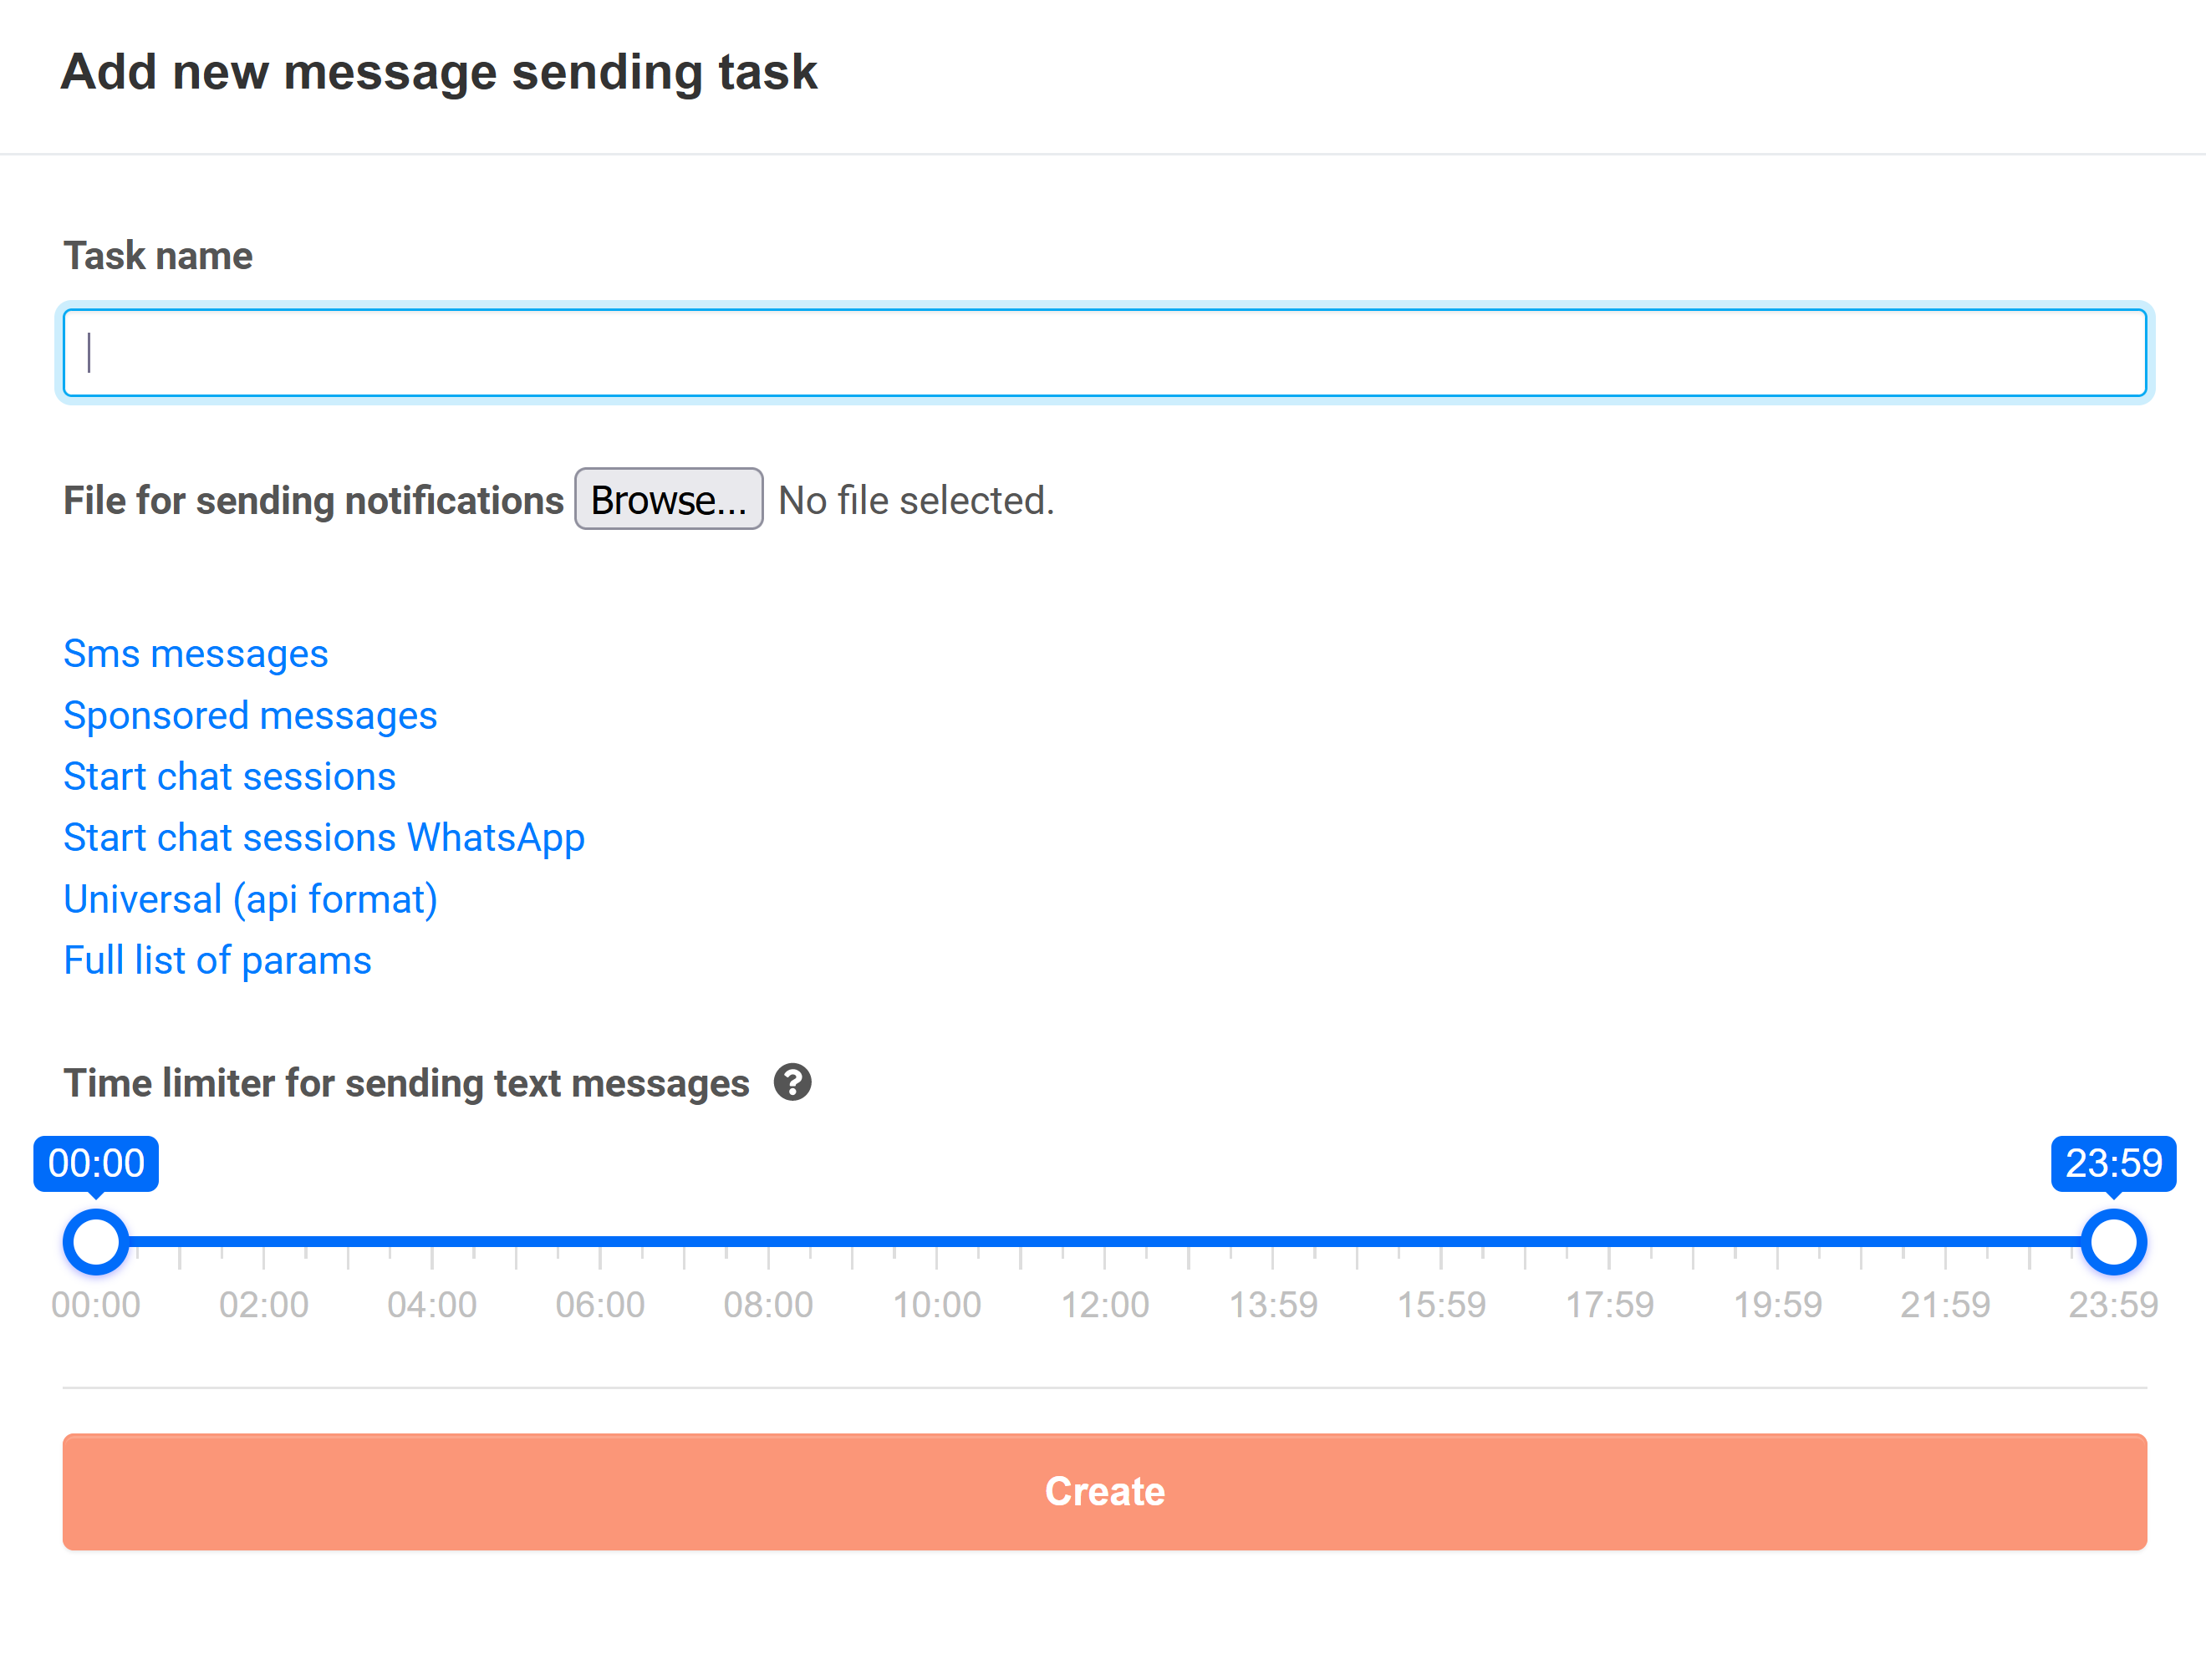
To create a new notification task, do the following:
- In the Task name field enter a name for a new notification task.
| Информация |
|---|
It is recommended to use simple and concise names for notification tasks. Later these names will help you remember why you created a certain notification task. |
2. Click the Browse button and select the necessary template for the notification task. The template is stored as an Excel file.
| Информация |
|---|
You can download the following types of notification templates:
|
3. In the Time limiter for sending text messages field select a period of time for the system to send notifications.

4. To save changes click Create.
As a result a new notification task will appear on the list.
Editing notification tasks
To edit a notification task click ![]() in the line for the necessary record.
in the line for the necessary record.

As a result the Change new message sending task dialog window will open.

Steps for editing a notification task are similar to those described in this section.
Deleting notification tasks
If you do not use a certain notification task, you can delete it.
For this select the necessary record on the list and click ![]() .
.
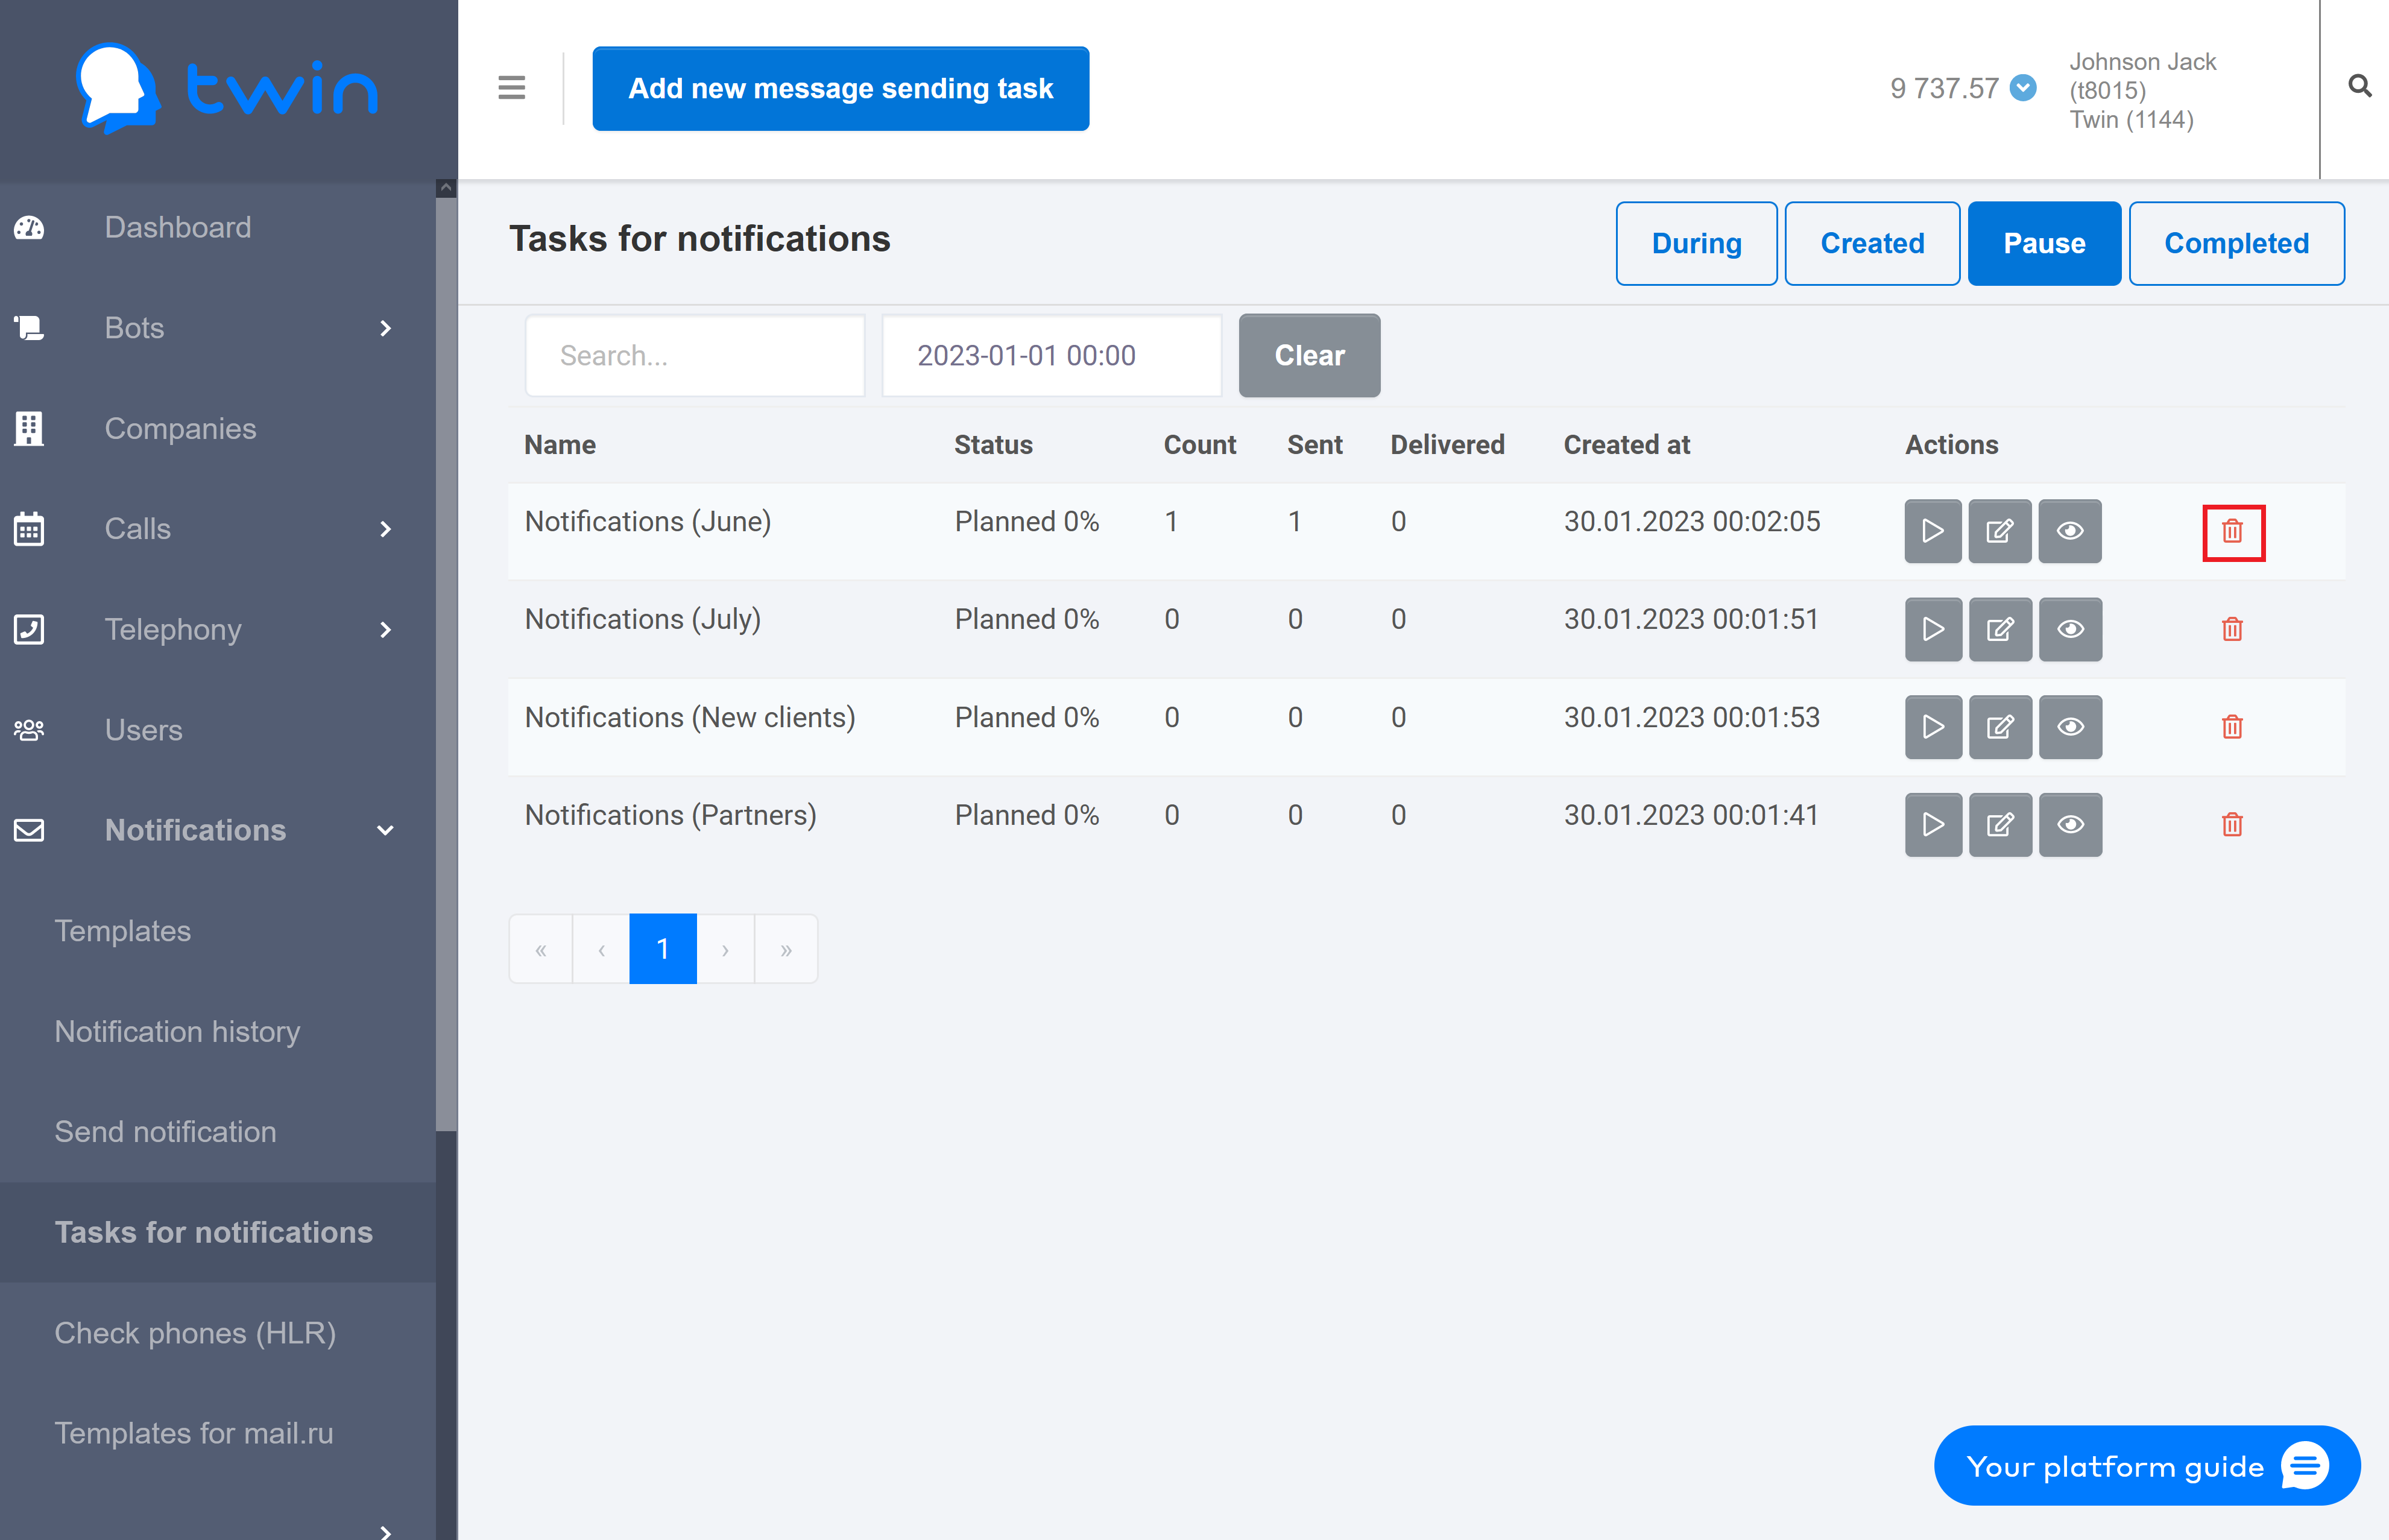
As a result the selected notification task will be deleted.
Viewing information about notifications sent using Twin API
On the side menu click Notifications – Check phones (HLR). As a result the Check phones (HLR) page will open.
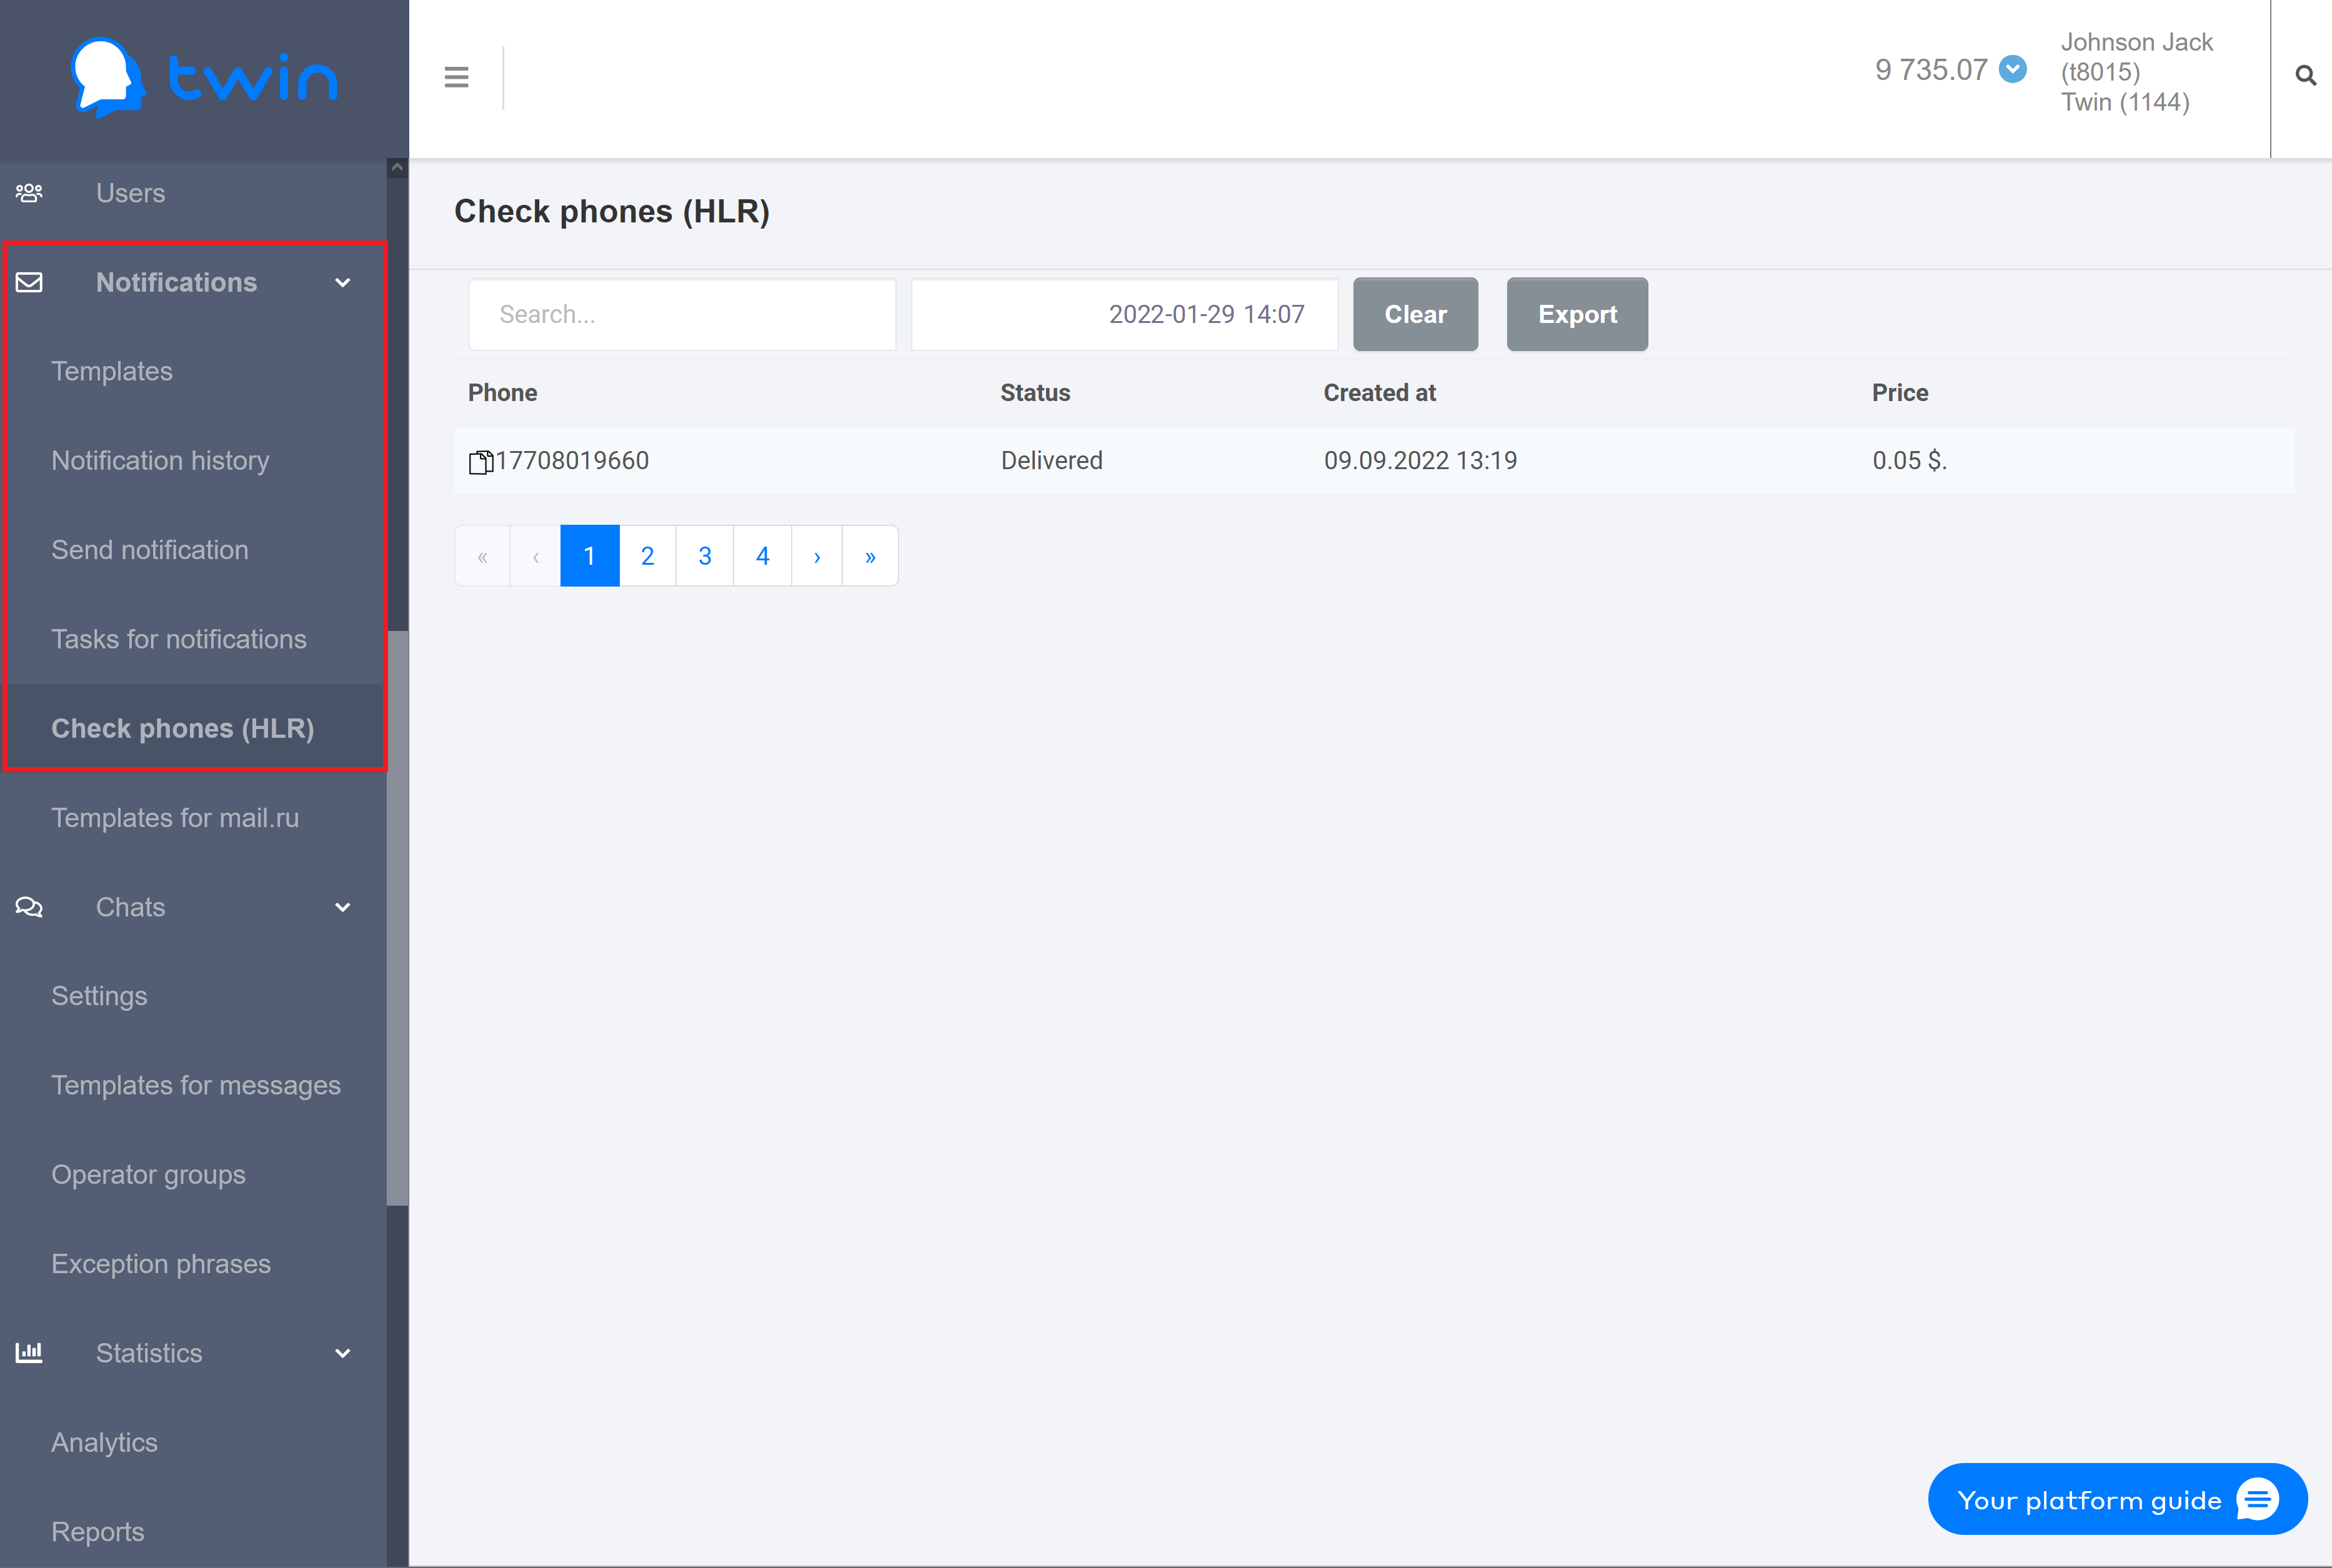
This page contains information about all notifications that were sent to clients using Twin API.
The page contains the following information:
- Client phone number
- Delivery status
- Creation date and time
- Cost
Searching for notifications sent using Twin API
If there are a lot of records on the list, you can filter records you need or search for the necessary record by a phone number or creation date and time.
For this enter the necessary value in the search fields at the top of the page.
To search for records by a phone number enter the necessary number or its part in the first search filed.
To search for records by time select the necessary period of time in the second search filed.
Search results are displayed automatically.
To delete specified values use the Clear button.
Viewing information about notifications sent using different communication channels
On the side menu click Notifications – Notification history. As a result the Notification history page will open.
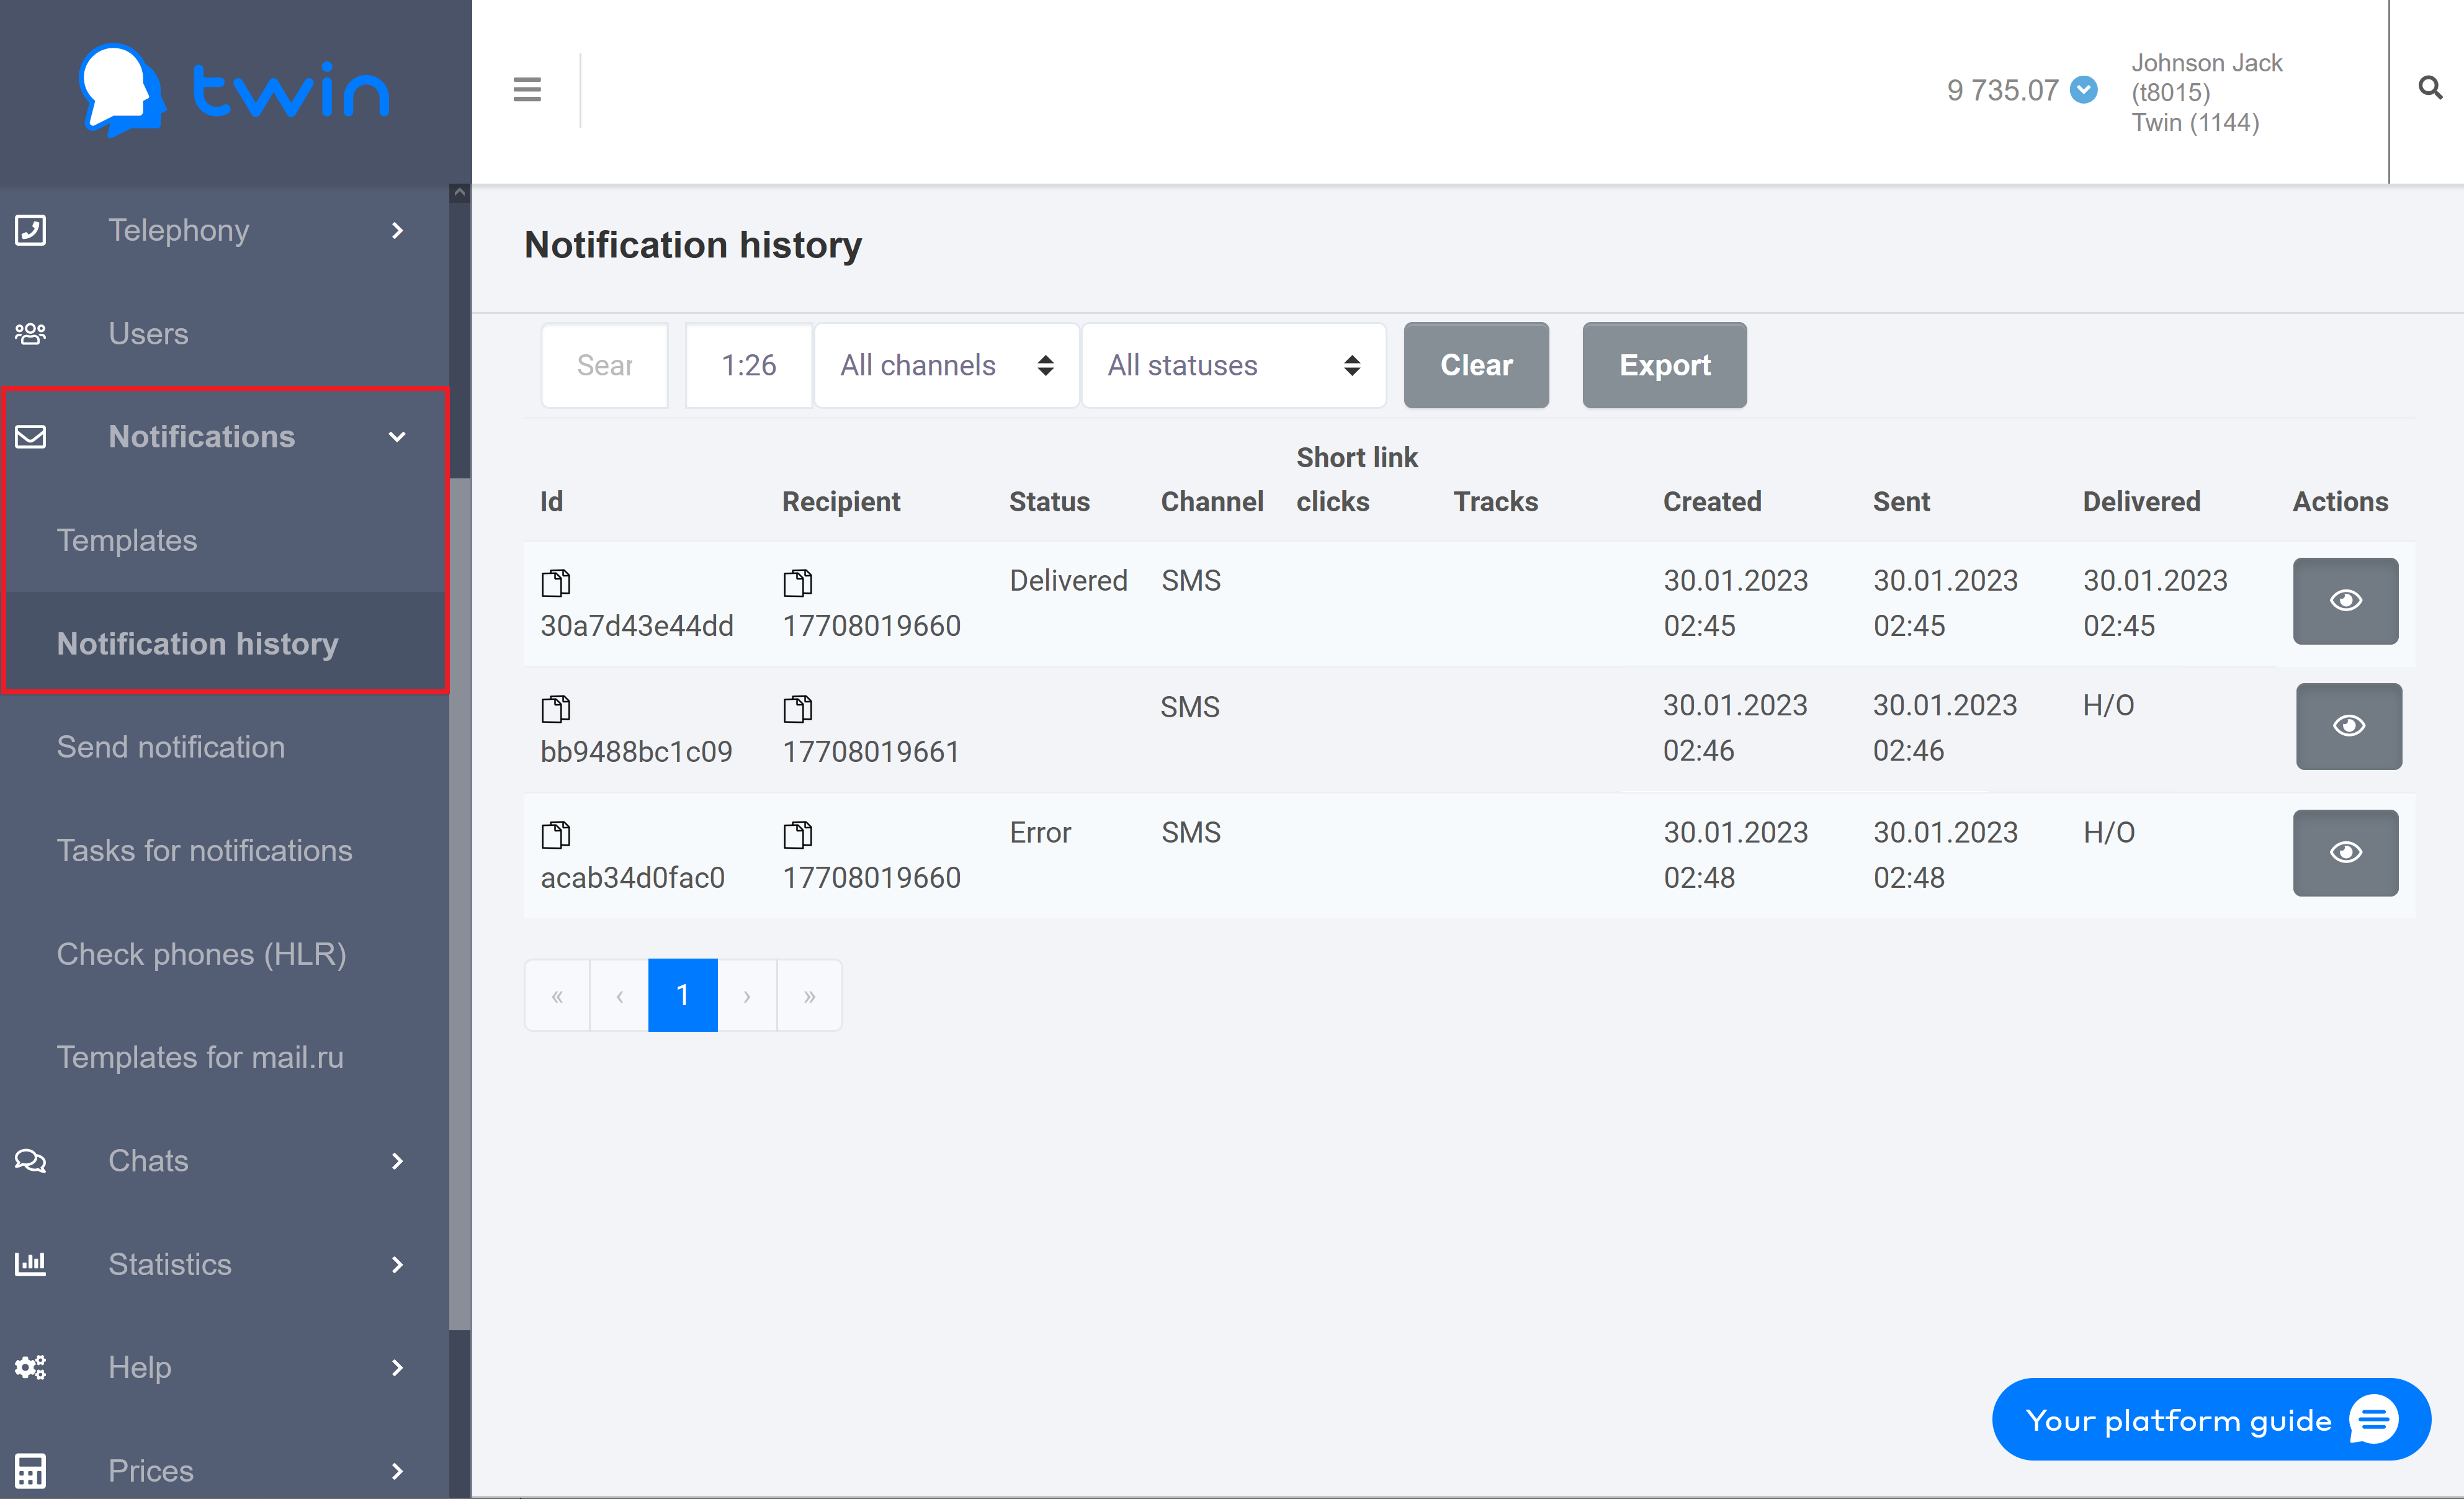
This page contains a list of records with the following information:
- Id – notification ID
- Recipient – recipient's phone number
- Status – delivery status
- Channel – communication channel that was used to send a notification
- Short link clicks – number of times clients clicked links in the message
- Tracks – number of tracks for notifications by email
- Created – date and time when a notification was created
- Sent – date and time when notification was sent
- Delivered – date and time when notification was delivered
With control elements at the top of the page you can filter and search for notifications.
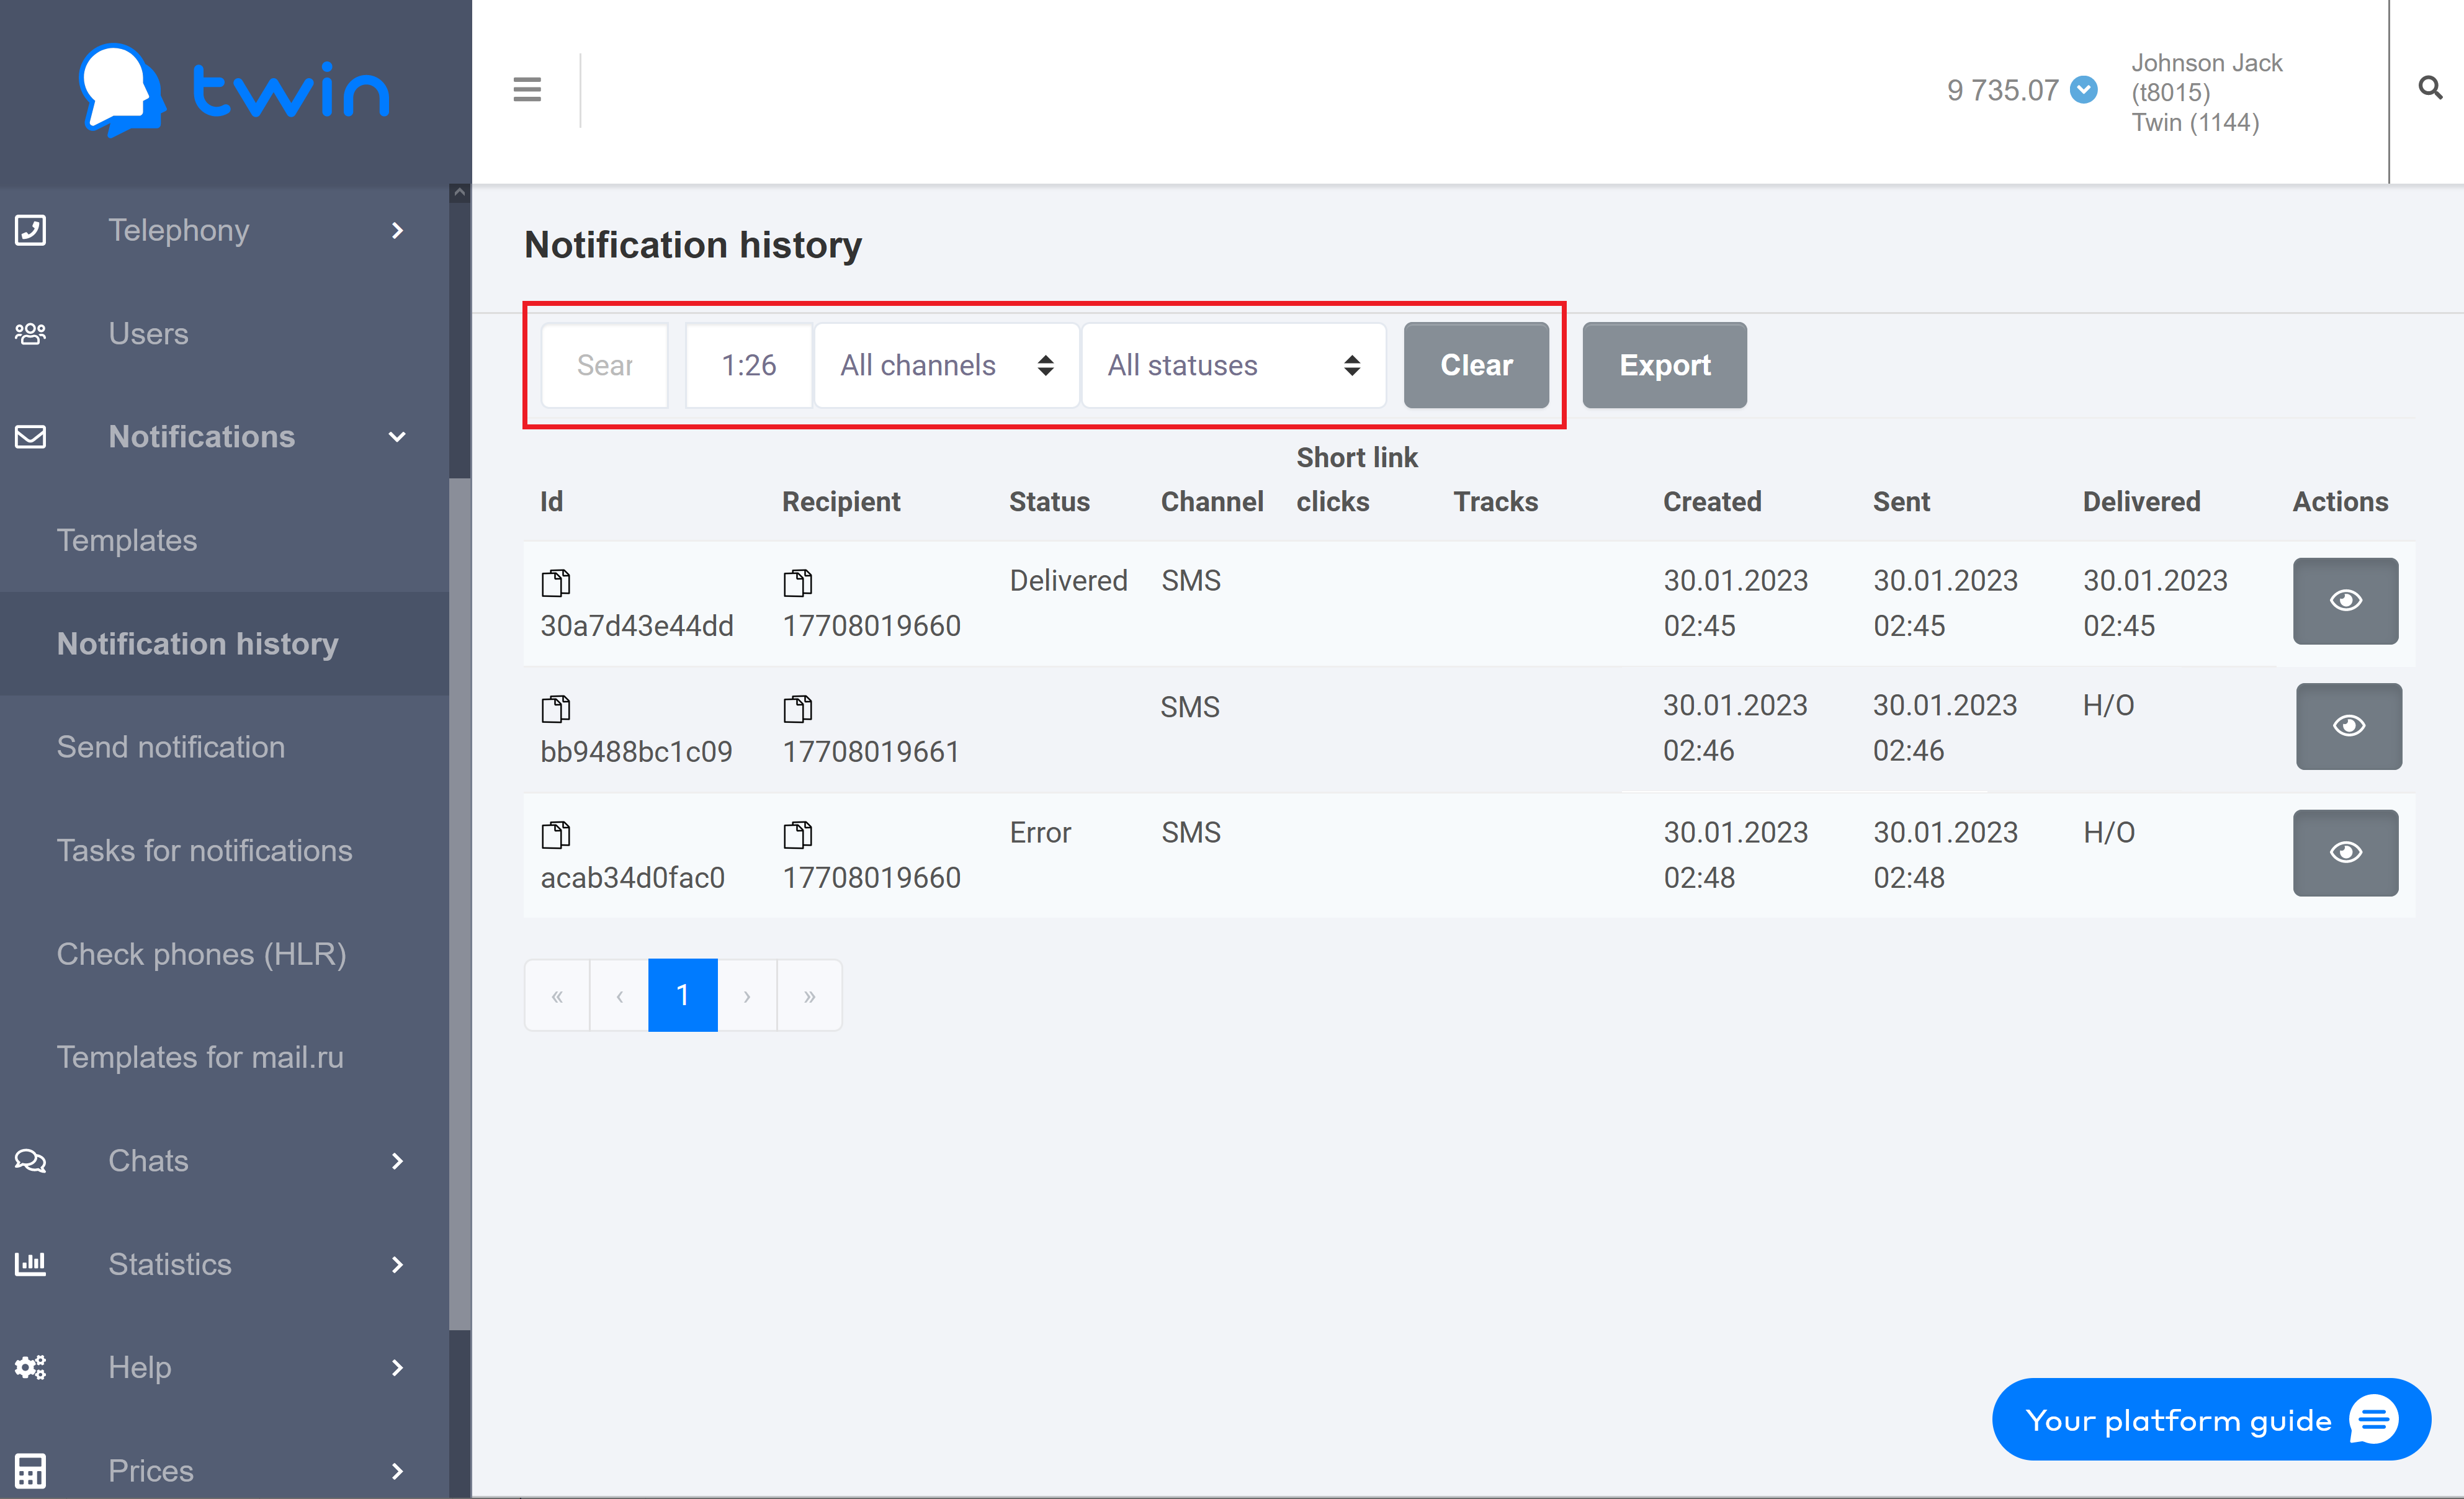
Using the Search field you can search for notifications by a recipient's phone number and the communication channel that was used to send notifications.
In the next field you can set the necessary period for the system to display notifications.
In the All channels field you can select the communication channel that the system used to send notifications.
In the All statuses field you can select the necessary delivery status. The following statuses are available:
- All statuses – all notifications are displayed.
- Created – notifications that were created but not yet sent to clients.
- Pending – notifications that the system is trying to send to clients.
- Delivered – notifications that were delivered to clients.
- Undelivered - notifications that were not delivered to clients due to an error.
- Canceled – notifications that were canceled by the user.
- Error – notifications that generated an error when the system attempted to send them (for example, a technical error that occurred due to a mobile network failure).
Delayed – notifications that will be sent within the time period specified in the notification template.
Created, optional – notifications that were created but were not sent. These notifications have the Required checkbox selected.
Omitted, optional – notifications that were not delivered via the specified communication channel (for example, Viber) due to technical problems. The system used an alternative communication channel to send these notifications (for example, SMS).
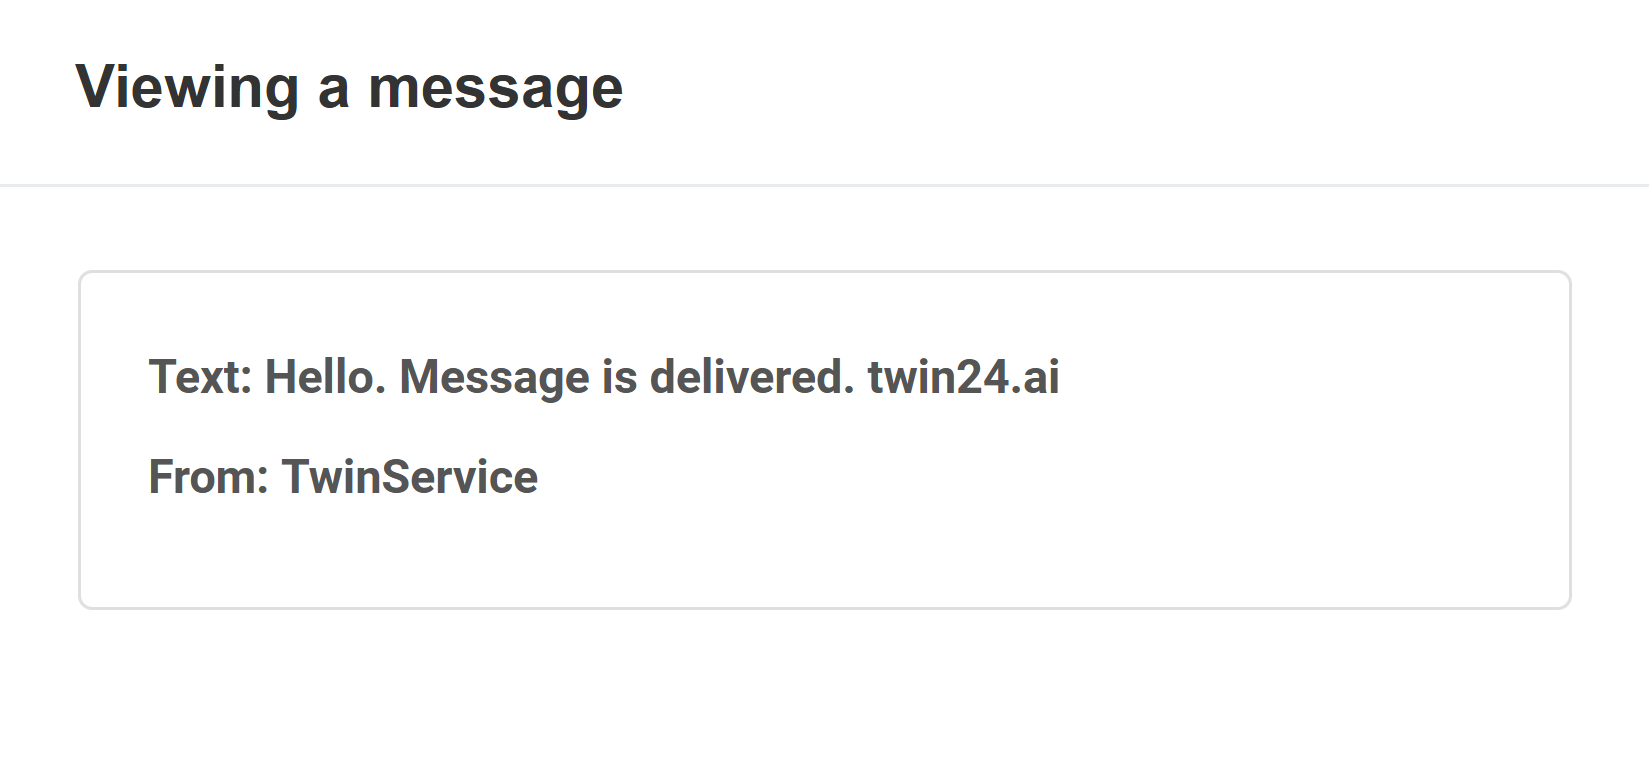
To view information about a sent notification select the necessary record on the list and click ![]() .
.
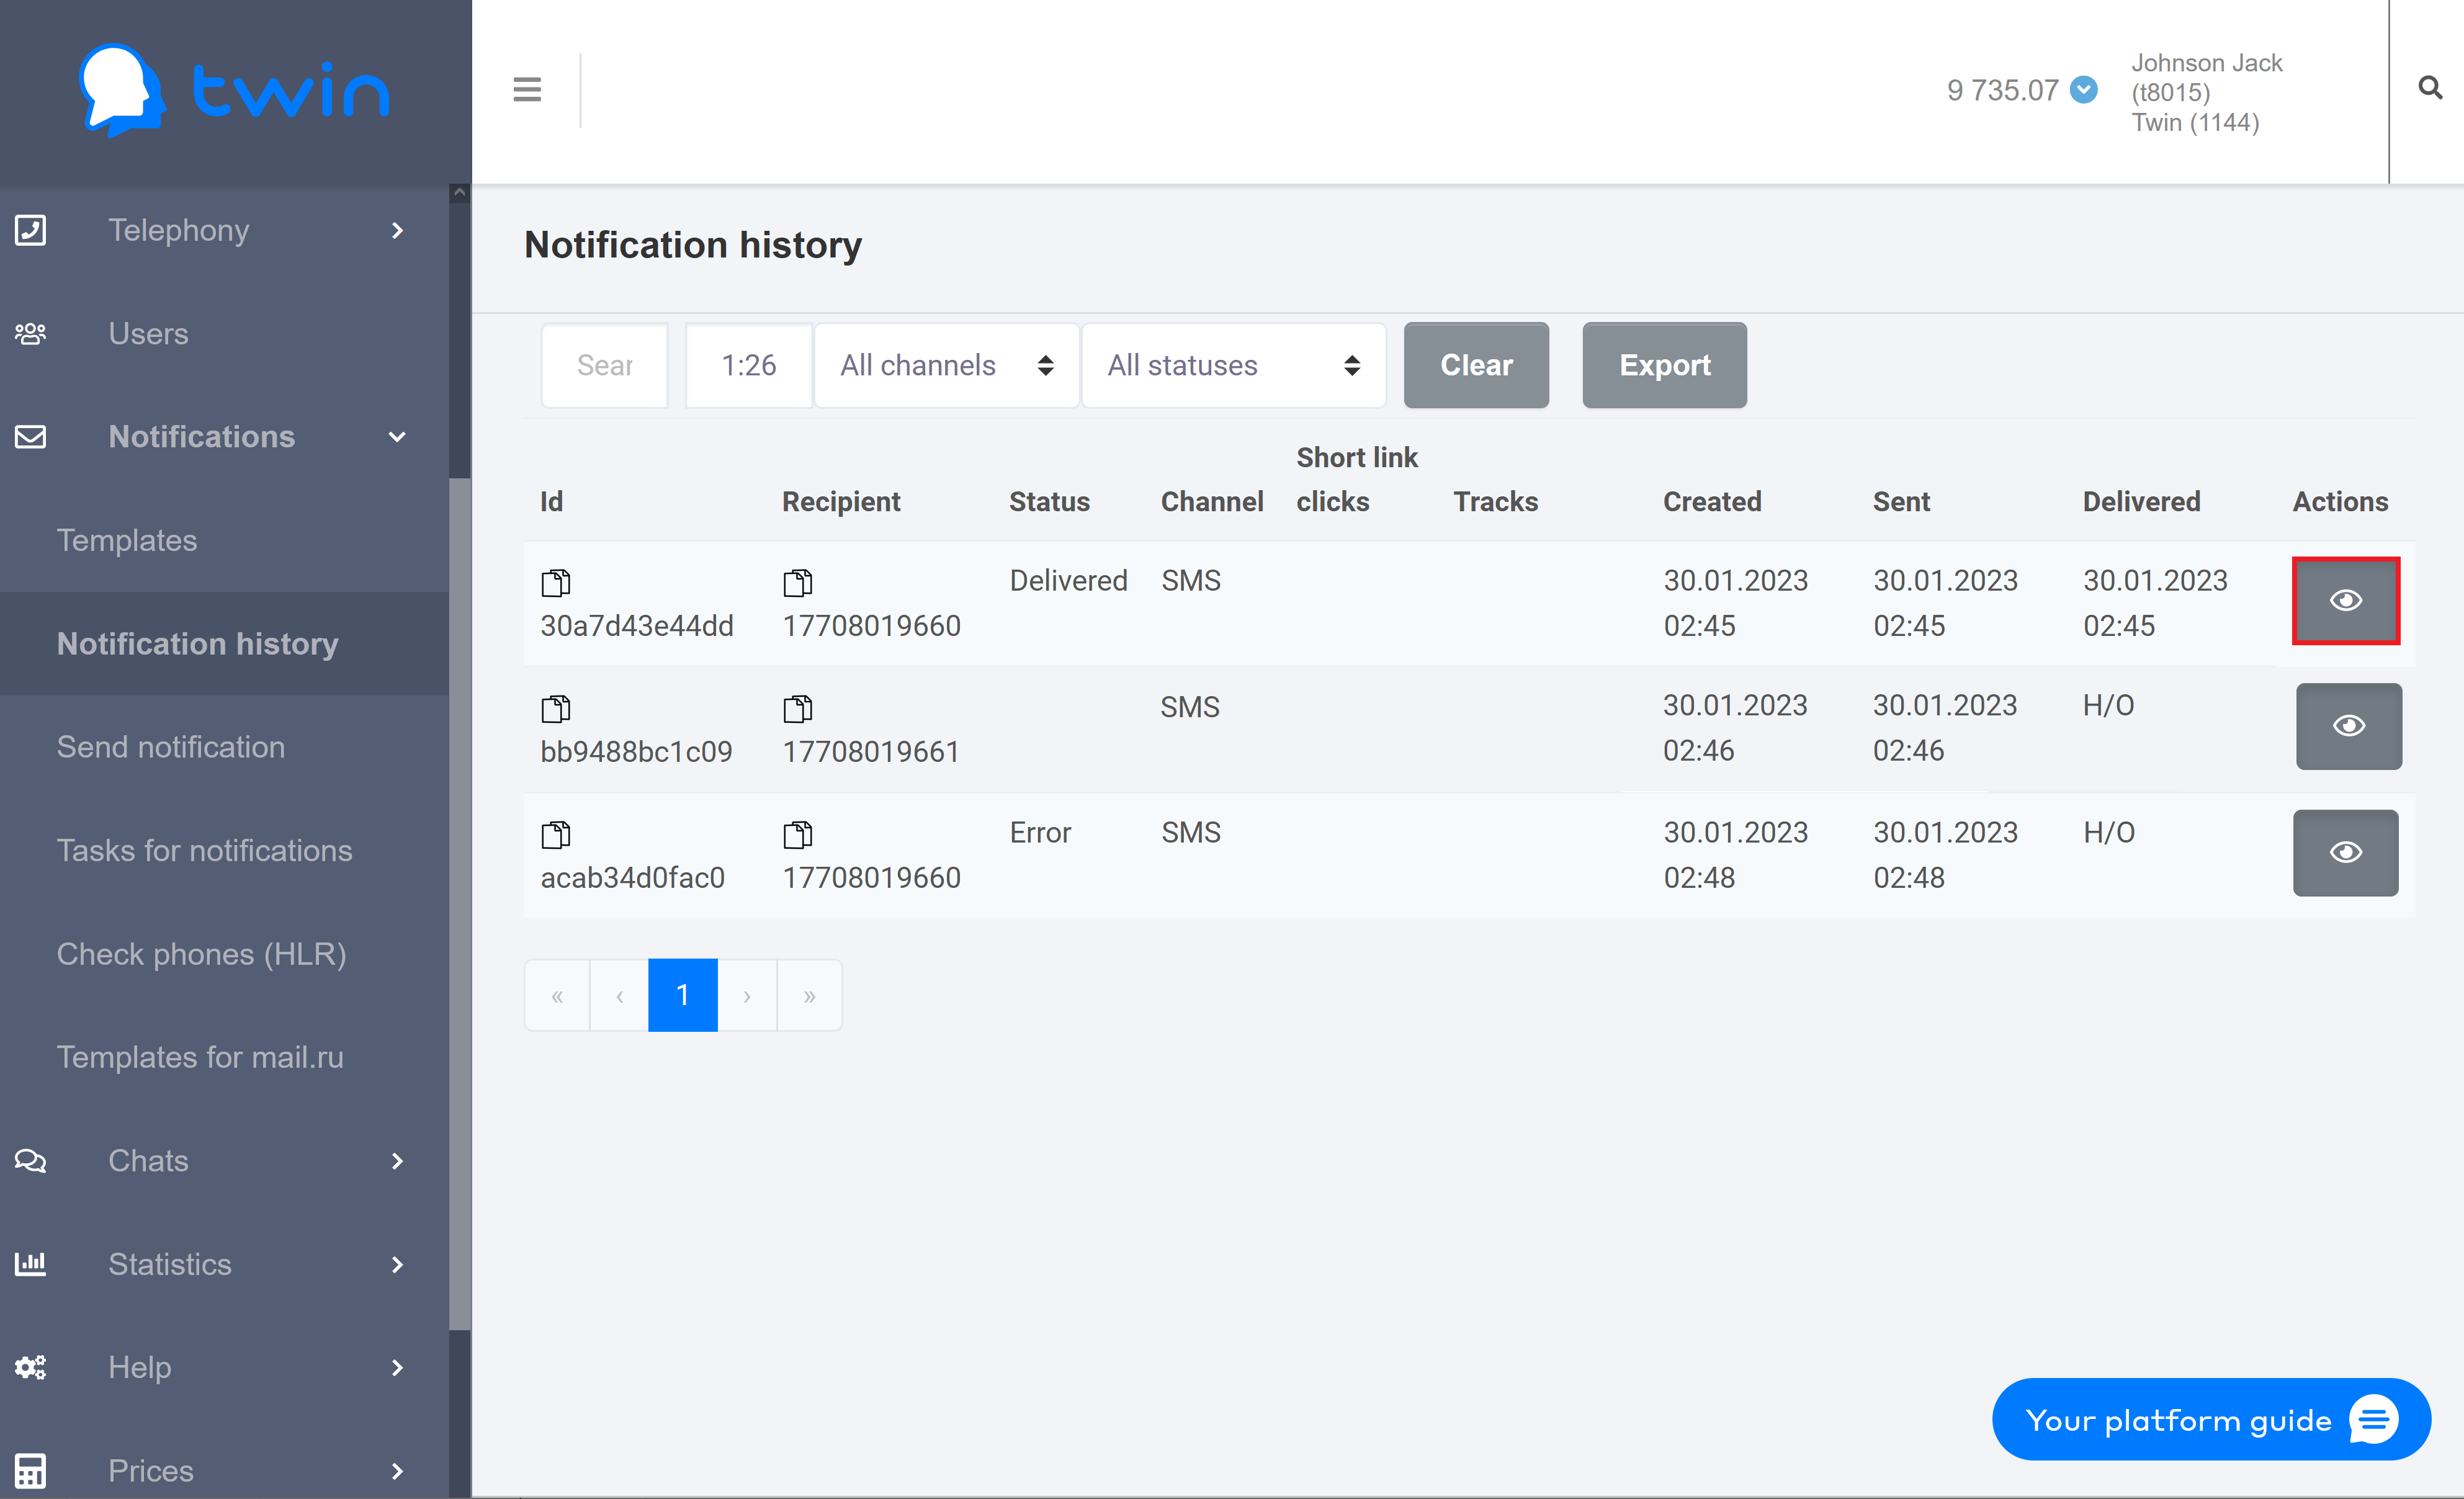
As a result the following dialog box will open.
Creating reports
Creating a report for notifications sent using different communication channels
On the Notification history page you can create reports with detailed information about all notifications that you sent to your clients.
Use the filter at the top of the page to select the communication channel and choose the necessary period of time.
To create a report click Export.
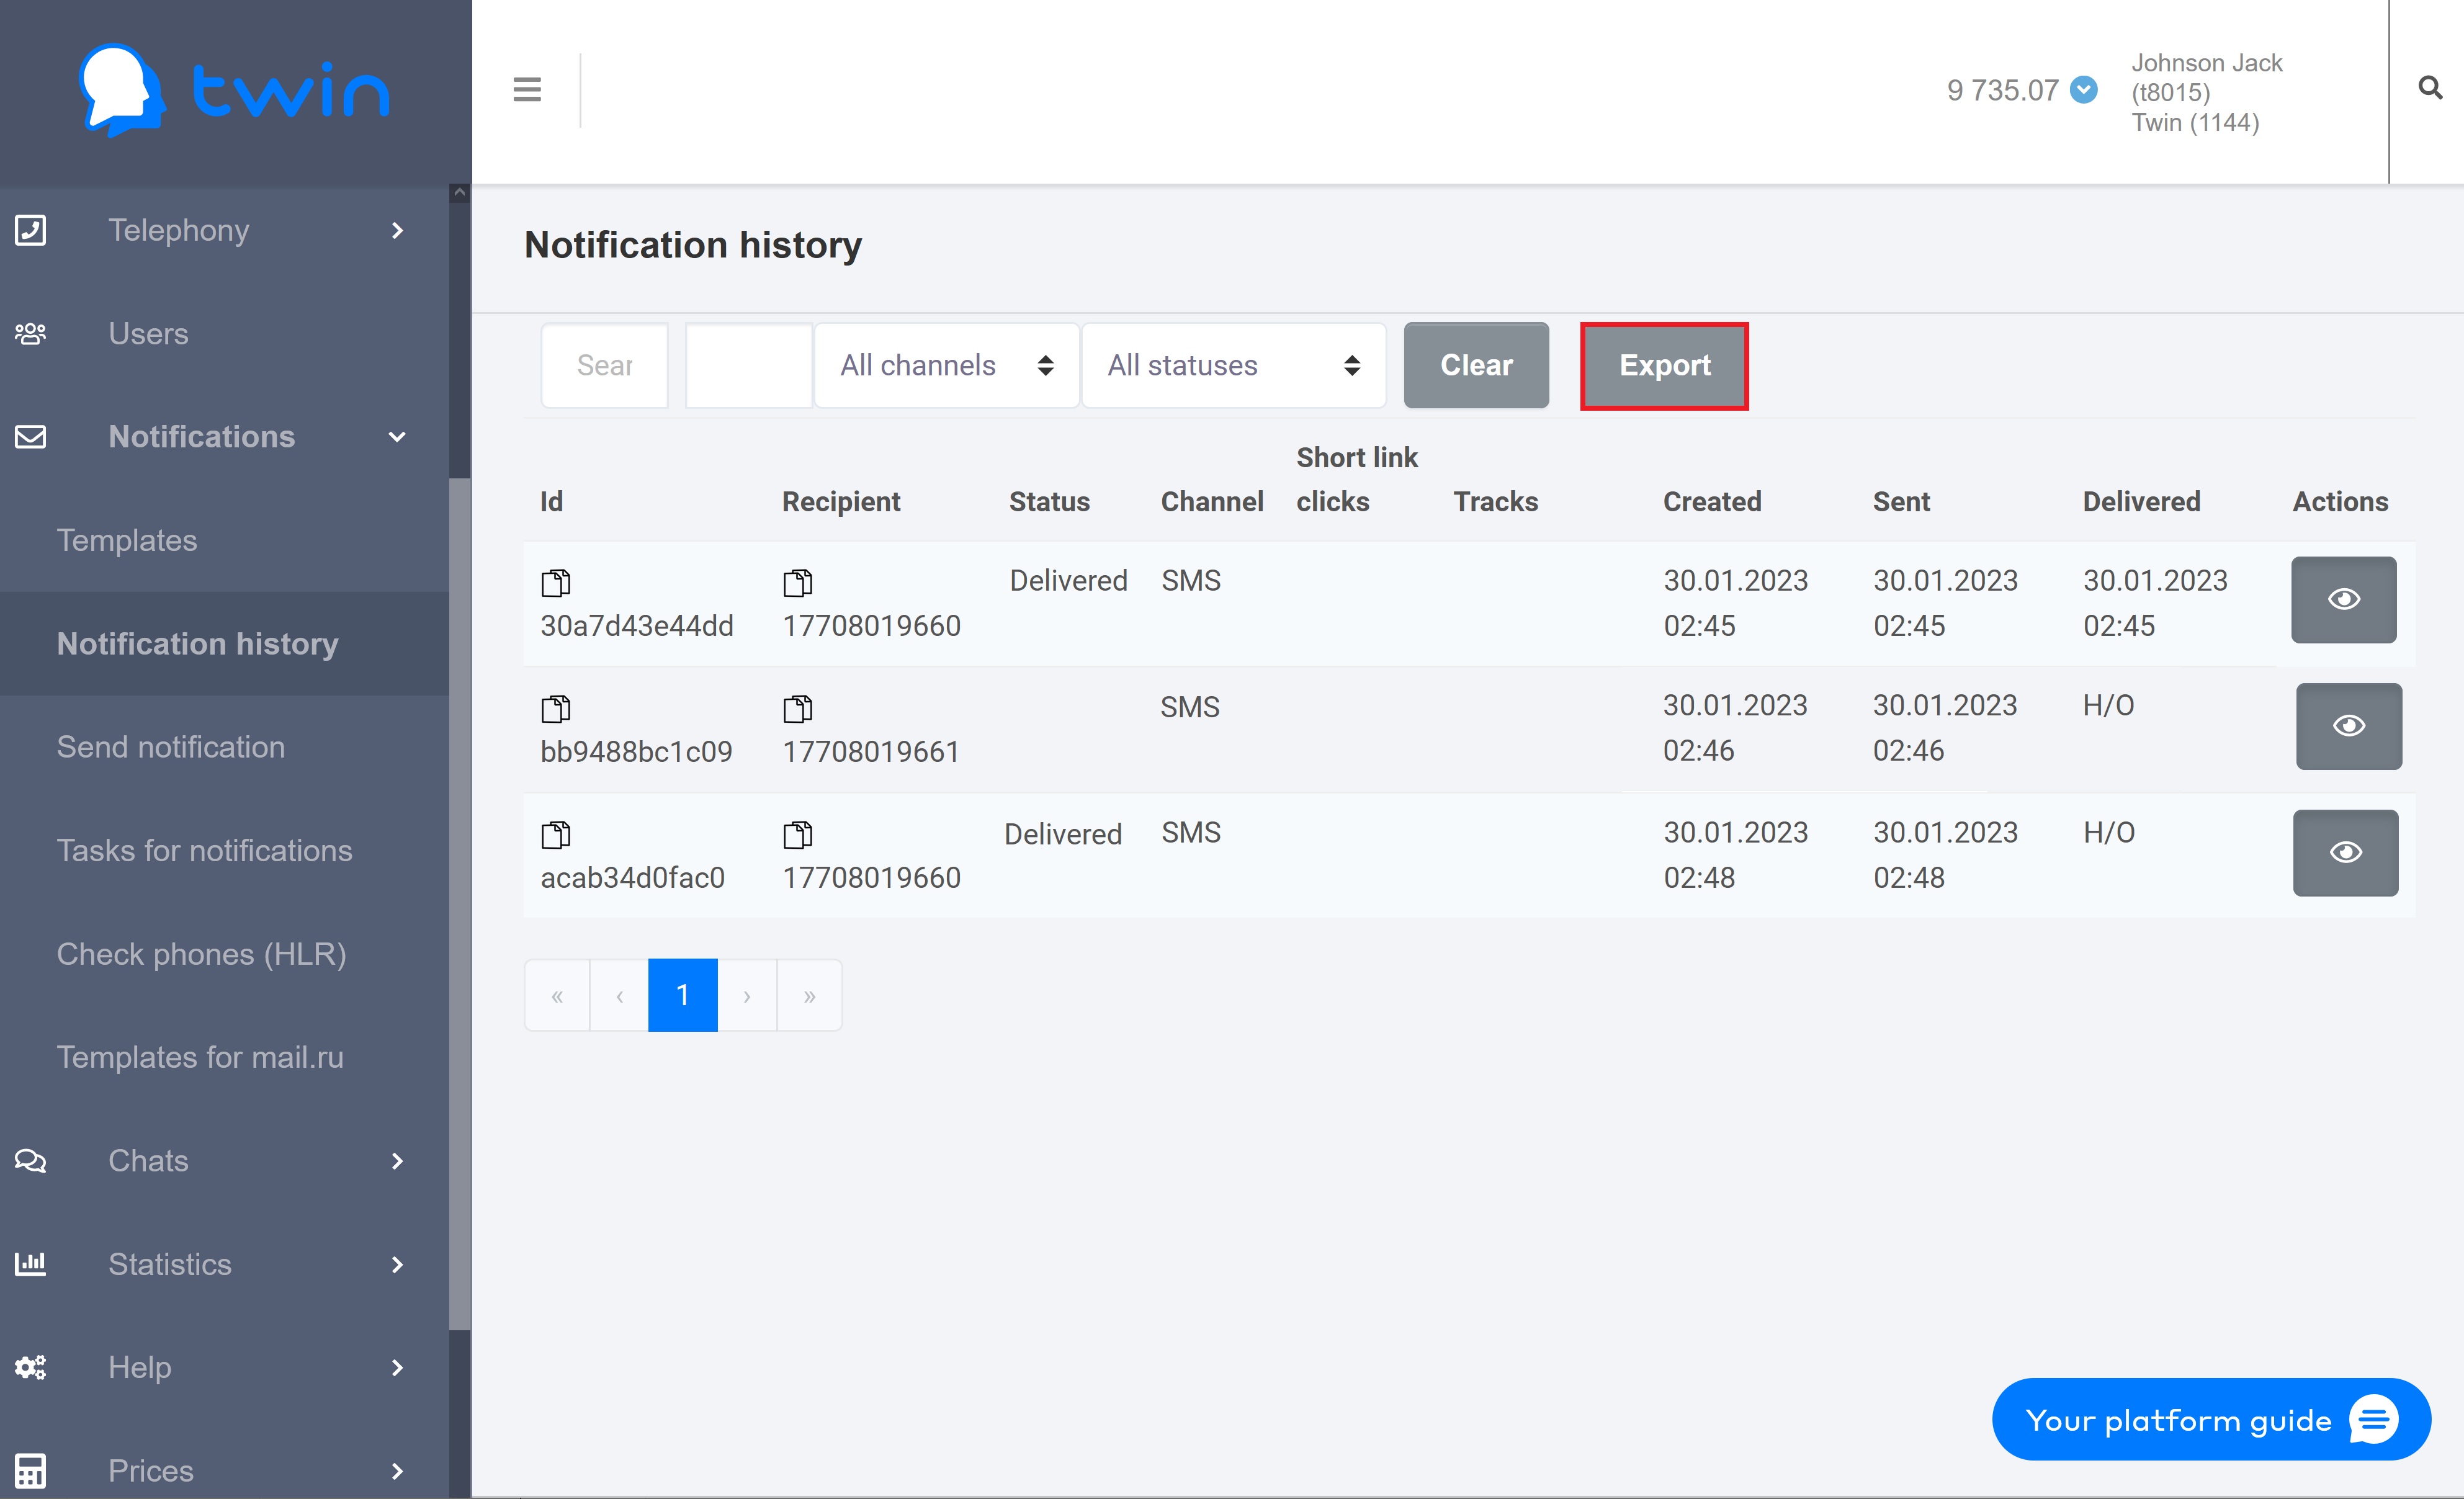
As a result the system wil generate the report.
The report contains the following information:
- Message identifier – unique identifier of the message.
- Bulk identifier – unique identifier for a batch of messages. Associated with every message in the batch.
- Group identifier – unique identifier for a batch of messages. The system uses this parameter to group notifications.
- Message flow identifier – unique identifier for a batch of messages that prevents messages from being sent to the same channel. Associated with every message in the batch.
- Message delivery status – delivery status. The following statuses are available:
- DELIVERED – notification was processed and delivered to the recipient.
- UNDELIVERED – notification was sent but not delivered to the recipient.
- PENDING – notification was sent to the recipient but the delivery report was not received.
- PAUSED – notification was successfully processed but was not sent.
- READ – notification was read.
- ERROR – error occurred while sending the notification.
- CREATED – notification was created but was not sent.
- SENT – notification was accepted for sending.
- QUEUED – notification that is in the queue.
- SKIPPED – notification from the queue that was not delivered.
- CANCELED –canceled notification.
- DELAYED – a notification from the queue that will be sent soon.
- Status description – status of the notification.
- Messaging channel – communication channel that the system used to send the notification.
- Sender – the sender name.
| Примечание |
|---|
The sender name is used only for the SMS channel. |
- Recipient – client phone number that the system used to send the notification.
- Message body – notification text.
- Message fee – price for sending the notification to a client.
- Mobile network operator – mobile network carrier that the system used to send the notification.
| Примечание |
|---|
In most cases the value of this parameter is not displayed since many mobile network carriers does not provide this information. |
- Message template identifier – ID of the notification template that was used to send the notification.
- Message template name – name of the notification template that was used to send the notification.
- Variables – variables that are used in the message text.
- Message part count – before the system sends a notification, it divides it into several parts. The price for sending a notification is calculated with regard to the number of these parts.
- Count of message views and clicks Email – number of views and clicks for the notification by email
- Short link – shortened link displayed in the message text.
- Short link count clicks – how many times the client clicked the link.
| Примечание |
|---|
This parameter is not used when notifications are sent using notification templates. |
- Date of the message registration in the system – date and time when the notification was created.
- Sending date – date and time when the notification was sent.
- Delivery date – date and time when the notification was delivered.
- Date of the start sending (for DELAYED messages) – date and time when the system started to send the scheduled notification.
- Delivery expiration date – date and time when the delivery of the notification ends.
When the report is generated, you can download it from the Reports page.
Creating a report for notifications sent using Twin API
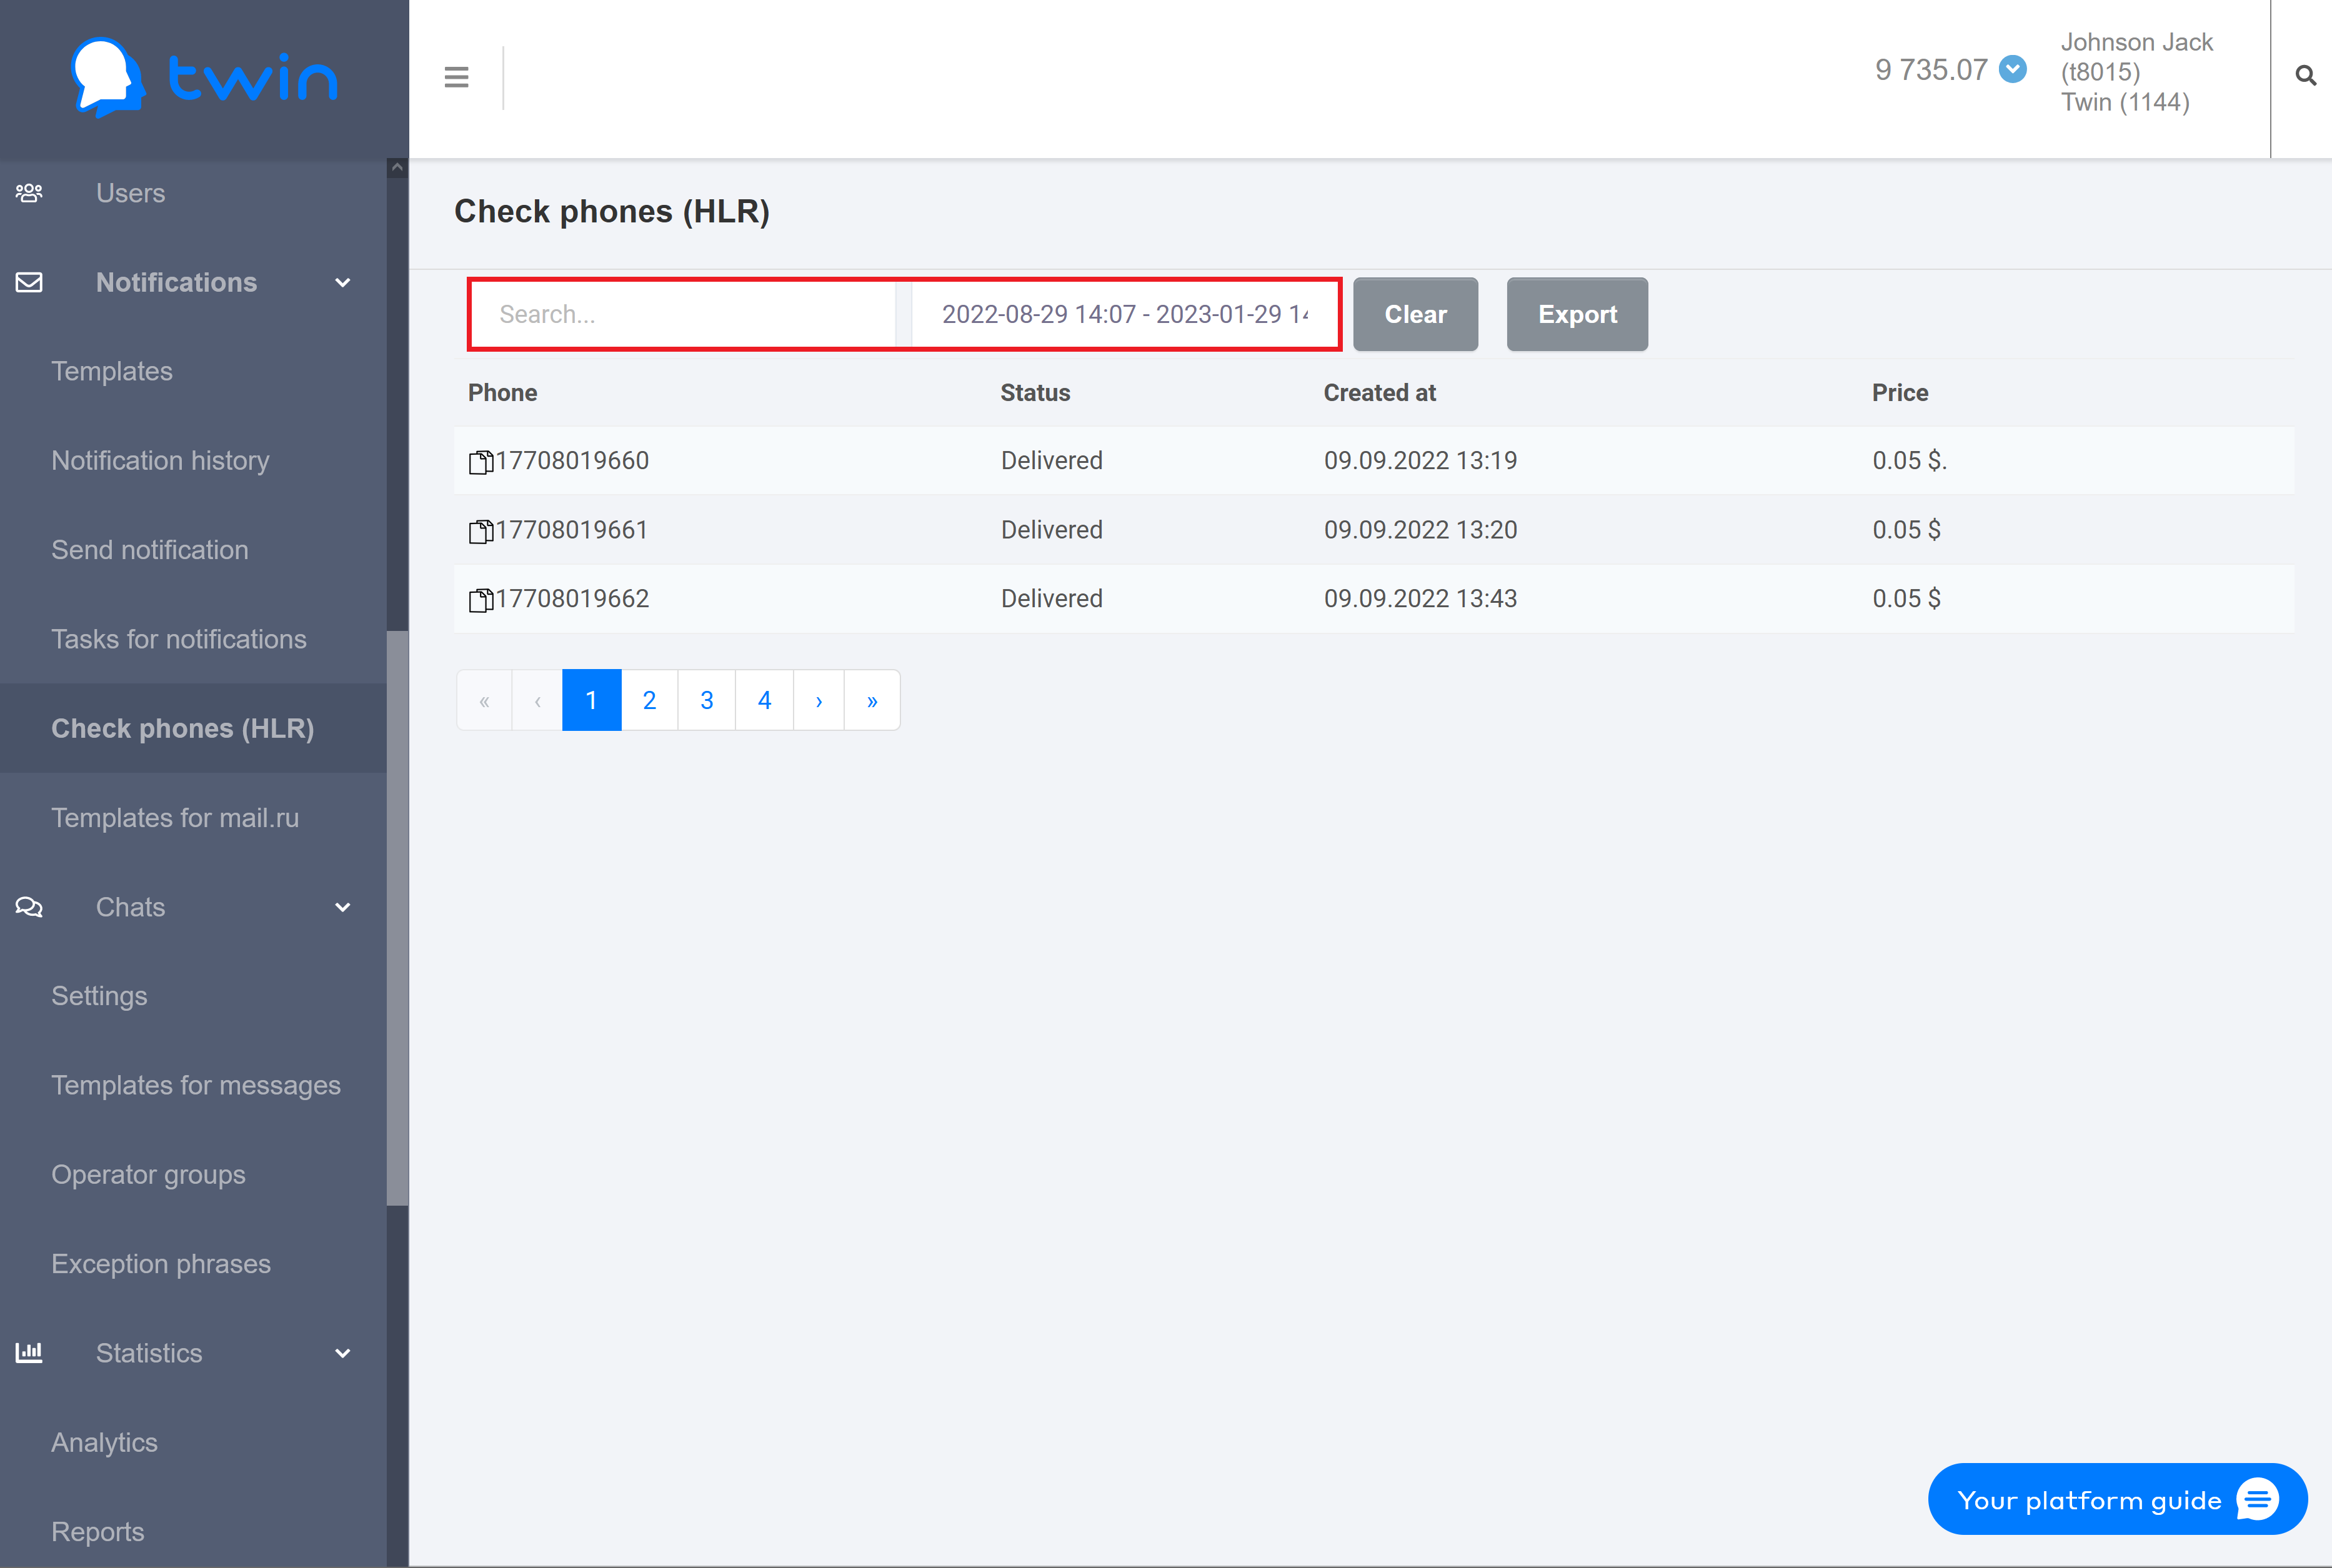
On the Check phones (HLR) page you can create reports with information about all notifications that you sent to clients using Twin API.
Use the filter at the top of the page to specify the phone number and select the necessary period of time.
To create a report click Export.

As a result the system wil generate the report that contains all displayed information.
The generated report contains the following information:
- Identifier check – unique ID
- Check status – message delivery status
- Status decription – description of message delivery status
- Phone – client phone number
- Check date – sent date
- Check price – price
When the report is generated, you can download it from the Reports page.
...
Button Hyperlink custom-icon top-button id top-button title . type standard class top-button url #Top
В разделе Уведомления можно выполнять рассылку сообщений клиентам, используя различные каналы связи.
Для доступа к данному разделу предназначен пункт Уведомления в боковом меню.

В разделе Уведомления содержатся следующие подразделы:
...

...
- Шаблоны - служит для поиска, создания, редактирования и удаления шаблонов уведомлений (подробнее см. Работа с шаблонами уведомлений);
- Просмотр сообщений - позволяет выполнять просмотр подробной информации об отправленных сообщениях: получатель сообщения, статус сообщения (например, Доставлено), наименование канала связи, который система использовала для отправки сообщения (например, sms, email), дата создания сообщения, дата доставки и др. (подробнее см. Просмотр отправленных сообщений).
- Отправка сообщений - предназначен для выполнения рассылки сообщений клиентам на основе подготовленных шаблонов (подробнее см. Отправка сообщений).
- Задания на отправку - служит для поиска, создания, редактирования, просмотра и управления выполнением заданий на отправку сообщений (подробнее см. Работа с заданиями на отправку сообщений).
- Проверка номеров - содержит информацию о номерах, которые использовались для выполнения клиентских рассылок, с указанием стоимости отправки сообщений, времени отправки и статусов доставки сообщений (подробнее см. Проверка номеров)
- Шаблоны mail.ru - позволяет создавать и редактировать шаблоны mail.ru для рассылки сообщений в социальных сетях "Вконтакте" и "Одноклассники".
...
| title | Содержание: |
|---|
Страница «Продвинутого поиска»
Раздел «Рабочий стол»
Раздел «Сценарии»
Раздел «Обзвон»
Раздел «Телефония»
Раздел «Компании»
Раздел "Пользователи"
Раздел «Уведомления»
Раздел «Чаты»
Раздел «Статистика»
Раздел «Помощь»
Раздел «Тарифы»
Раздел «Oтчеты»
Страница «Настройки пользователя»
- Выход из личного кабинета
- Полезная информация
...