-
Создана пользователем
 Кадубовский Андрей (Twin). Последнее обновление: 18 дек., 2022
Время чтения: 43 мин.
Кадубовский Андрей (Twin). Последнее обновление: 18 дек., 2022
Время чтения: 43 мин.
Contents
Creating a new script
Script Editor Window
Работа с блоками
Работа с переменными
2. Elements
Стрелка (Ветка)
Стартовый блок
Блок «Вопрос»
Блок «Пауза»
Блок «Информация»
Блок «Условие»
Блок «Случайный выбор»
Блок «Эмоции»
Блок «Результат»
Блок «Запрос к серверу»
Блок «Арифметика»
Блок «Порядковый выбор»
Блок «Телепорт»
Блок «Пустой»
Блок «AI»
1. Script
Creating a New Script
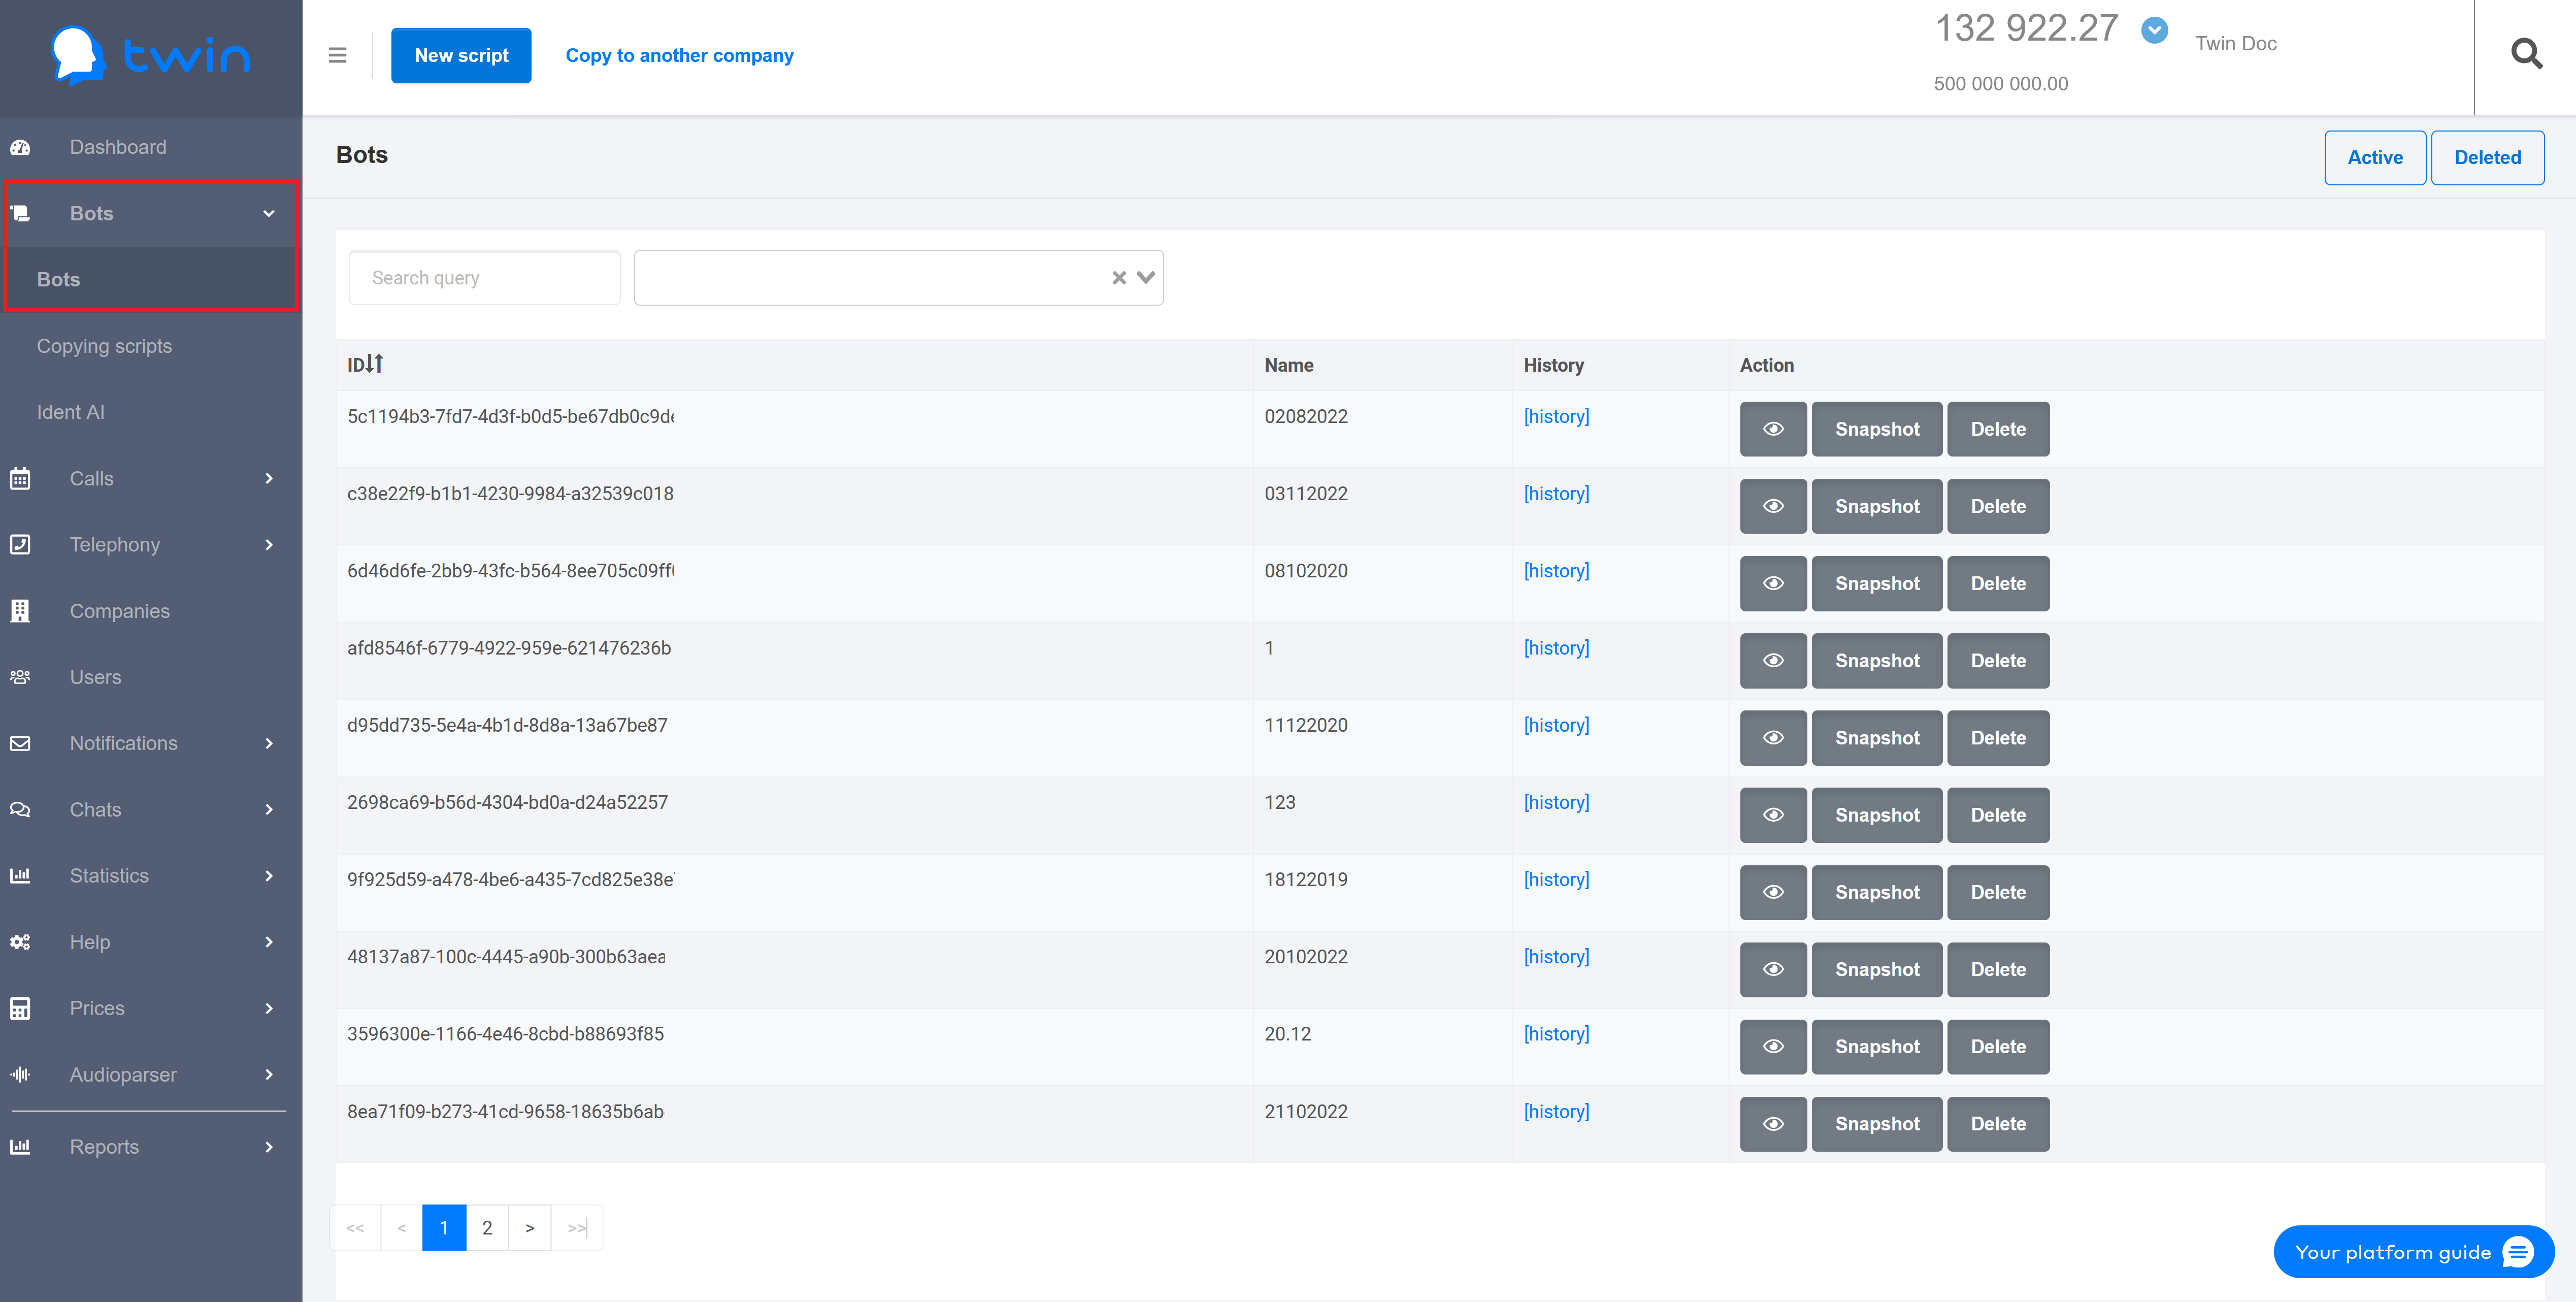
To create a new script, on the side menu click Bots – Bots and then click the New Script button.
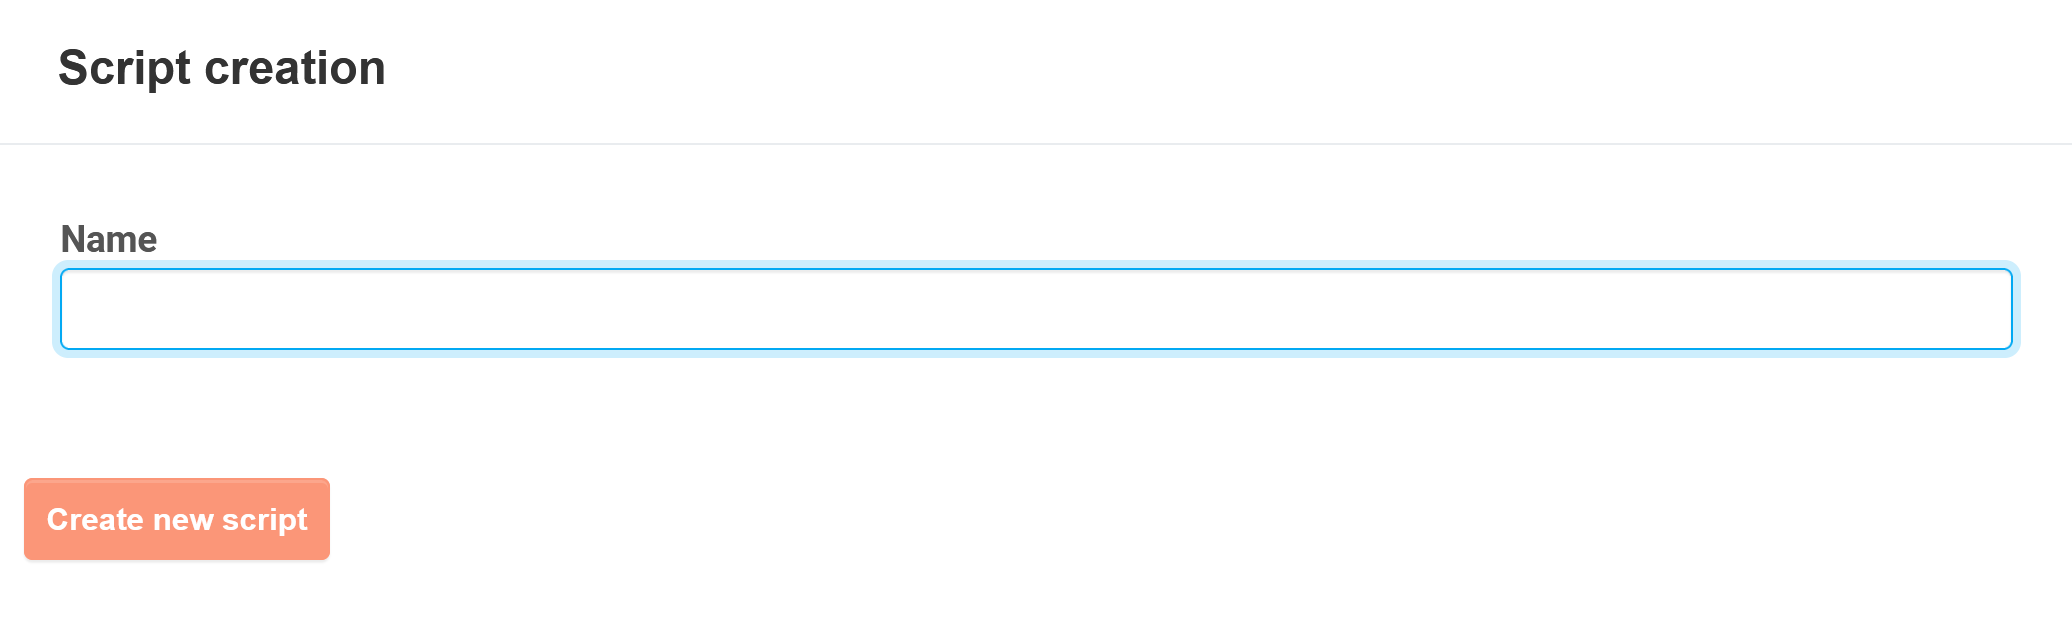
In the Script creation dialog box, enter a name for a new script and click the Create New Script button.
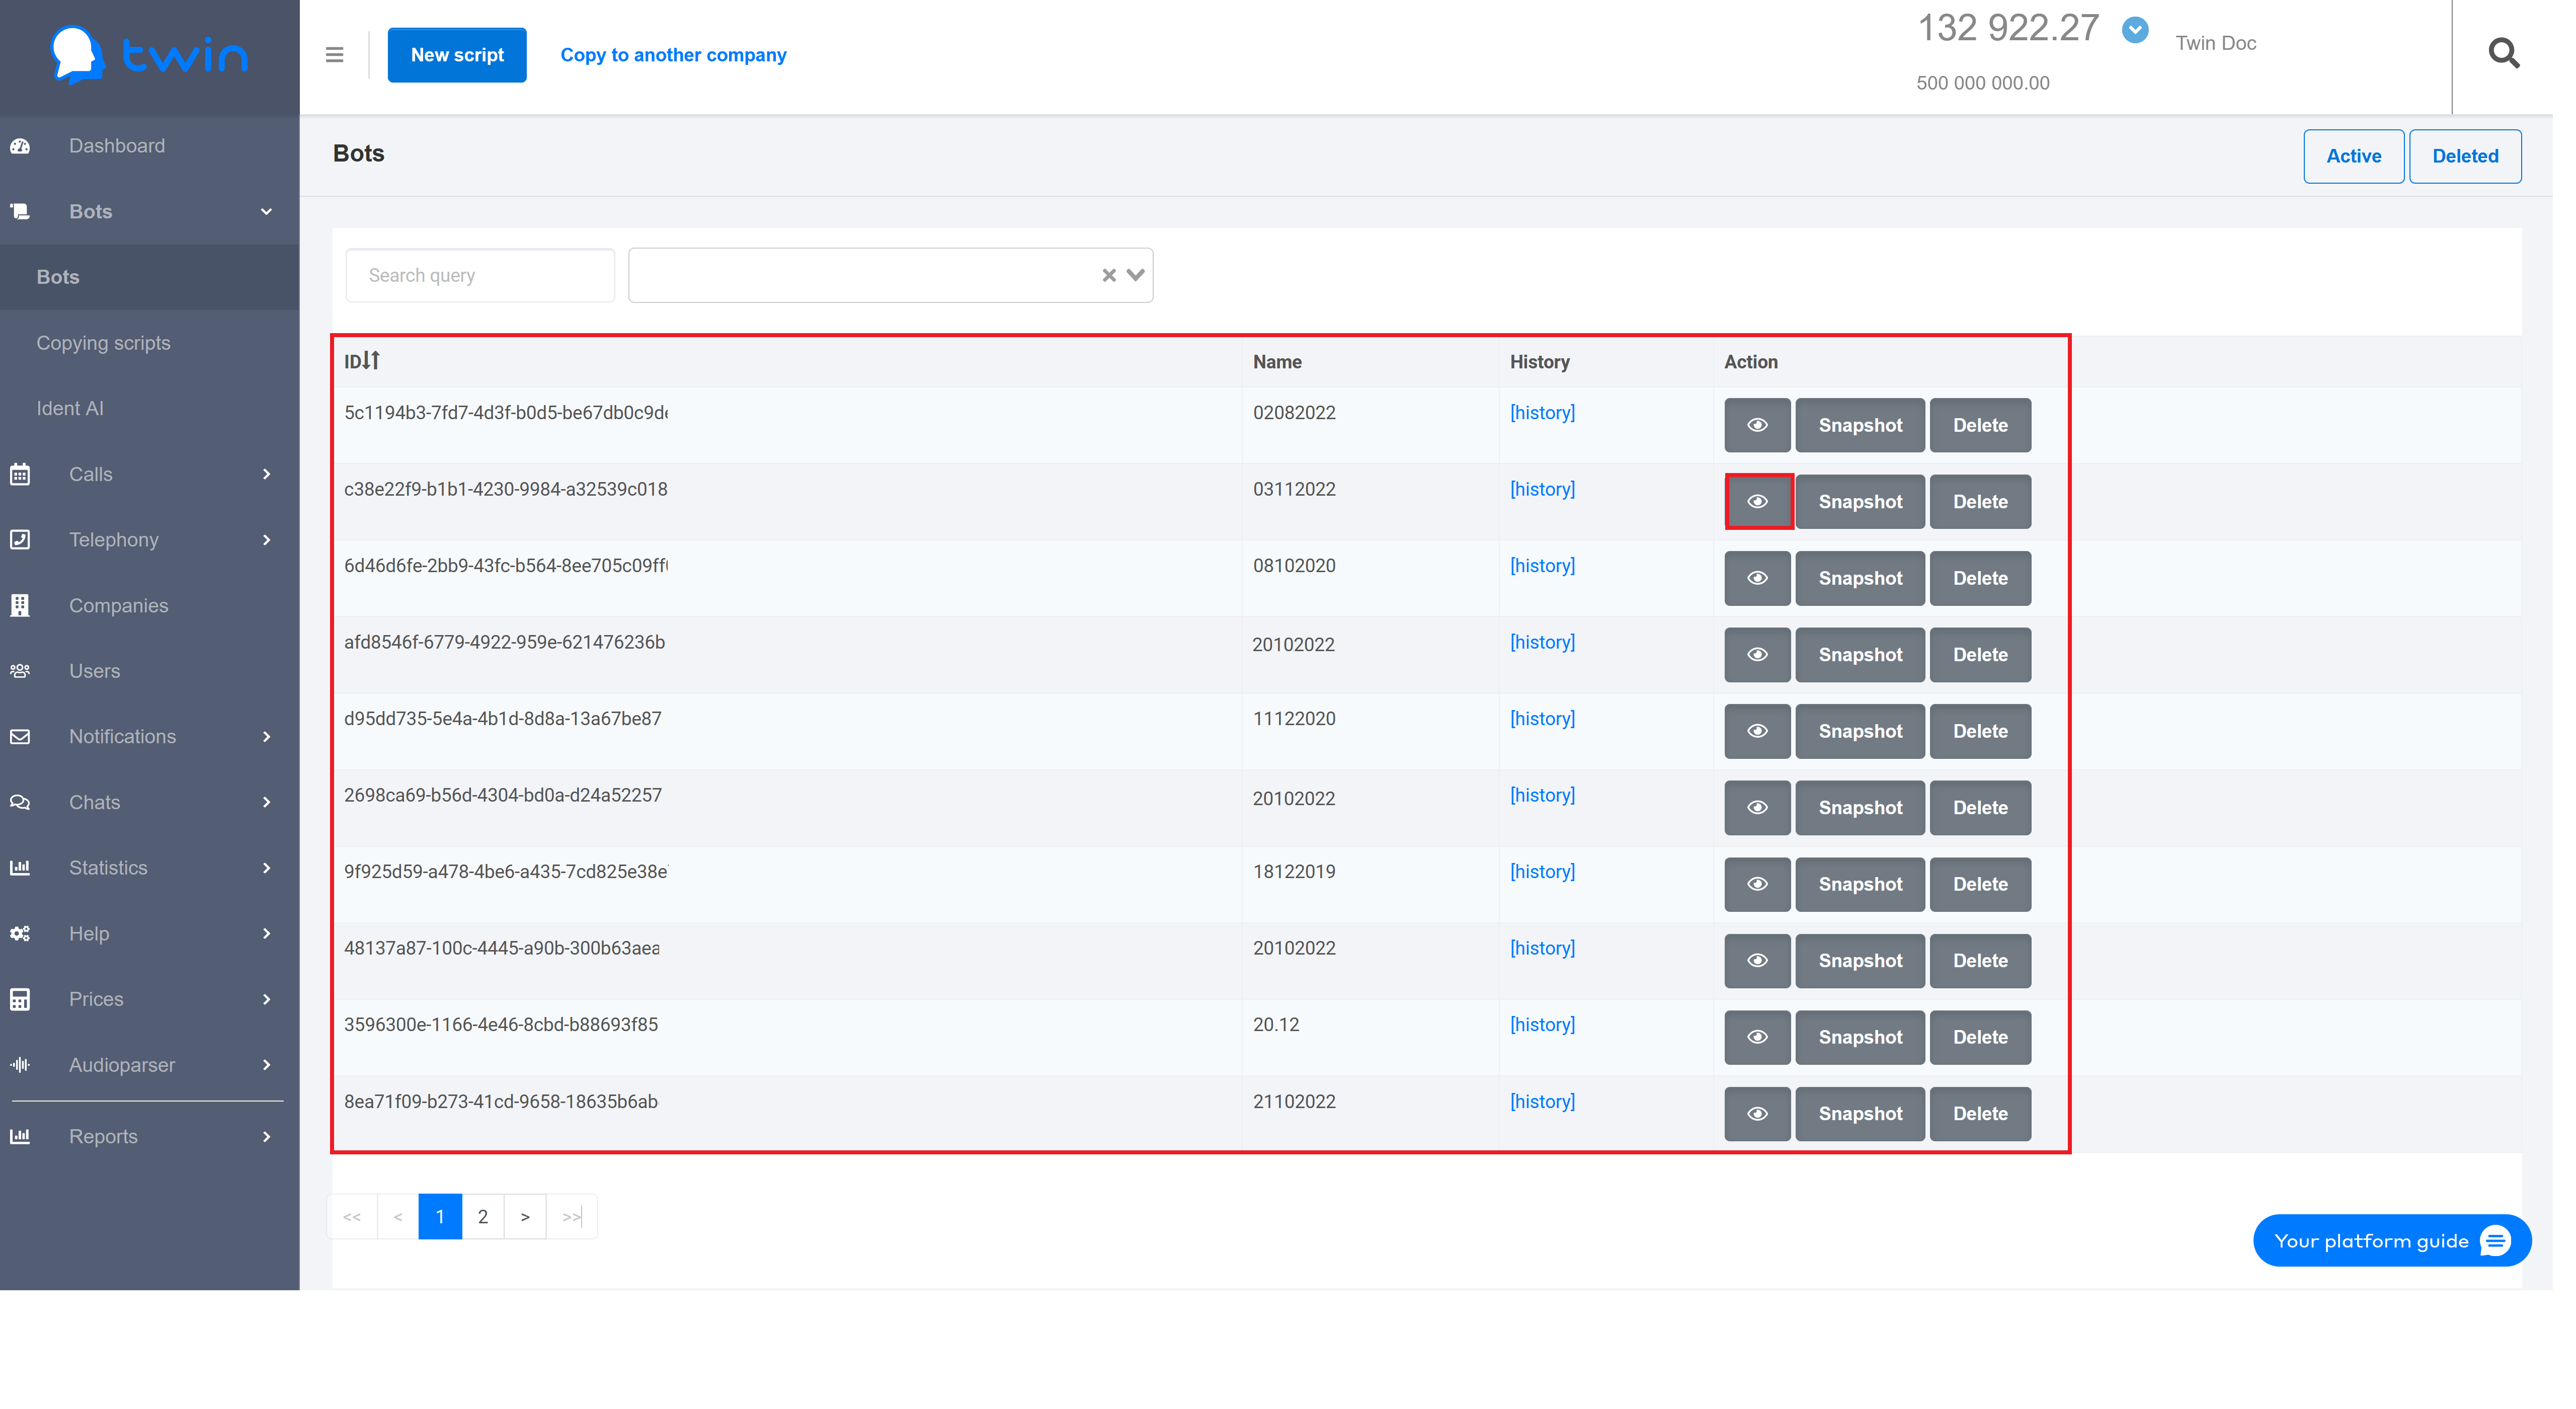
To edit the script, find its name on the list and click the ![]() button.
button.
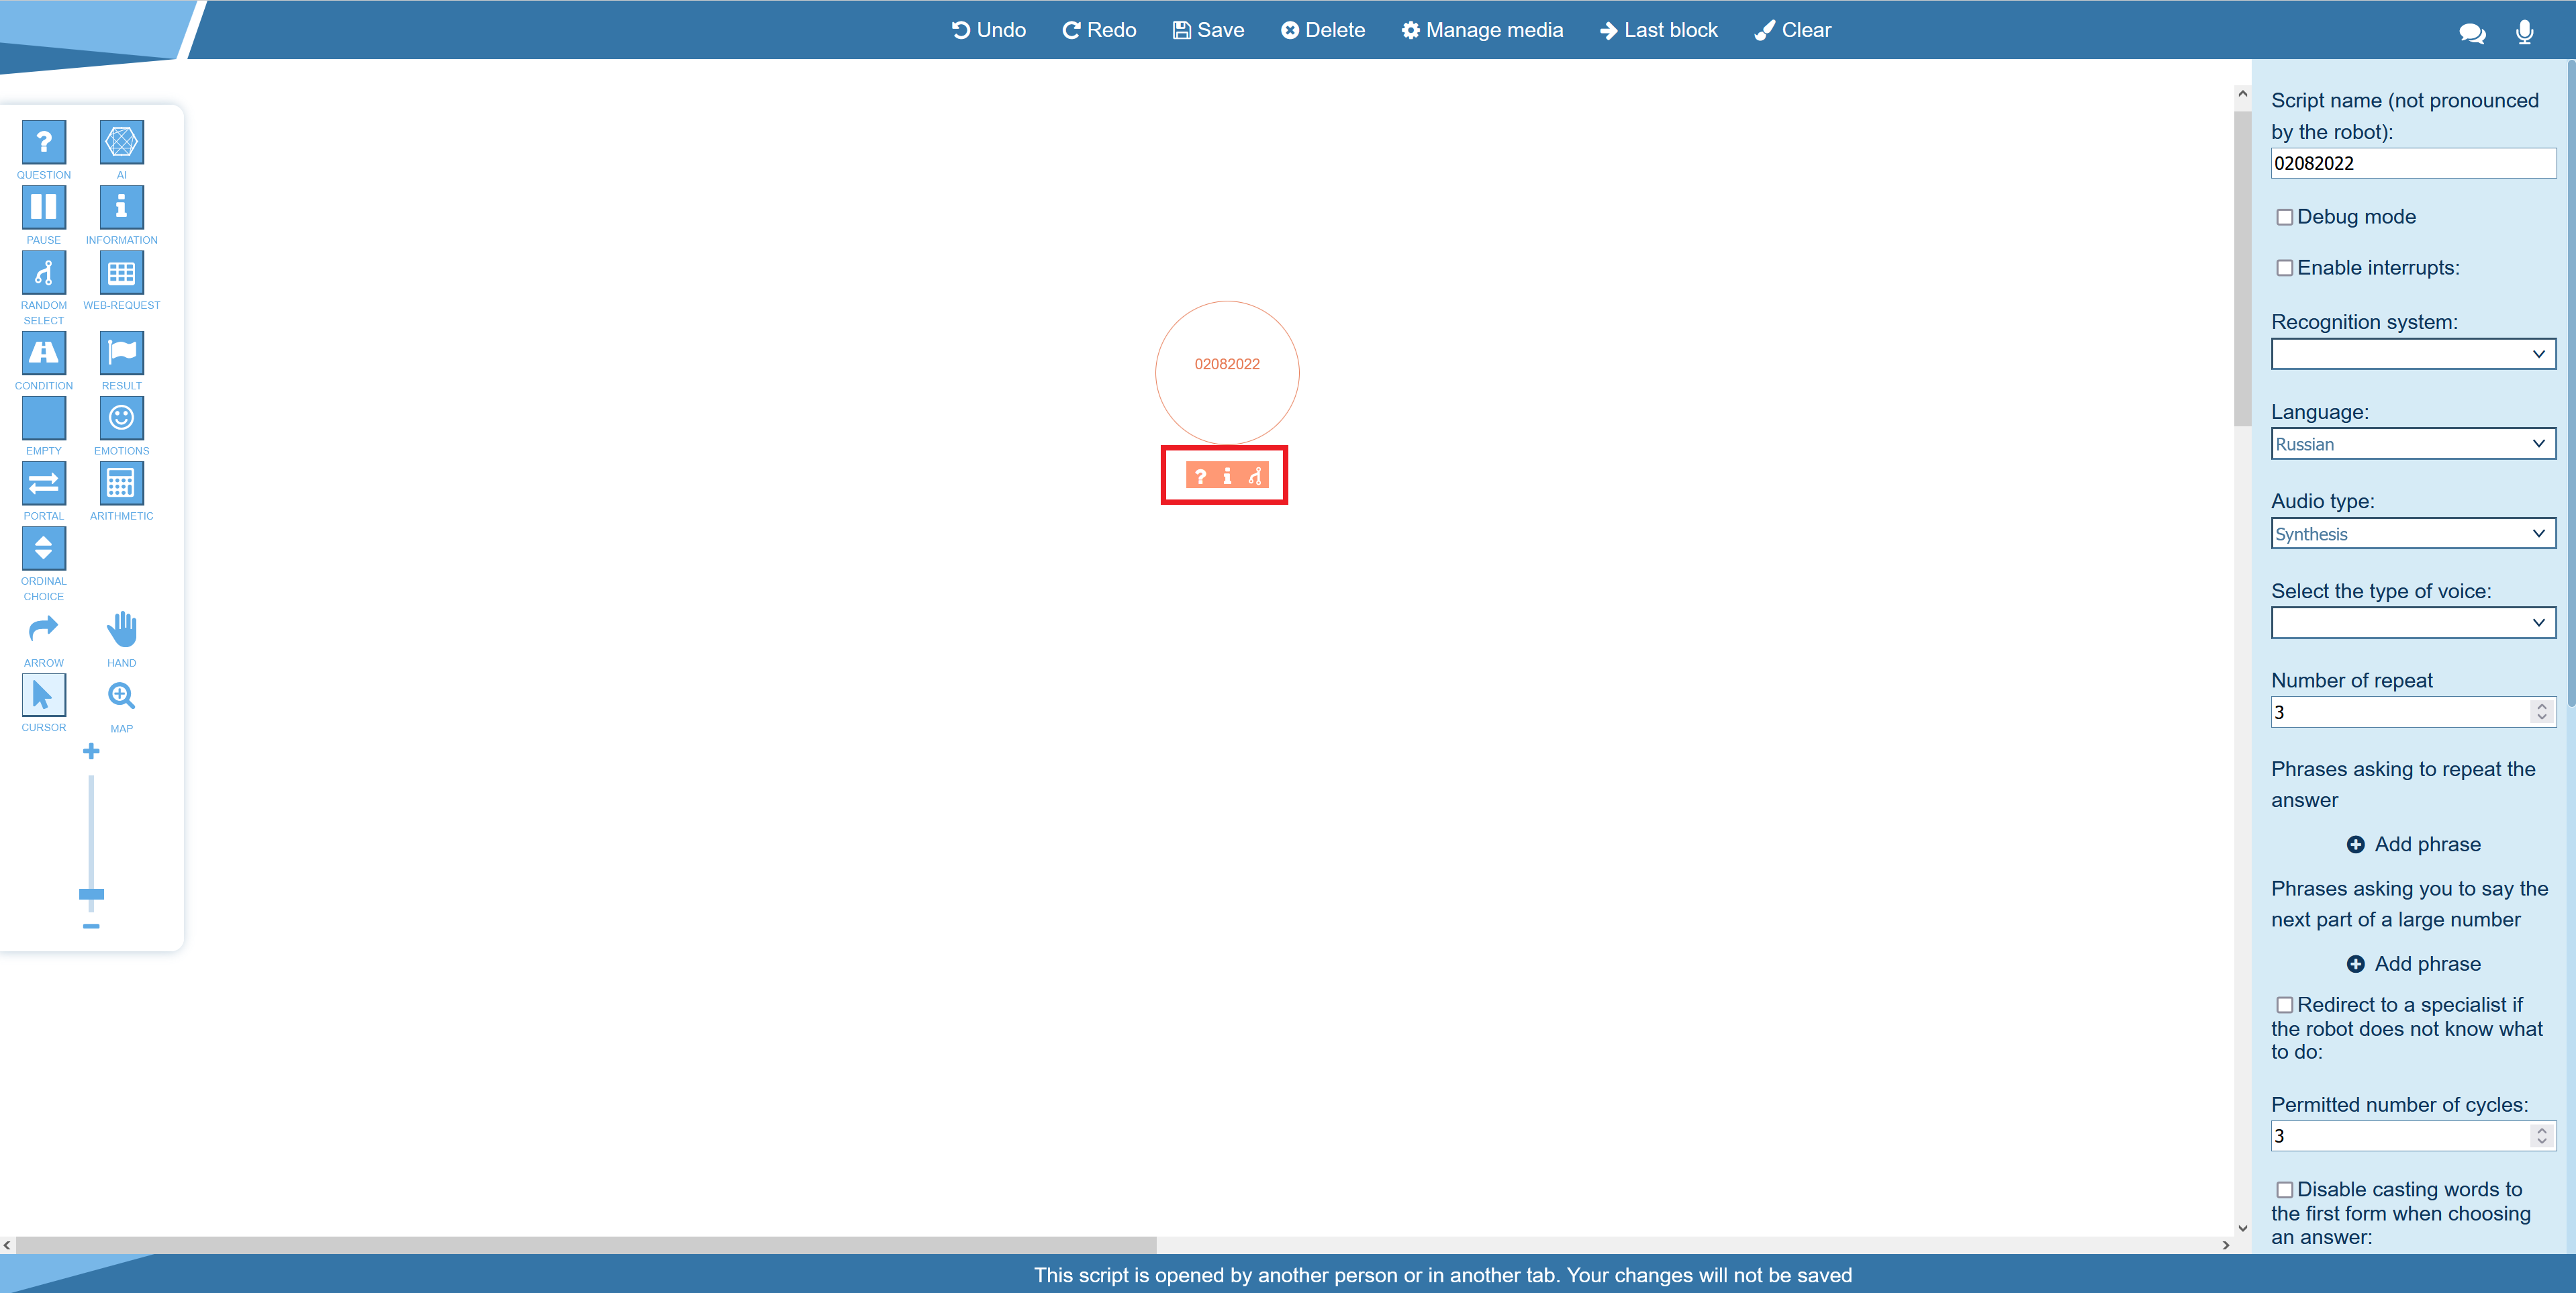
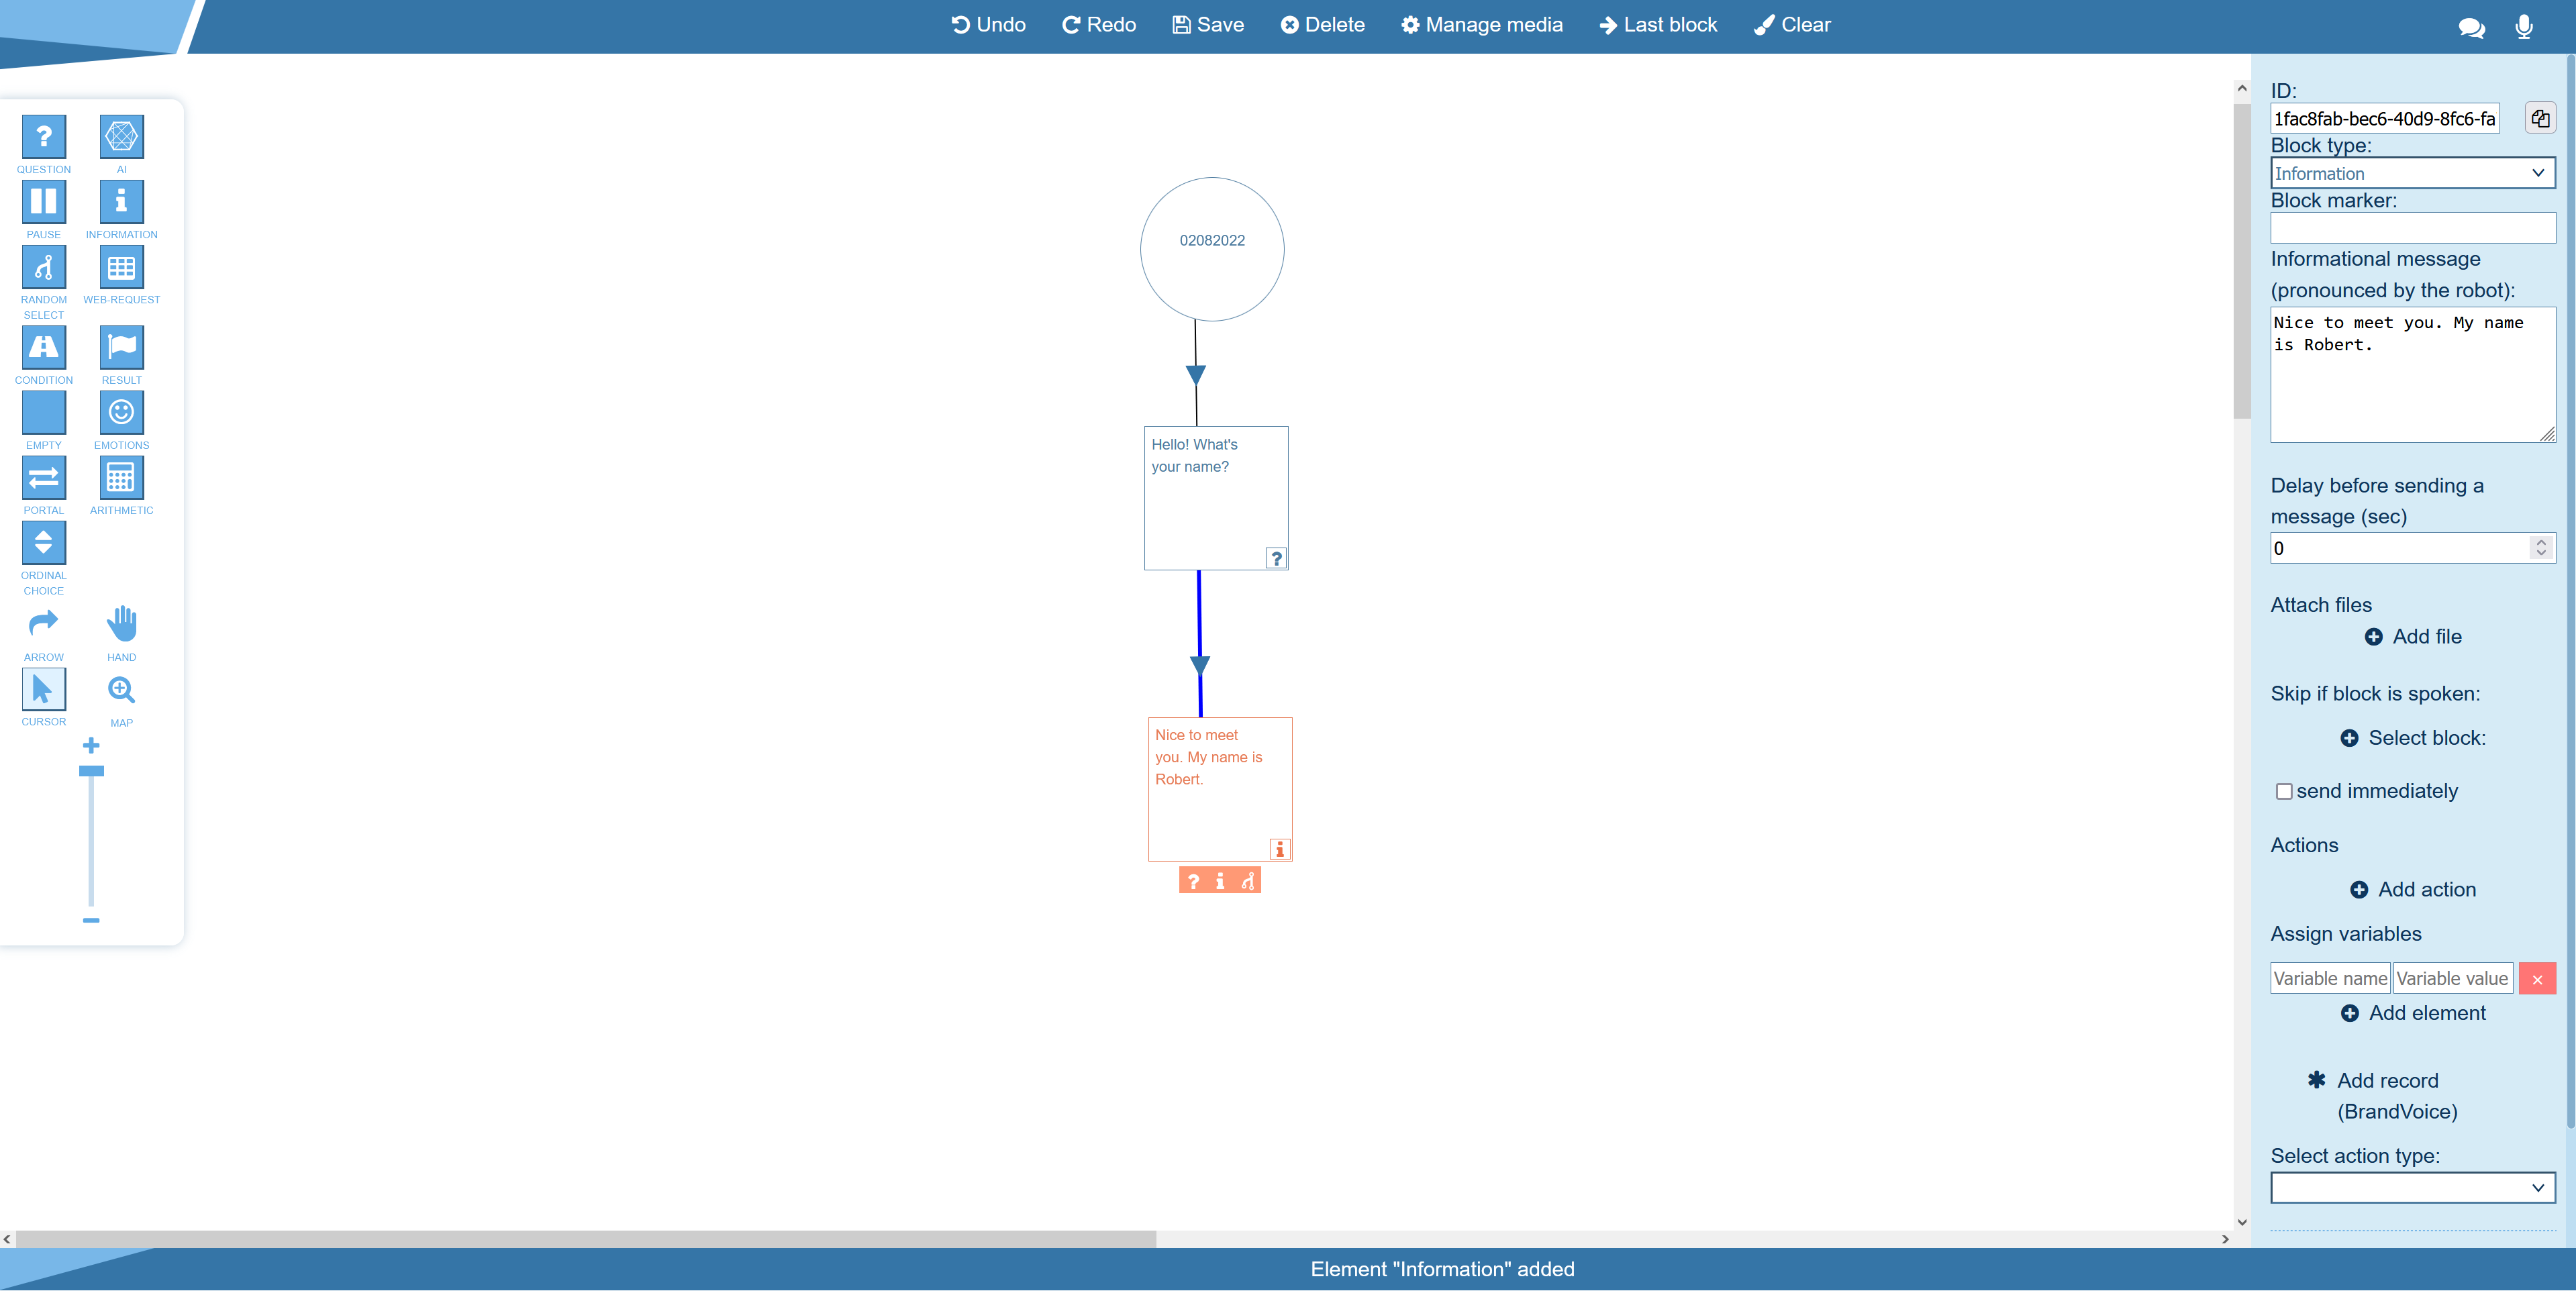
Script Editor Window
A script is created on the basis of questions and answers. You create questions and define possible answers for them. When a bot has a conversation with a client, it moves from the start to the end of the script changing directions with regard to as how clients answer these questions .
Control elements:
| Name | Element | Description |
|---|---|---|
| Action blocks |
| You use them to create a script |
| Arrow |
| You use it to define directions in a script |
| Hand |
| You use it to move around in the script editor window |
| Cursor |
| You use it to work with an object or select it |
| Map |
| Opens the navigation window that you can use to quickly move between the script blocks |
| Scale |
| Changes the scale in the script editor window |
| Cancel |
| Cancels your last action |
| Redo |
| Repeats undone action |
| Save |
| Saves script |
| Delete |
| Deletes script |
| Manage media |
| Manages all recorded and downloaded media files |
| Last block |
| Brings you to the last added block |
| Clear |
| Returns to the original state |
| Chat |
| Allows you to check the script with a chatbot |
| Microfon |
| Allows you to check the script with a voice bot |


Hotkeys:
| Клавиши | Результат |
|---|---|
Ctrl | Changes active tool to Hand |
Ctrl + S | Saves script |
| Ctrl + Z | Cancels last action |
| Esc | Removes selection |
| Del | Deletes selected element |
Working With Script Blocks
Each block or arrow has properties. You can configure them using the panel on the right side of the script editor window. To display properties of a block or arrow, click it.
To quickly create blocks in the script editor, use the following buttons that are appear under a block after you select it: Question, Information and Random selection. To create a new block, drag any of this buttons.
Working With Variables
You can create variables in two ways:
- Declare a variable in block properties
- Declare a variable in arrow properties
You can declare variables only in the following blocks:
- Question block
- Information block
- Results block
In all these blocks variables are declaired in the same way.
To declare a variable in a block, do the following:
- Select a block in the scipt.
- Click Add element.
- In the left field, enter variable name.
- In the right field, enter variable value.
You can declare variables only in arrows that come from the following blocks:
- Question block
- Pause block
To declare a variable in an arrow, do the following:
- Select an arrow.
- Select the Save answer checkbox.
- Enter the name of the variable that will store the answer.
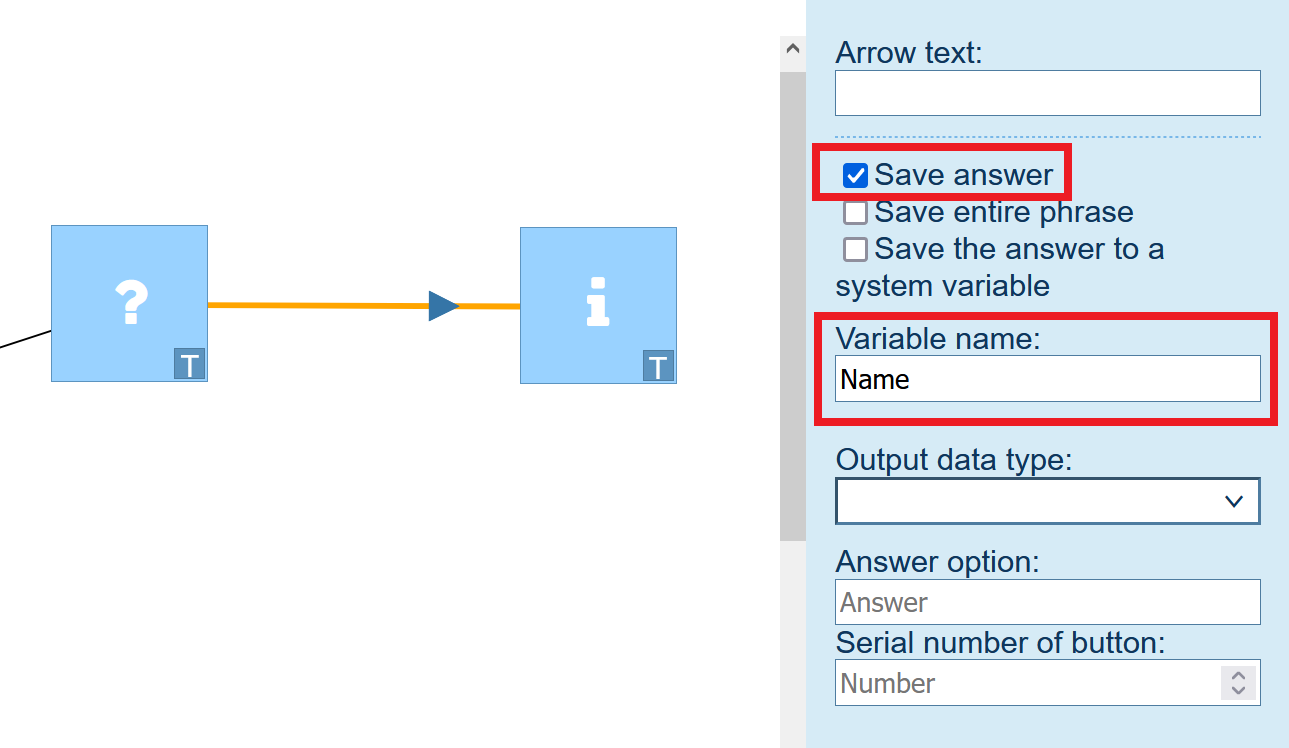
Unlike declaring a variable in a block, declaring a variable in an arrow makes it possible to store a client's response rather than a specified value.
After you declare a variable in a block or arrow, you can use it in the script. For this, enter the variable name in curly brackets
When you declare a variable, you should enter its name without curly brackets.
If you save different values into the same variable, only the last value will be used in the script.
2. Elements
Arrow

Description:
Shows the direction in the script and defines the conditions for moving from one block to another. In the Question, Condition, Request to the server and Emotions blocks, the arrow has properties that are different from those it has in other blocks.
Description | GUI element |
|---|---|
1. Arrow text You can use it as a description. This text can explain you what response you want to get from a client or it can help you to navigate the script. |
|

Starting block

Description:
The starting block marks the beginning of the script. This block has properties that affect the whole script. Using this block, you can quickly find the starting point even in scripts with a lot of blocks.
| Описание | Изображение |
|---|---|
1. Script name (not pronounced by the robot) - allows you to quickly find the block in the script editor. 2. Debug mode - enables detailed logging of the robot's actions. This mode is enabled at the request of technical support and used to find and fix errors in the robot. After you enable this mode, you need to repeat a problem dialogue with the client. All errors are logged on the developer's server. Since this mode increases the computational load on the system, it is not recommended to enable this mode without a corresponding instruction. 3. Enable interrupts - enables the bot interruption mode in dialogs. 4. Recognition system - selects the speech recognition system used in dialogs with clients. It is recommended to use the default recognition system and change it only on request from the technical support service. 5. Language - the language used in the speech recognition system. Currently, speech recognition works for the following languages:
6. Audio type - type of voice messages of the robot. Possible options:
7. Select the type of voice - type of the robot's voice in dialogues with clients. 8. Number of repeat - defines how many times the robot asks the client again if it does not receive or cannot recognize the answer to its question. If you use this option, you need to add a phrase or several phrases for the robot to voice. 9. Phrases asking to repeat the answer - a phrase that the robot uses to ask the client to repeat the answer if the robot does not receive or cannot recognize the answer to its question. 10. Phrases asking you to say the next part of a large number - the robot will play a specified phrase in a dialogue with the client if the number in the client's response contains fewer characters than expected. 11. Riderect to a specialist if the robot does not know what to do - if the robot does not know what to do, the system will trasnsfer the dialog to the operator. 12. Permitted number of cycles - the maximum number of times the robot asks the client to repeat the answer to a question. 13. Disable casting words to the first form when choosing an answer - disables the conversion of words to the initial form, which makes it difficult to recognize the client's speech. If this option is not used, then the system converts all words in the client's responses to their initial forms. Nouns are converted to the singular number and the nominative case (for example, a manager). Verbs are converted to the indefinite form (for example, to call). 14. Disable phonetic corrector on calls - disables phonetic corrector. This function corrects small mistakes in the pronunciation of words. 15. Select the default block - the block in the scenario to which the system directs the robot if it does not receive or cannot recognize the client's answer to its question. 16. Response timeout (sec) – a period of time during which the robot waits for the client to answer the question. If the client does not answer the question, or his answer is not suitable for the question, then the system will transfer the robot to the help block (see below). 17. Select help block - the Information block, to which the system will transfer the robot, if the client's response contains one of the following phrases: "Help", "What can you do". 18. Ambient noises - background noise that allows you to create a suitable atmosphere during a dialogue with a client (for example, office, street or airport sounds). 19. Keyword templates - allows you to define keywords at the level of the script. 20. Variables – allows you to define variables and their value types (used only in call scripts). 23. Ignore higher-level keywords - this function allows you to ignore keywords defined at higher levels (above the level of the script) so that only keywords defined at the level of the script and its blocks are used. Platform Keywords - contains a list of keywords that are defined at the level of the Twin platform. Company Keywords - contains a list of keywords that are defined at the company level. 24. New keyword - allows you to define new keywords at the level of the script for the interrupt function to work. |
|

Question block

Description:
This block is used to crate questions for the client.
Conditions for going from this block to another block:
- After the recognition session expires
- Upon receipt of a response from the client
| Описание | Скриншот |
|---|---|
1. ID – уникальный идентификатор блока. 2. Тип блока – отображает тип выбранного блока. Позволяет заменить тип блока на любой другой. 3. Маркер блока – произвольный пользовательский текст, может использоваться в отчетах как маркер посещения (необязателен для заполнения). 4. Вопрос – текст, который будет произнесен роботом, после того, как будет произведен переход в этот блок. 5. Задержка перед отправкой сообщения – период времени, по истечению которого будет произведена отправка сообщения после перехода в этот блок*. 6. Отправить немедленно – позволяет отправить сообщения до полного формирования очереди. 7. Присвоить переменные – дает возможность создать переменные и задать им значения. 8. Прикрепить файлы – позволяет добавить файлы в сценарий 9. Длительность сеанса распознавания – период времени, в течение которого система выполняет распознавание речи абонента во время вызова. Для выбора доступны следующие уровни длительности сеанса распознавания:
Уровни длительности сеанса распознавания речи абонента определяются различными параметрами. Посмотреть значения всех параметров можно в разделе Длительность сеанса распознавания 10. Система распознавания речи – выбор сервиса для распознавания речи
11. Количество переспросов – количество раз, когда робот переспрашивает клиента, если не получает или не может распознать ответ на свой вопрос. Для стабильной работы этой функции нужно добавить фразу или фразы переспроса. 12. Определение эмоций – при выставленной галке, система будет распознавать эмоциональную окраску пользователя и записывать её в переменную {детектор.эмоции} 13. Отключить переспрос – при выставленной галке , система не будет дожидаться ответа от клиента, а переведет его на оператора 14. Отключить возврат на предыдущий блок – при выставленной галке, система не будет пытаться найти ответ на поставленный вопрос через другие блоки типа «Вопрос», которые находятся на той же ветке 15. Использовать ответ пользователя – возможность использовать ответ пользователя, сохраненный в системной переменной 16. Действия – позволяет выбрать одно из вложенных действий***. 17. Фразы с просьбой повторить ответ – текст, который будет озвучен роботом в случае, если не удастся получить ожидаемый ответ клиента**. 18. Файлы с просьбой повторить ответ – возможность импорта фраз с аудиозаписями озвучек из файла. 19. Отключить рандом фраз повтора – при выcтавленной галке фразы повтора определяются в порядке их добавления, а не случайным образом. 20. Добавить запись (Гибридный синтез) – позволяет загрузить с компьютера аудиозапись для озвучки данного блока с помощью гибридного синтеза речи. 21. Выберите тип действия – используется для фиксации и вывода в отчёт момент завершения диалога, в столбец «Результат разговора». 22. Добавить запись – позволяет загрузить с компьютера аудиозапись для озвучки данного блока живым голосом. 23. Записать аудио – Позволяет создать и скачать аудиозапись для озвучки данного блока живым голосом. 24. Игнорировать вышестоящие ключевые слова – эта функция позволяет игнорировать установленные ключевые слова на вышестоящих уровнях, делая актуальными лишь слова, указанные в этом блоке и ниже. 25. Новое ключевое слово – позволяет указать новые ключевые слова для работы функции перебивания. * Задержка в блоках начинает срабатывать лишь после получения первого ответа от пользователя** Если вариантов больше чем одно, то фразы будут произноситься в случайном порядке*** Среди действий есть функция "Поделиться номером". Данный функционал позволяет вывести клиенту кнопку с предварительно заданным текстом, по нажатию на которую клиент может передать в бота свой контактный номер телефона (указанный в профиле). В данный момент данный функционал доступен только для ботов в Telegram, для корректной работы также необходимо чтобы текст на кнопке действия совпадал с текстом на кнопке в исходящей из блока стрелке и должен быть задан тип выходных данных "по умолчанию". |
|


Типы:
| Тип | Описание | Скриншот |
|---|---|---|
| Пользовательское событие | Интеграционный функционал для создания пользовательских событий (не поддерживается). 1. Сообщение на кнопке – текст, который отображается на кнопке клиента. 2. Название события – заголовок пользовательского события. 3. Данные – описание пользовательского события. |
|
| Принудительный переход к блоку | Позволяет переходить к выбранному блоку аналогично работе блока телепорта (не поддерживается). 1. Принудительный переход к блоку – выбранный блок для перехода. |
|
| Прикрепить шаблон WhatsApp | Позволяет прикрепить шаблон для WhatsApp. 1. ID шаблона – уникальный идентификатор полученный от тех. поддержки. 2. Название шаблона – название шаблона, полученное от тех. поддержки. 3. Сообщение на кнопке – текст, который отображается на кнопке клиента. 4. Ссылка на картинку – URL картинки. 5. Добавить переменную – возможность добавить переменную. 6. Тип кнопок – значение типов кнопок. |
|
| Кнопки WhatsApp | Позволяет добавлять кнопки в WhatsApp. 1. Тип кнопок – значения типов кнопок. 2. Header – текст, который отображается в верхней части сообщения. 3. Footer – текст, который отображается в нижней части сообщения. |
|
| Поделиться номером | Позволяет получить номер от клиента через кнопку. 1. Сообщение на кнопке – текст, который отображается на кнопке клиента. |
|


Свойства:
| Описание | Скриншот |
|---|---|
1. Текст стрелки – название стрелки в сценарии. По названию можно быстро найти нужную стрелку и понять ее назначение. 2. Сохранить ответ – позволяет сохранить ответ клиента в какую-либо переменную, чтобы в дальнейшем использовать его в блоках сценария. Если для этого параметра установлен флажок, то в поле Название переменной нужно ввести название используемой переменной. 3. Сохранить всю фразу – параметр определяет способ сохранения ответа. Если параметр используется, то система сохранит ответ клиента полностью. Если параметр не используется, то система сохранит только ключевое слово, по которому осуществляется переход в ветку. 4. Сохранить ответ в системную переменную – позволяет сохранить ответ пользователя, чтобы в дальнейшем использовать его в одном из блоков (или нескольких блоках) Вопрос. Это особенно удобно при переходе диалога из одного сценария в другой, чтобы не задавать пользователю вопрос, ответ на который был получен ранее. 5. Тип выходных данных – этот параметр должен быть заполнен для каждой стрелки принятия решения. Он определяет тип условия, при выполнении которого система понимает, что диалог должен развиваться в направлении, которое указано с помощью этой стрелки. 6. Варианты ответа* – с помощью этого параметра можно отображать клиенту возможные варианты ответа в виде кнопок. Если клиент нажмёт на такую кнопку, то диалог пойдет в направлении, которое указано с помощью стрелки, которая связана с выбранной кнопкой. В некоторых случаях клиенту удобнее использовать кнопки чем писать ответ. 7. Порядковый номер кнопки* – если существует несколько ответов на вопрос, то кнопок будет несколько. Этот параметр позволяет определить порядок отображения кнопок (первая, вторая, третья и т. д.). Отсчёт ведётся от 0. Если вы не укажите порядок отображения кнопок, то система разместит их в произвольном порядке. * Данный пункт используется только для чатов |
|

Для корректного отображения текста кнопки в Facebook, рекомендуется в поле Вариант ответа размещать текст не более 20-ти символов
Типы:
| Тип | Описание | Скриншот |
|---|---|---|
| Ветка по умолчанию | Данный тип используется для перехода, если система не найдет озвученный ответ во всех остальных стрелках данного блока. 1. Максимальный вес ветки – указывается для определения точности ответа в рамках NLU. 2. Вариант ответа – наименование кнопки ответа (см. описание в свойствах стрелки). 3. Порядковый номер кнопки – определяет порядок отображения кнопки (см. описание в свойствах стрелки). |
|
| Ключевые слова | Переход по ветке будет произведен, если ответ пользователя совпадет с ключевым словом. 1. Ключевые слова – слова или выражения, которые система ожидает от пользователя для перехода по ветке Ключевые слова вводятся через пробел. Выражения вводятся с использованием кавычек, например "уже на месте" Так же, можно использовать абстрактное слово NEAR в выражении, которое будет значиться любым словом, например: "я NEAR не пойду", где NEAR - может быть любым словом: никуда, никогда, сейчас, завтра и т.д. В системе предусмотрена система весов, когда явный ответ "да" от человека, не всегда может означать признание, например: фраза Да, я вас отчетливо слышу, я не пойду на обед. В данном ответе мы видим слово "да" и предлог "не", который по смыслу является приоритетней и в общей концепции ответа является отрицанием: фраза я не пойду на обед. Таким образом, при расстановке ключевых слов и выражений, будет более явно добавить вес к отрицательным словам: +++не В обратной ситуации мы можем наоборот, понижать вес, используя знак минус: -да 2. Словари – возможность использования заранее подготовленного набора ключевых слов* 3. Вариант ответа – наименование кнопки ответа (см. описание в свойствах стрелки). 4. Порядковый номер кнопки – Определяет порядок отображения кнопки (см. описание в свойствах стрелки). Важно Рекомендуется использовать не более 100 ключевых слов в ветке, для большего количества ключевых фраз мы рекомендуем использовать ветку "интеллектуальное принятие решений" в связке с НЛУ * Словари задаются в стартовом блоке в пункте 21 |
|
| Дата/Время/Дата и время | Переход по ветке будет произведен, если озвученная пользователем дата совпадет с указанной датой в свойстве стрелки. 1. Значение должно быть – условие проверки значения Например, для согласования даты доставки товара, можно сделать проверку на то, что дата должна быть больше текущей, чтобы избежать ситуации, когда доставка будет оформлена на прошедший день. Если необходимо пользовательское значение даты для сравнения, то дата задается в формате: YYYY-MM-DD (без времени) YYYY-MM-DD HH:MM:SS (дата и время) 2. Значение – ответ, который система ожидает от клиента Система знает и умеет работать с датами и относительными датами. Пример ответов пользователя, которые система сможет распознать:
Если в дате явно не указан год, берется текущий Форматы записи ответа в переменную:
Так же данный тип пытается найти время. Возможные варианты:
Если клиент явно не указывает время, берется текущее Формат записи в переменную: H:i 3. Вариант ответа – наименование кнопки ответа (см. описание в свойствах стрелки). 4. Порядковый номер кнопки – определяет порядок отображения кнопки (см. описание в свойствах стрелки). |
|
| Число | Переход по ветке будет произведен, если озвученное пользователем число совпадет с указанным числом в свойстве стрелки. 1. Значение должно быть – Условие проверки значения Например, при проведения соц. опроса, система может задать вопрос: "Скажите, сколько вам лет?" и благодаря условиям можно задать различные вопросы разным возрастным группам. Сравнение происходит по правилам: {РАСПОЗНАННОЕ} {ОПЕРАТОР} {СРАВНИВАЕМОЕ} Где
2. Значение – ответ, который система ожидает от клиента 3. Вариант ответа – наименование кнопки ответа (см. описание в свойствах стрелки). 4. Порядковый номер кнопки – определяет порядок отображения кнопки (см. описание в свойствах стрелки). 5. Интеллектуальное определение – с помощью этого параметра робот распознает числа в ответах клиентов, как во время обзвонов, когда клиент произносит число голосом, так и при переписке, когда клиент вместо числа пишет слово (например, вместо «18» пишет «восемнадцать»). Если для этого параметра установлен флажок, то робот распознает число во всех указанных случаях. * Может содержать в себе переменные заключенные в фигурные скобки, которые могут быть переданы при постановке задания. |
|
| Большое число | Переход по ветке будет произведен, если количество озвученных символов в номере, совпадет с указанным количеством символов в свойстве стрелки. 1. Значение должно быть – условие проверки значения 2. Маска для большого числа – Маска ожидаемого ввода Например, для паспорта мы можем задать маску вида #### ######, где каждый символ # - это цифра 3. Пользователю дается одна попытка – В случае, если система не распознала ответ или ответ от пользователя не совпадает с указанным, то система не будет предпринимать попытки повторного опроса 4. Значение – значение, которое система будет ожидать от пользователя В случае если человек при разговоре назовет число которое не будет подходить под указанное значение, то система будет просить пользователя ввести необходимые цифры до тех пор, пока они точно не совпадут с указанным вариантом в сценарии. 5. Вариант ответа – наименование кнопки ответа (см. описание в свойствах стрелки). 6. Порядковый номер кнопки – определяет порядок отображения кнопки (см. описание в свойствах стрелки). 7. Интеллектуальное определение – с помощью этого параметра робот распознает числа в ответах клиентов, как во время обзвонов, когда клиент произносит число голосом, так и при переписке, когда клиент вместо числа пишет слово (например, вместо «18» пишет «восемнадцать»). Если для этого параметра установлен флажок, то робот распознает число во всех указанных случаях. |
|
| Интеллектуальное принятие решений | Переход по ветке будет произведен, если указанное в свойствах намерение совпадет с озвученным намерением клиента* 1. Агент – выбор агента 2. Приоритет ветки – возможность выставить более высокий приоритет, чем для ветки с ключевым словом. 3. Добавить намерение – намерения, которые система ожидает от пользователя. 4. Сущности – создание переменных, в которые могут быть записаны данные, которые были выяснены системой во время диалога 5. Вариант ответа – наименование кнопки ответа (см. описание в свойствах стрелки). 6. Порядковый номер кнопки – Определяет порядок отображения кнопки (см. описание в свойствах стрелки). * Для работы с данным типом, нужно иметь подключение к Twin.ai и необходим обученный агент. Подробнее об этом вы можете прочитать здесь |
|
| Номер телефона | Переход по ветке будет произведен, если количество озвученных символов будет соответствовать ожидаемому количеству цифр в номере телефона*. 1. Значение должно быть – условие проверки значения 2. Значение – значение, которое система будет ожидать от пользователя В случае если человек при разговоре назовет число которое не будет подходить под указанное значение, то система будет просить пользователя ввести необходимые цифры до тех пор, пока они точно не совпадут с указанным вариантом в сценарии. 3. Вариант ответа – наименование кнопки ответа (см. описание в свойствах стрелки). 4. Порядковый номер кнопки – определяет порядок отображения кнопки (см. описание в свойствах стрелки). * Параметр Номер телефона позволяет отслеживать как мобильные, так и городские номера. На текущий момент данная функция работает только с номерами российских операторов связи.Номер телефона должен содержать не более 11 цифр. В противном случае робот не сможет его распознать.При вводе мобильного номера код страны указывать необязательно.При вводе городского номера нужно указывать код страны и код города (например, 7 и 812). |
|
| Ошибка определения номера телефона | Переход по ветке будет произведен, если озвученный клиентом номер телефона будет недействующим. 1. Вариант ответа – наименование кнопки ответа (см. описание в свойствах стрелки). 2. Порядковый номер кнопки – определяет порядок отображения кнопки (см. описание в свойствах стрелки). |
|
| Сигнал DTMF | Эту функцию удобно использовать в голосовых меню. Система позволяет отслеживать нажатие клиентом кнопок в диапазоне от 0 до 9, а также кнопок с символами * и #. В зависимости о того, на какую кнопку нажмет клиент, система перейдет по соответствующей стрелке (например, робот говорит клиенту: «Для создания нового заказа нажмите кнопку 1. Для перехода к работе с текущим заказом нажмите кнопку 2. Для завершения разговора нажмите кнопку 3»). 1. Сигнал – символ, необходимый для перехода по ветке. 2. Вариант ответа – наименование кнопки ответа (см. описание в свойствах стрелки). 3. Порядковый номер кнопки – определяет порядок отображения кнопки (см. описание в свойствах стрелки). |
|


Блок «Пауза»

Описание:
Данный блок переводит систему в режим ожидания ответа.
Условия выхода:
- По истечении заданного времени
- По факту получения ответа от клиента
| Описание | Скриншот |
|---|---|
1. ID – уникальный идентификатор блока. 2. Тип блока – отображает тип выбранного блока. Позволяет заменить тип блока на любой другой. 3. Маркер блока – произвольный пользовательский текст, может использоваться в отчетах как маркер посещения (необязателен для заполнения) 4. Текст – текст, который будет произнесен роботом, после того, как будет произведен переход в этот блок. 5. Отправить немедленно – позволяет отправить сообщения до полного формирования очереди. 6. Задержка перед отправкой сообщения – период времени, по истечению которого будет произведена отправка сообщения после перехода в этот блок*. 7. Максимальное время ожидания до повтора – Время, через которое будет произнесен текст из секции «Текст повтора» (см. пункт № 6) 8. Максимальное время ожидания ответа собеседника – Время, по истечении которого, звонок будет переведен на оператора 9. Текст повтора – варианты повтора, которые будут озвучены системой по истечении времени ожидания** 10. Добавить запись (Гибридный синтез) – позволяет загрузить с компьютера аудиозапись для озвучки данного блока с помощью гибридного синтеза речи. 11. Выберите тип действия – возможность зафиксировать результат для отчета 12. Добавить запись – позволяет загрузить с компьютера аудиозапись для озвучки данного блока живым голосом. 13. Записать аудио – позволяет создать и скачать аудиозапись для озвучки данного блока живым голосом. 14. Игнорировать вышестоящие ключевые слова – эта функция позволяет игнорировать установленные ключевые слова на вышестоящих уровнях, делая актуальными лишь слова, указанные в этом блоке и ниже. 15. Новое ключевое слово – позволяет указать новые ключевые слова для работы функции перебивания. * Задержка в блоках начинает срабатывать лишь после получения первого ответа от пользователя** Если вариантов больше чем одно, то фразы будут произноситься в случайном порядке |
|


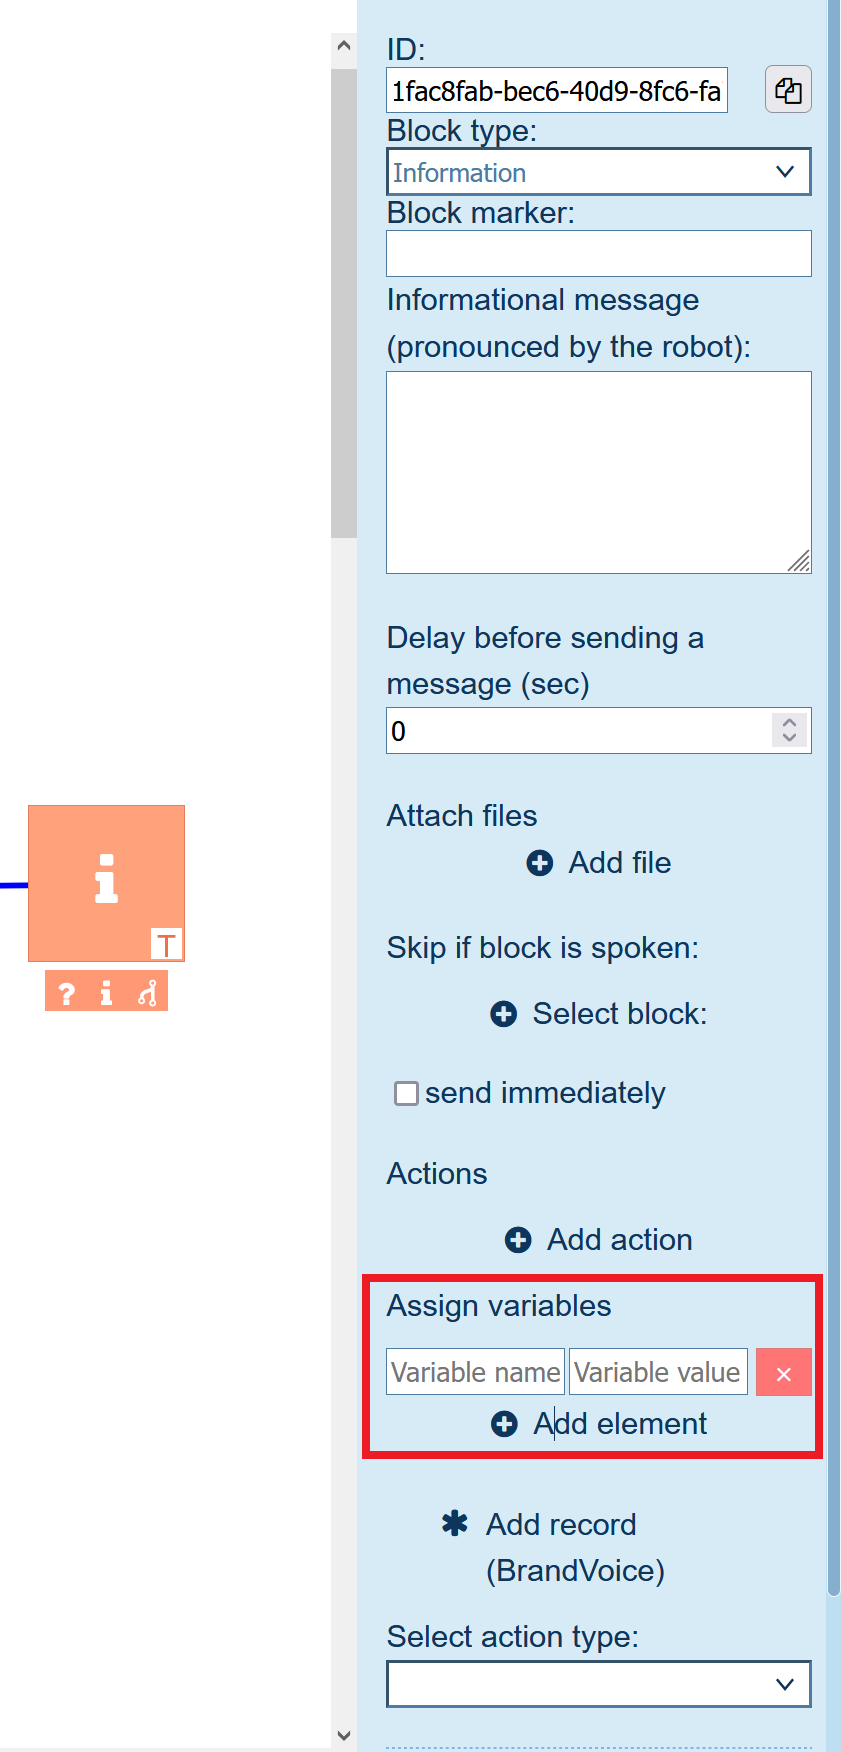
Блок «Информация»

Описание:
Данный блок используется для произнесения сообщения клиенту.
Условия выхода:
- После озвученного сообщения системой
- Пропуск блока
| Описание | Скриншот |
|---|---|
1. ID – уникальный идентификатор блока. 2. Тип блока – отображает тип выбранного блока. Позволяет заменить тип блока на любой другой. 3. Маркер блока – произвольный пользовательский текст, может использоваться в отчетах как маркер посещения (необязателен для заполнения) 4. Информационное сообщение – текст, который будет произнесен роботом, после того, как будет произведен переход в этот блок. 5. Задержка перед отправкой сообщения – период времени, по истечению которого будет произведена отправка сообщения после перехода в этот блок*. 6. Прикрепить файлы – позволяет добавить файлы в сценарий 7. Пропустить блок, если произнесен блок – система пропустит текущий блок, если она озвучит информационный блок, который будет выбран в данном пункте** 8. Отправить немедленно – позволяет отправить сообщения до полного формирования очереди. Например в сценарии идет цепочка из 3 блоков информации, блока запроса к серверу и еще 2 блоков информации. И сообщения уйдут лишь после обработки блока запроса к серверу. 9. Действия – позволяет выбрать одно из вложенных действий. 10. Добавить элемент – дает возможность создать переменные и задать им значения. 11. Добавить запись (Гибридный синтез) – позволяет загрузить с компьютера аудиозапись для озвучки данного блока с помощью гибридного синтеза речи. 12. Выберите тип действия – возможность зафиксировать результат для отчета 13. Добавить запись – позволяет загрузить с компьютера аудиозапись для озвучки данного блока живым голосом. 14. Записать аудио – позволяет создать и скачать аудиозапись для озвучки данного блока живым голосом. * Задержка в блоках начинает срабатывать лишь после получения первого ответа от пользователя** Выбрать возможно только блок типа «Информация» |
|


Блок «Условие»

Описание:
Данный блок позволяет определить направление сценария на основании состояния диалога.
| Описание | Скриншот |
|---|---|
1. ID – уникальный идентификатор блока. 2. Тип блока – отображает тип выбранного блока. Позволяет заменить тип блока на любой другой. 3. Маркер блока – произвольный пользовательский текст, может использоваться в отчетах как маркер посещения (необязателен для заполнения) |
|

Свойства:
| Описание | Скриншот |
|---|---|
1. Текст стрелки – вспомогательный текст, который позволяет создателю сценария ориентироваться в связях. 2. Тип – способ принятия решения. |
|

Типы:
| Тип | Описание | Скиншот |
|---|---|---|
| По умолчанию | Данный тип используется для перехода по ветке, в случае, если условия во всех остальных стрелках данного блока не будут соблюдены. |
|
| Условие И / ИЛИ | Переход по ветке будет произведен, если заданное условие будет выполнено. 1. Загрузить файл – возможность импорта условий и переменных из файла. 2. Условия – набор условий, по которым принимается решение.
Логические операторы: 3. Присвоить переменные при выборе ветки - служит для установки значений переменным. В левое поле записывается название переменной без фигурных скобок В правое поле записывается значение, которое мы хотим присвоить переменной* * Допускается использование переменных, которые будут заменены на их значение в момент присваивания |
|
|


Примеры использования условий "*" и "**"
Разберем на примере сравнения переменной {answer} (записываемой как ответ пользователя) с заданным значением
Если задано условие {answer} * как дела
то при получении фраз:
"привет как дела" - условие будет выполнено, т.к. фраза содержит искомый фрагмент "как дела"
"как ваши дела" - условие не будет выполнено, т.к. фраза содержит только часть искомого фрагмента "как дела"
"как дела у Алексея Петровича?" - условие будет выполнено, т.к. фраза содержит искомый фрагмент "как дела"
"как добраться до аптеки" - условие не будет выполнено, т.к. фраза содержит только часть искомого фрагмента "как дела"
Если задано условие Если задано условие {answer} ** привет как дела
то при получении фраз:
"привет как дела" - условие будет выполнено, т.к. фраза совпадает с фразой условия "привет как дела"
"привет, как ваши дела" - условие не будет выполнено, т.к. фраза не совпадает с фразой условия "привет как дела"
"как дела у Алексея Петровича?" - условие не будет выполнено, т.к. фраза не совпадает с фразой условия "привет как дела"
"привет как дела, Василий" - условие не будет выполнено, т.к. фраза не совпадает с фразой условия "привет как дела"
Операция "*"
В секции "Условия", для правого поля возможно использовать операцию "*"
Данная операция используется для определения текста по маске, где * это любое количество букв или цифр.
Например:
если условие будет иметь вид имя = *на, то под условие будут попадать имена Анна, Карина, Марина и т.д.
или условие ответ ** * как дела, то под условие будут попадать любые фразы где перед "как дела" содержится иной текст или не содержится ничего ("Василий, как дела", "Здравствуйте, Игорь Петрович, как дела", "как дела")
Вес решения
Если есть две ветки которые удовлетворяют переходу, то будет выбрана та ветка, у которой количество совпавших условий больше. В случае равенства совпавших условий, приоритет будет отдан ветке с типом "Условие И", т.к. оно более строгое
Для корректной работы блока необходимо чтобы не было двух и более веток с идентичными условиями
Следует избегать ситуаций соответствия в ветках более чем 2м условиям одновременно
Блок «Случайный выбор»

Описание:
Данный блок предназначен для вариативности диалога. Система в случайном порядке выполняет переход по стрелкам, которые выходят из блока.
| Описание | Скриншот |
|---|---|
1. ID – уникальный идентификатор блока. 2. Тип блока – отображает тип выбранного блока. Позволяет заменить тип блока на любой другой. 3. Маркер блока – произвольный пользовательский текст, может использоваться в отчетах как маркер посещения (необязателен для заполнения). 4. Описание фиксации – произвольный пользовательский текст, который может использоваться для описания работы блока. Также благодаря этому тексту можно удобно найти нужный блок с помощью сочетаний клавиш ctrl+F. |
|

Блок «Эмоции»

Описание:
Данный блок позволяет определить направление сценария на основании эмоции клиента.
| Описание | Скриншот |
|---|---|
1. ID – уникальный идентификатор блока. 2. Тип блока – отображает тип выбранного блока. Позволяет заменить тип блока на любой другой. 3. Маркер блока – произвольный пользовательский текст, может использоваться в отчетах как маркер посещения (необязателен для заполнения). |
|

Свойства:
| Описание | Скриншот |
|---|---|
1. Текст стрелки – вспомогательный текст, который позволяет создателю сценария ориентироваться в связях. 2. Тип эмоций – выбор эмоции, которую система будет ожидать для переход по ветке. |
|

Типы:
| Тип | Описание |
|---|---|
| Позитивная | Переход по стрелке будет происходить в случае, если переменная {детектор.эмоции} имеет значение positive |
| Негативная | Переход по стрелке будет происходить в случае, если переменная {детектор.эмоции} имеет значение negative |
| Нейтральная | Переход по стрелке будет происходить в случае, если переменная {детектор.эмоции} имеет значение neutral |
Result block

Description:
This block is intended for saving the result of the conversation, as well as for forced transfer to the operator, sending a message and/or notification.
| Description | Image |
|---|---|
1. ID - a unique block identifier. 2. Block type - displays the type of the selected block. You can change the type of any block in the script. 3. Block marker - custom text that can be used in reports as a marker (optional). 4. Fixation description (not pronounced by the robot) – custom text that can be used to describe the operation of the block. Using this text you can quickly find the necessary block running the search with CTRL+F keyboard shortcuts. 5. Assign variables – allows you to change the value of any variable or create a new variable. 6. Select action type – selects an action for the bot to perform. |
|

Types:
| Type | Description | Image |
|---|---|---|
| No action | The robot does not do anything, and proceeds to the next block (provided there is one). |
|
| Sending email | The robot sends an email. 1. Recipient email - email address of the recipient. 2. Email header - contains the subject of the message. 3. Send transcription - attaches a transcript of a conversation between the robot and the client in the message body. 4. Message text – contains text of the message. |
|
| Sending notification | The robot sends a notification to the client. 1. Select a notification template - a template that will be used by the system to send a notification. 2. Shorten links - short forms of links are used in the message text. 3. Recipient's phone number - the phone number of the recipient of the notification. |
|
Тестирование сообщений If you plan to send the result of the conversation to yourself, then it is better to send it via email because it is free. | ||
Commit the result | Saves conversation to a report. 1. Date - a field where you can enter a date for uploading conversation to a report.* 2. Rate - a field in where you can enter a rate for uploading conversation to the report. * 3. NPS - arbitrary information. As a result, it will be displayed in the NPS column of the report . 4. Confirmation - a field where yypu can enter data for upload to the report.* * Optional field |
|
Sending DTMF signals | Functionality that is used to bypass the IVR menu. 1. Signals - characters from 0 to 9, * and #, used to send a signal to the robot to go to the desired branch of the IVR menu. |
|
| Riderect to operator | The robot can transfer a client to an operator or switch to a different script. 1. Redirect action (Outgoing calls) - robot ends the call. 2. Redirect action (Incoming calls) – a set of actions that the system uses to forward an incomming call. 3. Text accompaniment - this text will be displayed to a client and operator when the system transfers the dialogue with this client to the operator. 4. Operator group - allows you to transfer dialogs with your clients to different departments of your company or different specialists (for example, to the sales department, accounting, technical support). |
|
1. Redirect action (Outgoing calls) - the call will be transferred to the operator. 2. Redirect action (Incoming calls) – a set of actions that the system uses to forward an incomming call. 3. Text accompaniment - this text will be displayed to a client and operator when the system transfers the dialogue with this client to the operator. 4. Operator group - allows you to transfer dialogs with your clients to different departments of your company or different specialists (for example, to the sales department, accounting, technical support). |
| |
1. Redirect action (Outgoing calls) - uses the forwarding settings from the call task. 2. Redirect action (Incoming calls) – a set of actions that the system uses to forward an incomming call. 3. Text accompaniment - this text will be displayed to a client and operator when the system transfers the dialogue with this client to the operator. 4. Operator group - allows you to transfer dialogs with your clients to different departments of your company or different specialists (for example, to the sales department, accounting, technical support). |
| |
1. Redirect action (Outgoing calls) - the dialing plan that the system will use to forward the call.* 2. Redirect action (Incoming calls) – select a dialing plan from the dropdown list. 3. Enter phone number – phone number to which you want to forward calls. 4. Redirect action (Incoming calls) – a set of actions that the system uses to forward an incomming call. 5. Text accompaniment - this text will be displayed to a client and operator when the system transfers the dialogue with this client to the operator. 6. Operator group - allows you to transfer dialogs with your clients to different departments of your company or different specialists (for example, to the sales department, accounting, technical support). * The dialing plan is created in the "Telephony" section |
| |
1. Redirect action (Outgoing calls) - uses the call forwarding settings from the translation plan.* 2. Redirect action (Outgoing calls) - drop-down list with call forwarding directions. 3. Redirect action (Incoming calls) – a set of actions that the system uses to forward an incomming call (similar to ougoing calls). 4. Text accompaniment - this text will be displayed to a client and operator when the system transfers the dialogue with this client to the operator. 5. Operator group - allows you to transfer dialogs with your clients to different departments of your company or different specialists (for example, to the sales department, accounting, technical support). * The dialing plan is created in the "Telephony" section |
| |
1. Redirect action (Outgoing calls) - transfers calls to the specified number. 2. Number - phone number to which calls are transferred. 3. Accompanying headers – header text used in transfers. 4. Redirect action (Incoming calls) – a set of actions that the system uses to forward an incomming call (similar to ougoing calls). 5. Text accompaniment - this text will be displayed to a client and operator when the system transfers the dialogue with this client to the operator. 5. Operator group - allows you to transfer dialogs with your clients to different departments of your company or different specialists (for example, to the sales department, accounting, technical support). |
| |
1. Redirect action (Outgoing calls) - switches to the selected script. 2. Redirect action (Outgoing calls) - selects the script. 3. Redirect action (Incoming calls) – a set of actions that the system uses to forward an incomming call (similar to ougoing calls). 4. Text accompaniment - this text will be displayed to a client and operator when the system transfers the dialogue with this client to the operator. 5. Operator group - allows you to transfer dialogs with your clients to different departments of your company or different specialists (for example, to the sales department, accounting, technical support). |
| |
| Call back | 1. Date and time for call back - creates a new call task for a specific time. This field uses a variable of the Date type, which is declared in the start block. |
|
| Идентификация клиента | The robot will send the client ID to the selected client. 1. Recipient's phone number – the phone number of the client. 2. Recipient's email - the client's email address. 3. Client ID - a value that allows you to identify the client. This can be a phone number, email or ID. |
|
| Arbitrary result | It is used to save your own variables. 1. Add element - allows you to create variables and assign values to them. |
|
| Cancel recall | Cancels recall. |
|


Web-request block

Description:
This block allows the robot to interact with an external or internal CRM system during a dialogue with the user and exchange information about the client via the API. The robot can interact with the CRM system to search for and obtain information about the client (place of residence, residential address, profession) and save new information about the client (for example, pets, hobbies, interests, etc. .) that it receives during the dialogue. This block also allows the robot to use network services that are available through the API (for example, a calculator, unit converter, weather forecast, program guide, etc.).
Example:
There is an incoming call from a client. The robot identifies the phone number and answers the call. Using the Web-request block, the robot accesses the corporate CRM system, which stores client data, complete information on the entire range of products, as well as information on all orders. Using the client's phone number, the robot receives information about the client and realizes that the client has an active order. The robot addresses the client by name and before the client starts to speak, the robot asks whether the client wants to know the status of their order. After an affirmative answer, the robot provides information about the current status of the order.
For more nformation on how the Web-request block works, it is recommended to read about the syntax of the JSON format.
| Description | Image |
|---|---|
1. ID - a unique block identifier. 2. Block type - displays the type of the selected block. You can change the type of any block in the script. 3. Block marker - a custom text that can be used in reports as a marker (optional). 4. Message asking you to wait - a text asking you to wait, that will be voiced by the robot. This text can be used to fill in a pause during which the system makes a request to the API of a third-party service or CRM system. 5. Send immediately - allows you to send messages before the queue is formed completely . 6. Delay before sending a message - the period of time after which the message will be sent after the bot switches to this block*. 7. Add record (BrandVoice) - allows you to upload an audio file from your computer and use it in hybrid speech synthesis. 8. How often to say still wait (in sec) - the period of time after which the robot will repeat the message (see step 4) until it receives a response from the server. 9. Message asking you to wait a little longer - a phrase asking you to wait, which will be voiced by the robot until it receives a response from a third-party service or CRM system. 10. Callback URL - the URL of the page that the robot will open after the request is complete. This parameter is optional. You can use it for notification that the request is complete (for example, to display a page with a standard phrase or an image). 11. Authorization type – type of user authorization for access to data on the server. Possible values for this parameter are described below. 12. Select request type – type of request to the server. Possible values for this parameter are described below. 13. URL - the address of the page that the robot works with. It contains query parameters and variables. In the address bar, you can specify a variable that the bot will use to transfer information to the service that it accesses. 14. Cookie - when sending requests to certain methods, you may need to pass a cookie. The required value is contained in the response, that you get after you send a request to the method for the first time. 15. Add element - when sending requests to certain methods, you may also need to pass headers. The required header values are contained in the response, that you get after you send a request to these methods for the first time. 16. Forced asynchronous mode - the ability of the bot to continue the dialogue with a client while it sends a request to the server. * Delay in blocks starts to work only after the bot receives the first response from the client |
|

Types of requests:
| Тип | Description | Скриншот |
|---|---|---|
| GET | Used to receive data from the server. With this type of request, you can get information about an order, product, user, etc. 1. URL - the address of the page the robot works with. 2. Cookie - cookie value (if required by a third-party service). 3. Add element - adds the header value (if required by a third-party service). 4. Forced asynchronous mode - enables the bot to continue the dialogue with the client while it sends requests to the server. |
|
| POST | Used to send data to the server. With this type of request, you can save information about orders, add products, update user data, and so on. 1. URL - the address of the page the robot works with. 2. Cookie - cookie value (if required by a third-party service). 3. Add element - adds the header value (if required by a third-party service). 4. Forced asynchronous mode - enables the bot to continue the dialogue with the client while it sends requests to the server. 5. Select the content type - type of content to be used in the request. Possible values:
{
"first_name" : "John"
}
6. Add element - allows you to set the order in which you define a key and its value. For example: if you need to send data in the request body, then you need to enter the first_name key in the left field, and its value John in the right field. 7. Variable name with attachments - allows you to send an attached file in the request. |
|
| Delete | Used to delete data on the server. The request requires the ID of the resource. Using this type of request, you can delete information about orders, products, etc. 1. URL - the address of the page the robot works with. 2. Cookie - cookie value (if required by a third-party service). 3. Add element - adds the header value (if required by a third-party service). 4. Forced asynchronous mode - enables the bot to continue the dialogue with the client while it sends requests to the server. |
|
| Put | Used to update data on the server. The request requires the ID of the resource. Using this type of request, you can save information about orders, create new products, update user data, etc. 1. URL - the address of the page the robot works with. 2. Cookie - cookie value (if required by a third-party service). 3. Add element - adds the header value (if required by a third-party service). 4. Forced asynchronous mode - enables the bot to continue the dialogue with the client while it sends requests to the server. 5. Select the content type - type of content to be used in the request. Possible values:
6. Add element - allows you to set the order in which you define a key and its value. For example: if you need to send data in the request body, then you need to enter the first_name key in the left field, and its value John in the right field. {
"first_name" : "John"
}
7. Variable name with attachments - allows you to send an attached file in the request. |
|


Types of authorization:
| Тип | Description | Скриншот |
|---|---|---|
| None | This type is used if authorization is not required to work with the page (for example, if the service is located in a secure zone). 1. Select request type - one of the request types described above. 2. URL - the address of the page the robot works with. 3. Cookie - cookie value (if required by a third-party service). 4. Add element - adds the header value (if required by a third-party service). 5. Forced asynchronous mode - enables the bot to continue the dialogue with the client while it sends requests to the server. |
|
Login/Password | This type is used if you need to perform authorization by login and password to work with the page. 1. User name - login. 2. Password - password. 3. Select request type - one of the request types described above. 4. URL - the address of the page the robot works with. 5. Cookie - cookie value (if required by a third-party service). 6. Add element - adds the header value (if required by a third-party service). 7. Forced asynchronous mode - enables the bot to continue the dialogue with the client while it sends requests to the server. |
|
| Header | This type is used if you need to use a header to work with the page. In this case, you need: 1. Authorization type - the authorization scheme that the robot will use to work with the page. 2. Key value - the name of the key. 3. Select request type - one of the request types described above. 4. URL - the address of the page the robot works with. 5. Cookie - cookie value (if required by a third-party service). 6. Add element - adds the header value (if required by a third-party service). 7. Forced asynchronous mode - enables the bot to continue the dialogue with the client while it sends requests to the server. |
|


Properties:
| Description | Image |
|---|---|
1. Arrow text - additional text that helps you navigate the script. 2. Type - the type of decision making. The transition to the next block of the script is performed according to the result of a request (successful or not successful) or by default. |
|

Types:
| Type | Description | Скриншот | |
|---|---|---|---|
| By default | This type is used to go in the direction that the arrow shows, if conditions defined in other arrows of this block are not met. |
| |
| Result | Success | The robot will go in the direction that the arrow shows if the response code from the server matches the one specified in the properties of the arrow, and if the defined conditions are met. The result of the response from the server is stored in the result variable. 1. Success of request - determines the success of the request. 2. Upload file – allows you to import conditions and variables from a file. 3. Response code - the code that the system expects to receive after the request is complete.* 4. Conditions - a set of conditions used to make a decision. 5. Add element – creates a variable that will store the value contained in the response from the server For example, we receive the following response: {
"success": true,
"data": {
"booking_days": {
"6": [
2,
3,
4,
5,
6,
7,
8,
9,
10,
11,
12,
13,
14,
15,
16,
17,
18,
19,
20,
21,
22,
23,
24,
25,
26,
27,
28,
29,
30
],
"7": [
1,
2,
3,
4
]
},
"booking_dates": [
"2022-06-02",
"2022-06-03",
"2022-06-04",
"2022-06-05",
"2022-06-06",
"2022-06-07",
"2022-06-08",
"2022-06-09",
"2022-06-10",
"2022-06-11",
"2022-06-12",
"2022-06-13",
"2022-06-14",
"2022-06-15",
"2022-06-16",
"2022-06-17",
"2022-06-18",
"2022-06-19",
"2022-06-20",
"2022-06-21",
"2022-06-22",
"2022-06-23",
"2022-06-24",
"2022-06-25",
"2022-06-26",
"2022-06-27",
"2022-06-28",
"2022-06-29",
"2022-06-30",
"2022-07-01",
"2022-07-02",
"2022-07-03",
"2022-07-04"
],
"working_days": {
"6": [
2,
3,
4,
5,
6,
7,
8,
9,
10,
11,
12,
13,
14,
15,
16,
17,
18,
19,
20,
21,
22,
23,
24,
25,
26,
27,
28,
29,
30
],
"7": [
1,
2,
3
]
},
"working_dates": [
"2022-06-02",
"2022-06-03",
"2022-06-04",
"2022-06-05",
"2022-06-06",
"2022-06-07",
"2022-06-08",
"2022-06-09",
"2022-06-10",
"2022-06-11",
"2022-06-12",
"2022-06-13",
"2022-06-14",
"2022-06-15",
"2022-06-16",
"2022-06-17",
"2022-06-18",
"2022-06-19",
"2022-06-20",
"2022-06-21",
"2022-06-22",
"2022-06-23",
"2022-06-24",
"2022-06-25",
"2022-06-26",
"2022-06-27",
"2022-06-28",
"2022-06-29",
"2022-06-30",
"2022-07-01",
"2022-07-02",
"2022-07-03"
]
},
"meta": []
}
To store the 2nd array element 6 (value 3) from the Where:
To store the 3rd array element 7 (value 3) from the Where:
To store the 2nd array element from the Where:
|
|
| Failed | The robot will go in the direction that the arrow shows if the response from the server is not received. |
| |


Arithmetic block

Description:
This block is used to perform arithmetic operations with numbers and variables.
Types:
| Description | Скриншот |
|---|---|
1. ID - a unique block identifier. 2. Block type - displays the type of the selected block. You can change the type of any block in the script. 3. Block marker - a custom text that can be used in reports as a marker (optional). 4. Type – defines the type of arithmetic operation block. 5. Add operation – buttons for adding arithmetic operations to the working area where you create an arithmetic expression* 6. Add variable – adds a variable to the working area 7. Save result to variable – saves calculation results to the spevified variable (required field). |
|
1. Offset from date – allows you to define an offset from the specified date. The offset is specified in seconds. You can add and subtract dates. 2. Save the result to a variable – allows you to save the date with the specified offset into a variable in the following format "YYYY-MM-DD HH:MM:SS". |
|
1. AST expression (only for experienced users) - allows you to enter an ATS expression. 2. BPL expression - allows you to enter a BPL expression that you can convert to an AST expression. В конце каждой строчки данного блока необходимо ставить символ ";". At the end of each line of this block, you must enter the ";" symbol . 3. Convert BPL to AST – converts BPL expression to AST expression. BPL expressions work only with widgets, instant messengers and incoming calls. |
|


*In addition to simple arithmetic expressions, you can use enable rounding the calculation results. For this, you need to specify the expression in the follwoing form: math.round({var},2), where {var} is a variable, number or arithmetic expression and 2 is the rounding accuracy (number of simbols after ф comma).
Examples:
math.round(1/3,2) defines the following: 1 will be divided by 3 and the result will be written with accuracy of 2 symbols after a comma - 0.33.
math.round(1.6666666,0) defines the following: 1.6666666 will be rounded to an integer - 2.
Important!
One block supports one arithmetic expression per line. If sequential calculations are required, then you need to use multiple blocks.
A block must always have one incoming and one outgoing arrow.
Ordinal choice block

Description:
This block is used to sequentially navigate branches that come from this block within one session.
Example: on the first visit to the ordinal choice block, a bot is transferred to branch with number "1". On the next visit to this block, the bot is transferred to branch with number 2, and etc.
| Description | Image |
|---|---|
1. ID - a unique block identifier. 2. Block type - displays the type of the selected block. You can change the type of any block in the script. 3. Block marker - a custom text that can be used in reports as a marker (optional). |
|

| Description | Image |
|---|---|
1. Arrow text is a custom user-defined block of text that can be used to describe the purpose of the arrow. You can quickly find this text in the script using the CTRL+ F keyboard shortcuts. 2. Output data type – type of data stored in a variable. This parameters is necessary only for voice calls. 2. Sequence number - the number of block visits on the basis of which the bot selects a branch. |
|

Testing messages
Arrows must be numbered beginning with "1". If there is no arrow with the number of the current block visit then the bot will be transferred to the operator.
Portal block

Description:
The Portal block is used for the same purpose as an arrow. It connects blocks in a script.
| Description | Скриншот |
|---|---|
1. ID - a unique block identifier. 2. Block type - displays the type of the selected block. You can change the type of any block in the script. 3. Block marker - a custom text that can be used in reports as a marker (optional). 4. Teleport note - custom user-defined text that can be used to describe the purpose of the block. You can quickly find this text in the script using the CTRL+ F keyboard shortcuts. 5. Send to block - block to which the bot will be sent. |
|

Empty block

Description:
The empty block is used to create more structured block designs. You can also draw more than one arrow from this block to other blocks in the script .
| Description | Image |
|---|---|
1. ID - a unique block identifier. 2. Block type - displays the type of the selected block. You can change the type of any block in the script. 3. Block marker - a custom text that can be used in reports as a marker (optional). |
|

AI block

Description:
The AI block is used for integrations with third-party neural networks.
| Description | Image |
|---|---|
1. ID - a unique block identifier. 2. Block type - displays the type of the selected block. You can change the type of any block in the script. 3. Block marker - a custom text that can be used in reports as a marker (optional). 4. Model - neural network model. 5. Type - type of neural network. 6. Add record - allows you to upload an audio file from your computer so that a bot can play it in a conversation with a client. 7. Record audio - allows you to record an audio file so that a bot can play it in a conversation with a client. |
|
