...
| Подсказка |
|---|
Each notification template contains the sender name, the message text, and other parameters. |
| Примечание |
|---|
To send automated texts and advertisement messages to your clients you must register the sender name with your mobile network carrier. The sender name that you plan to use must match the name of your company or your website. After that you need to create a request to the technical support so that you can use the registered sender name in with your account. |
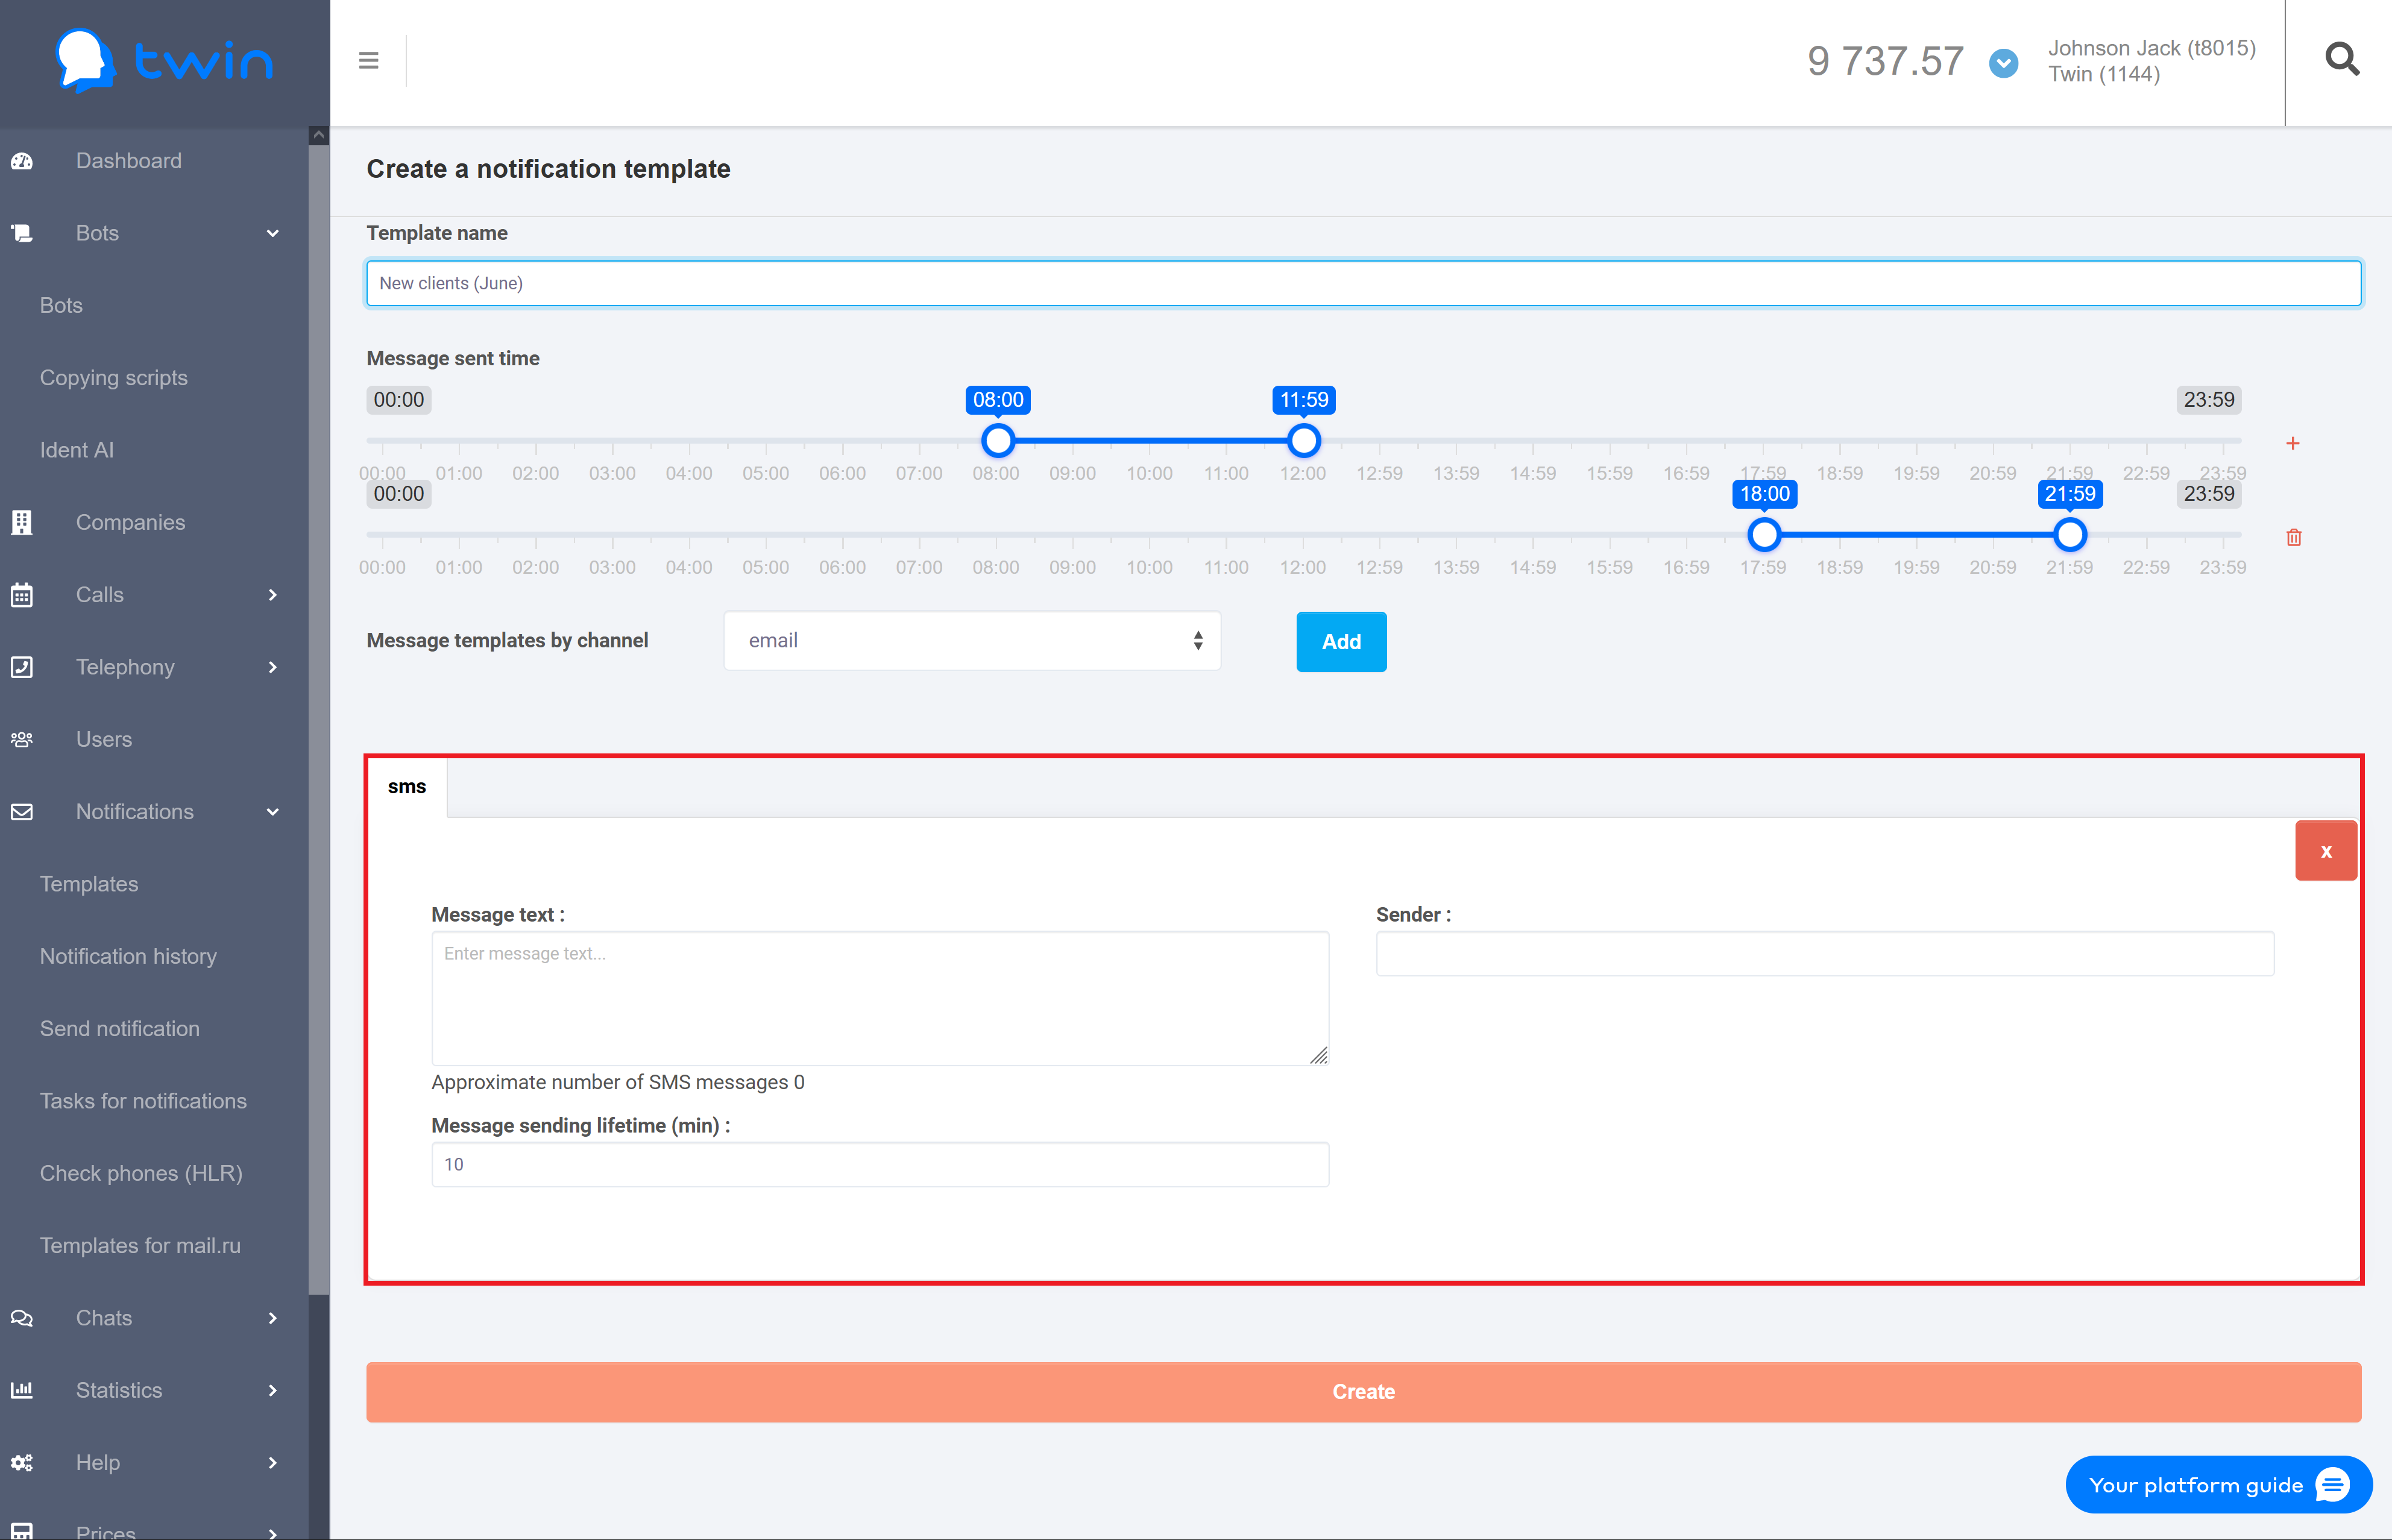
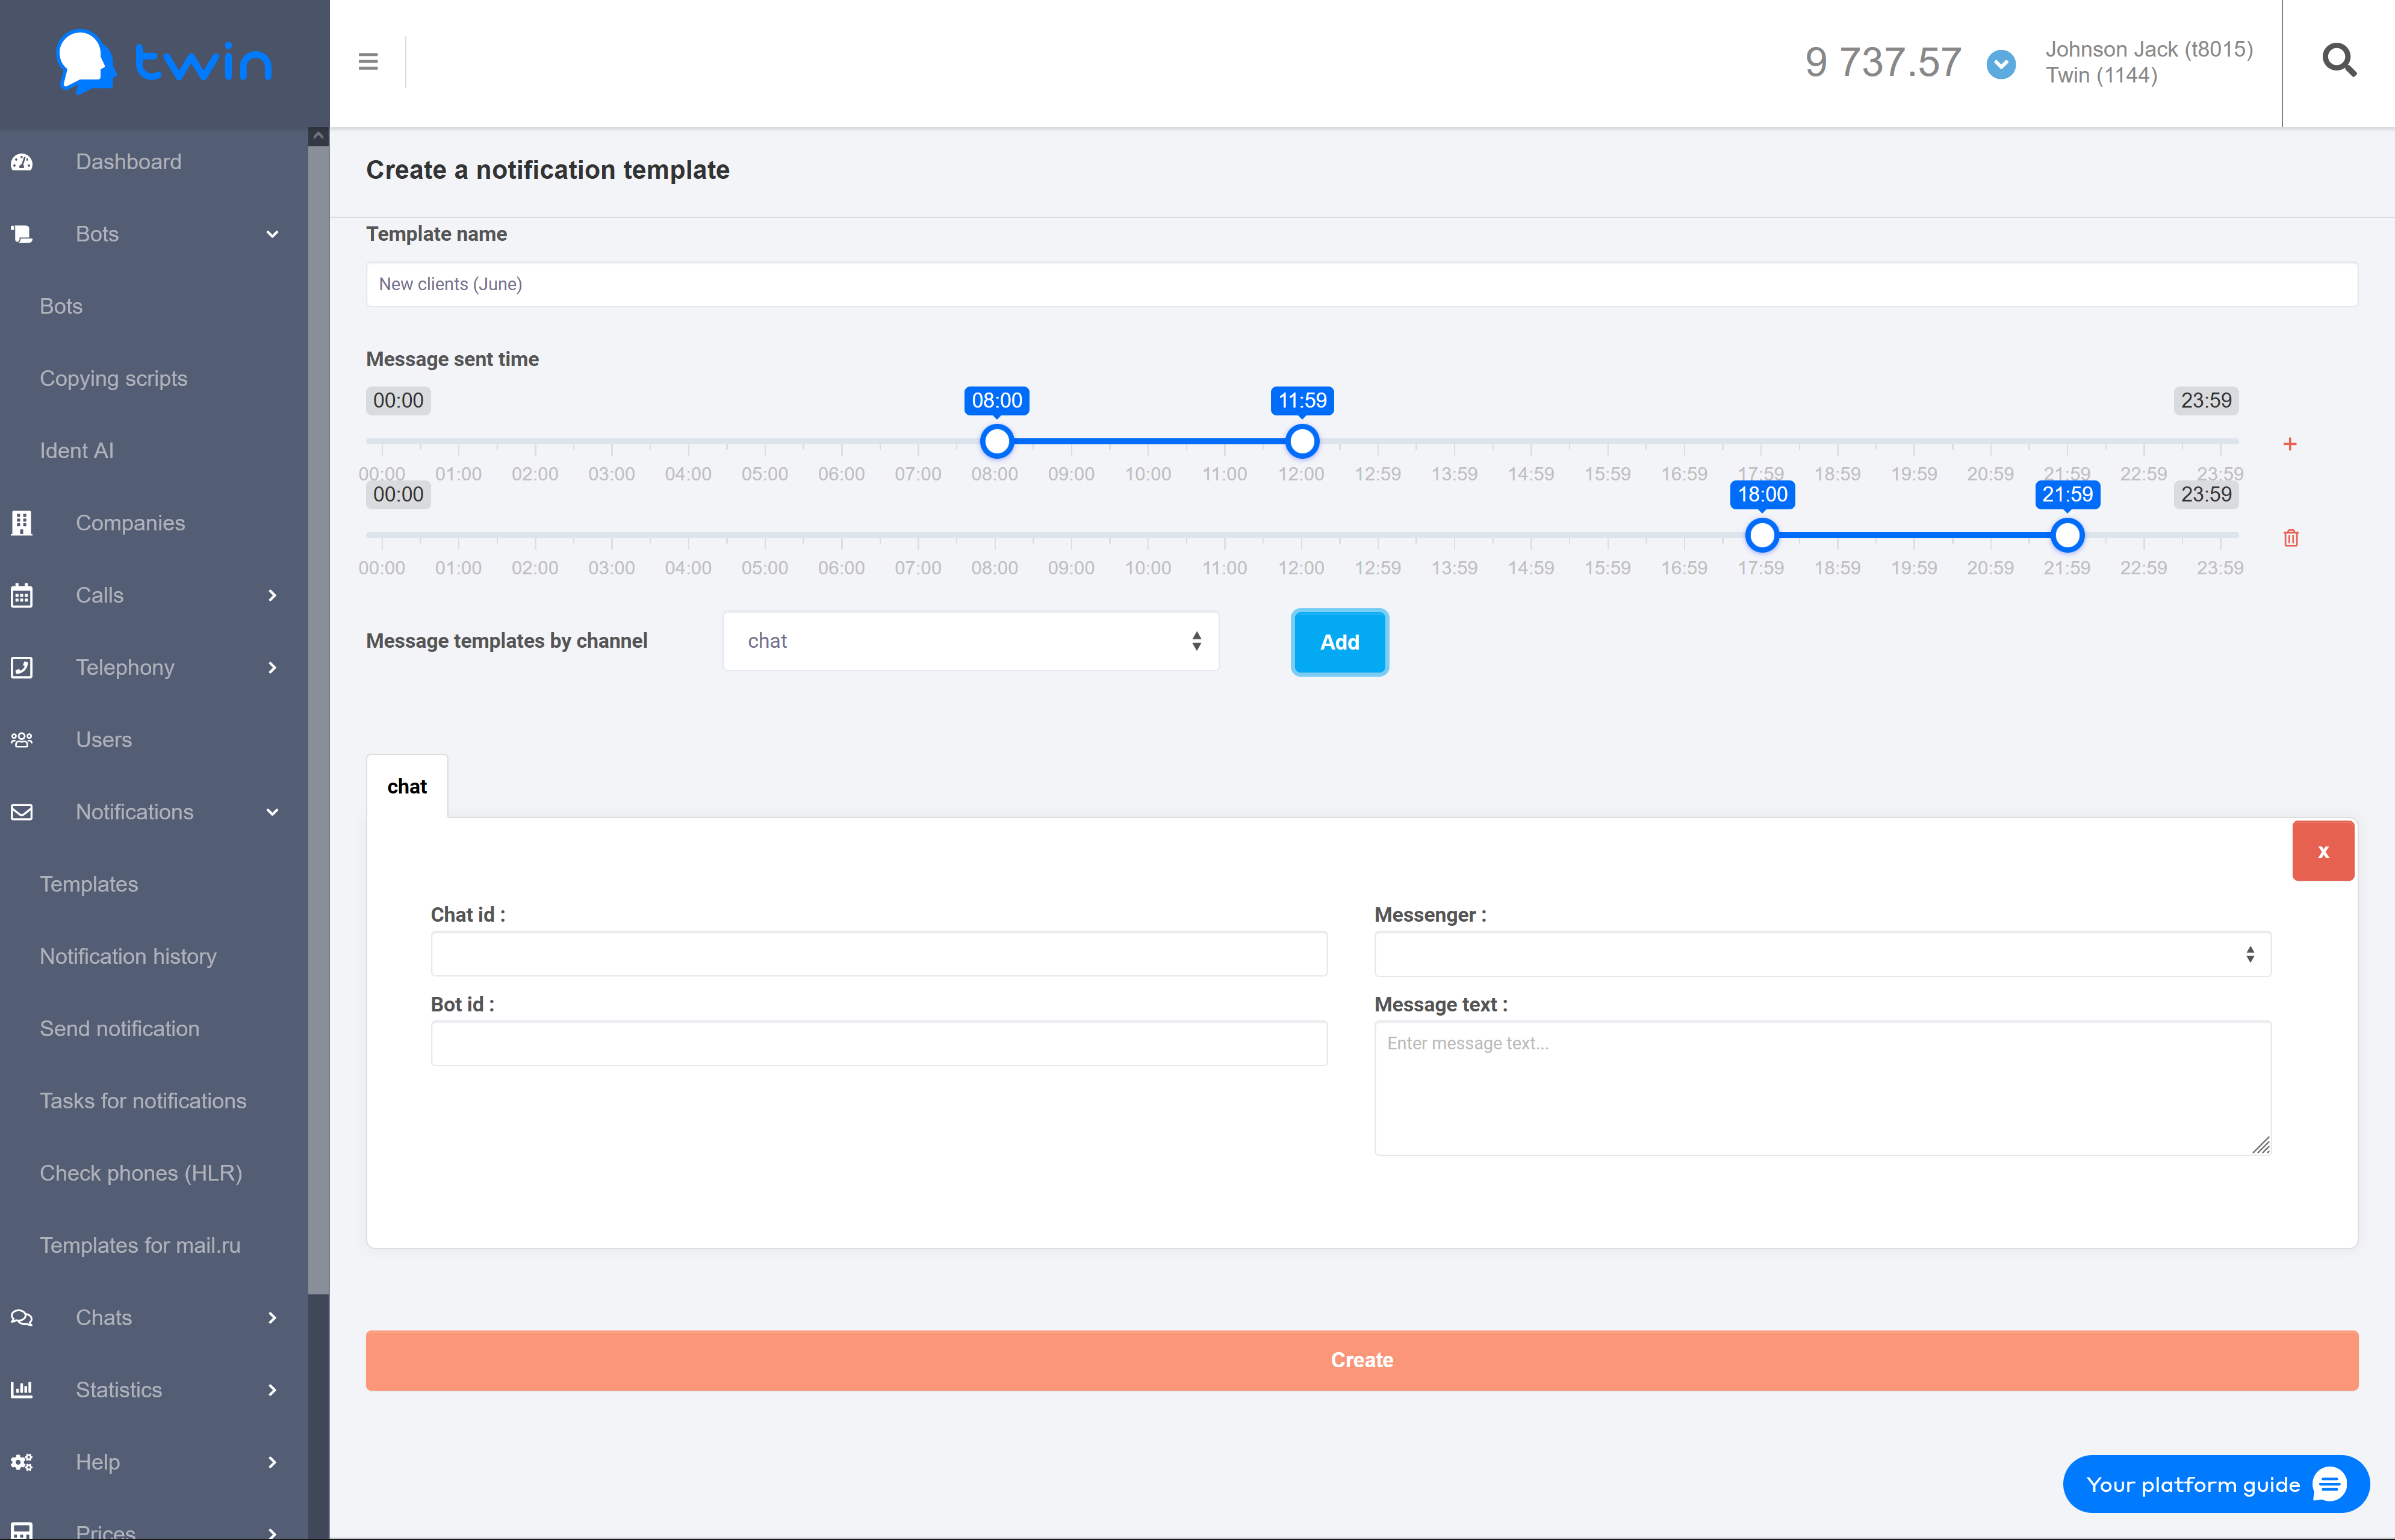
Creating notification templates
...
| Информация |
|---|
It is recommended to use simple and concise template names for notification templates. Later this these names will help you remember why you created a certain notification template. |
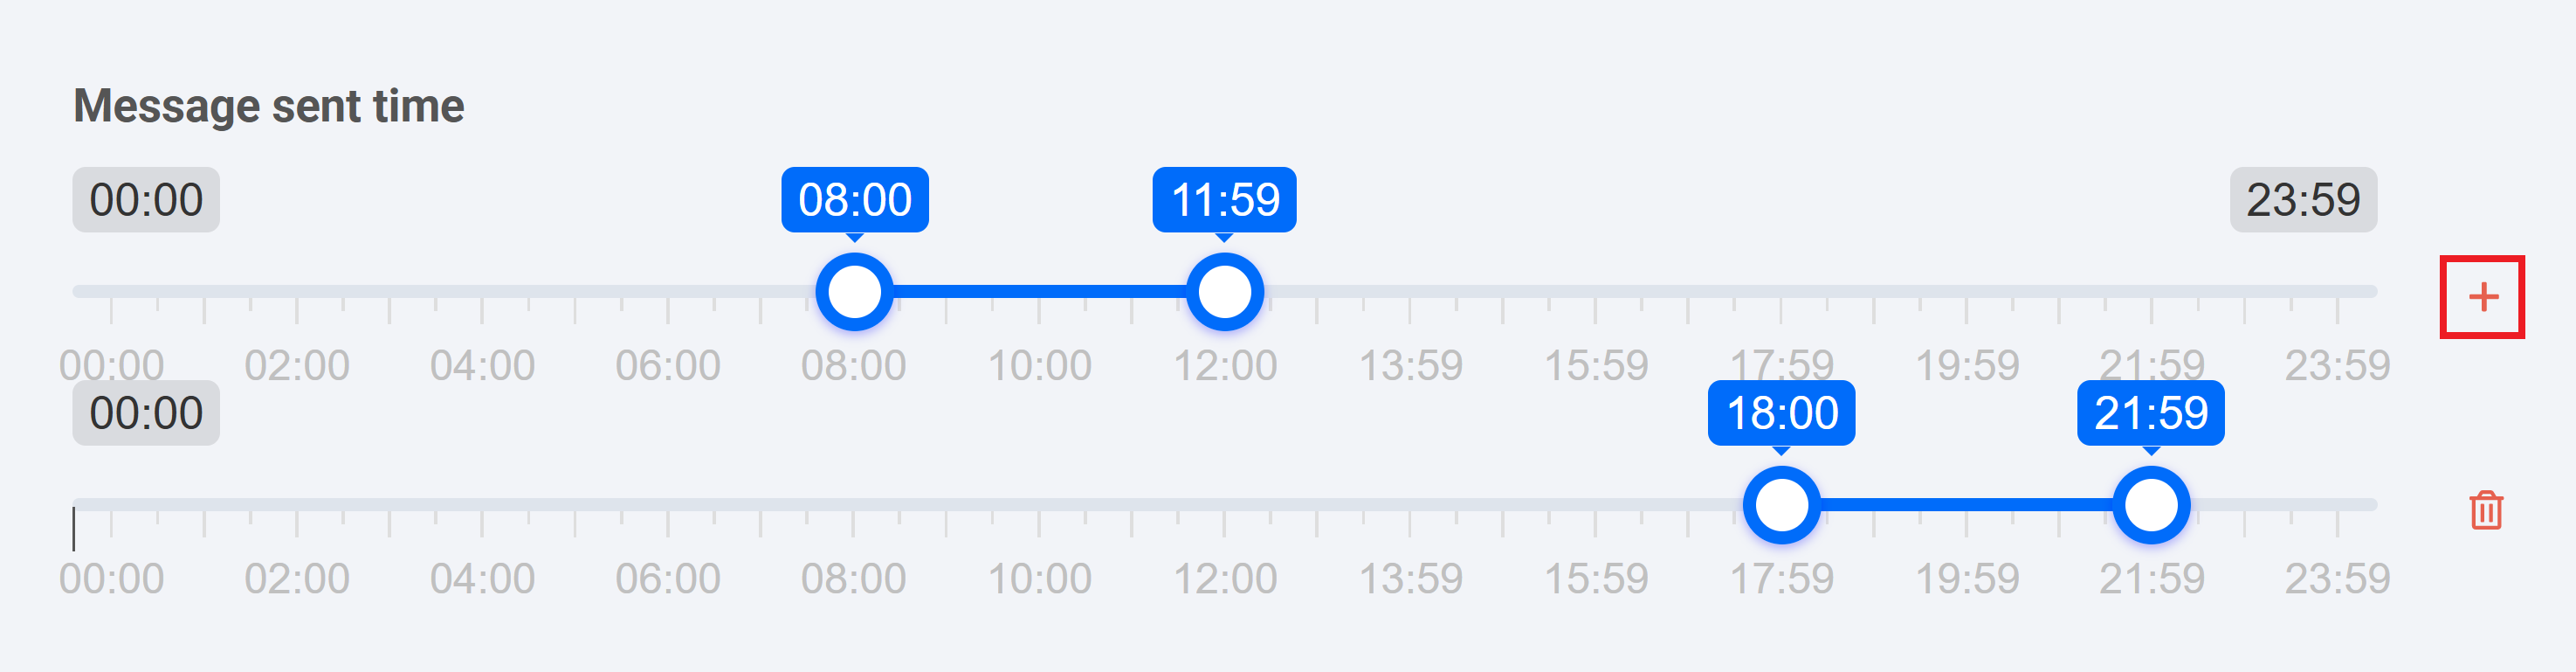
2. In the Message sent time section select the a period of time that you want for the system to send automated texts or advertisement messages to your clients.
| Подсказка |
|---|
If necessary you can click on the + button and set select an additional time period. If you send notifications after the first selected time period is over, then the system will send them within the second selected time period.
|
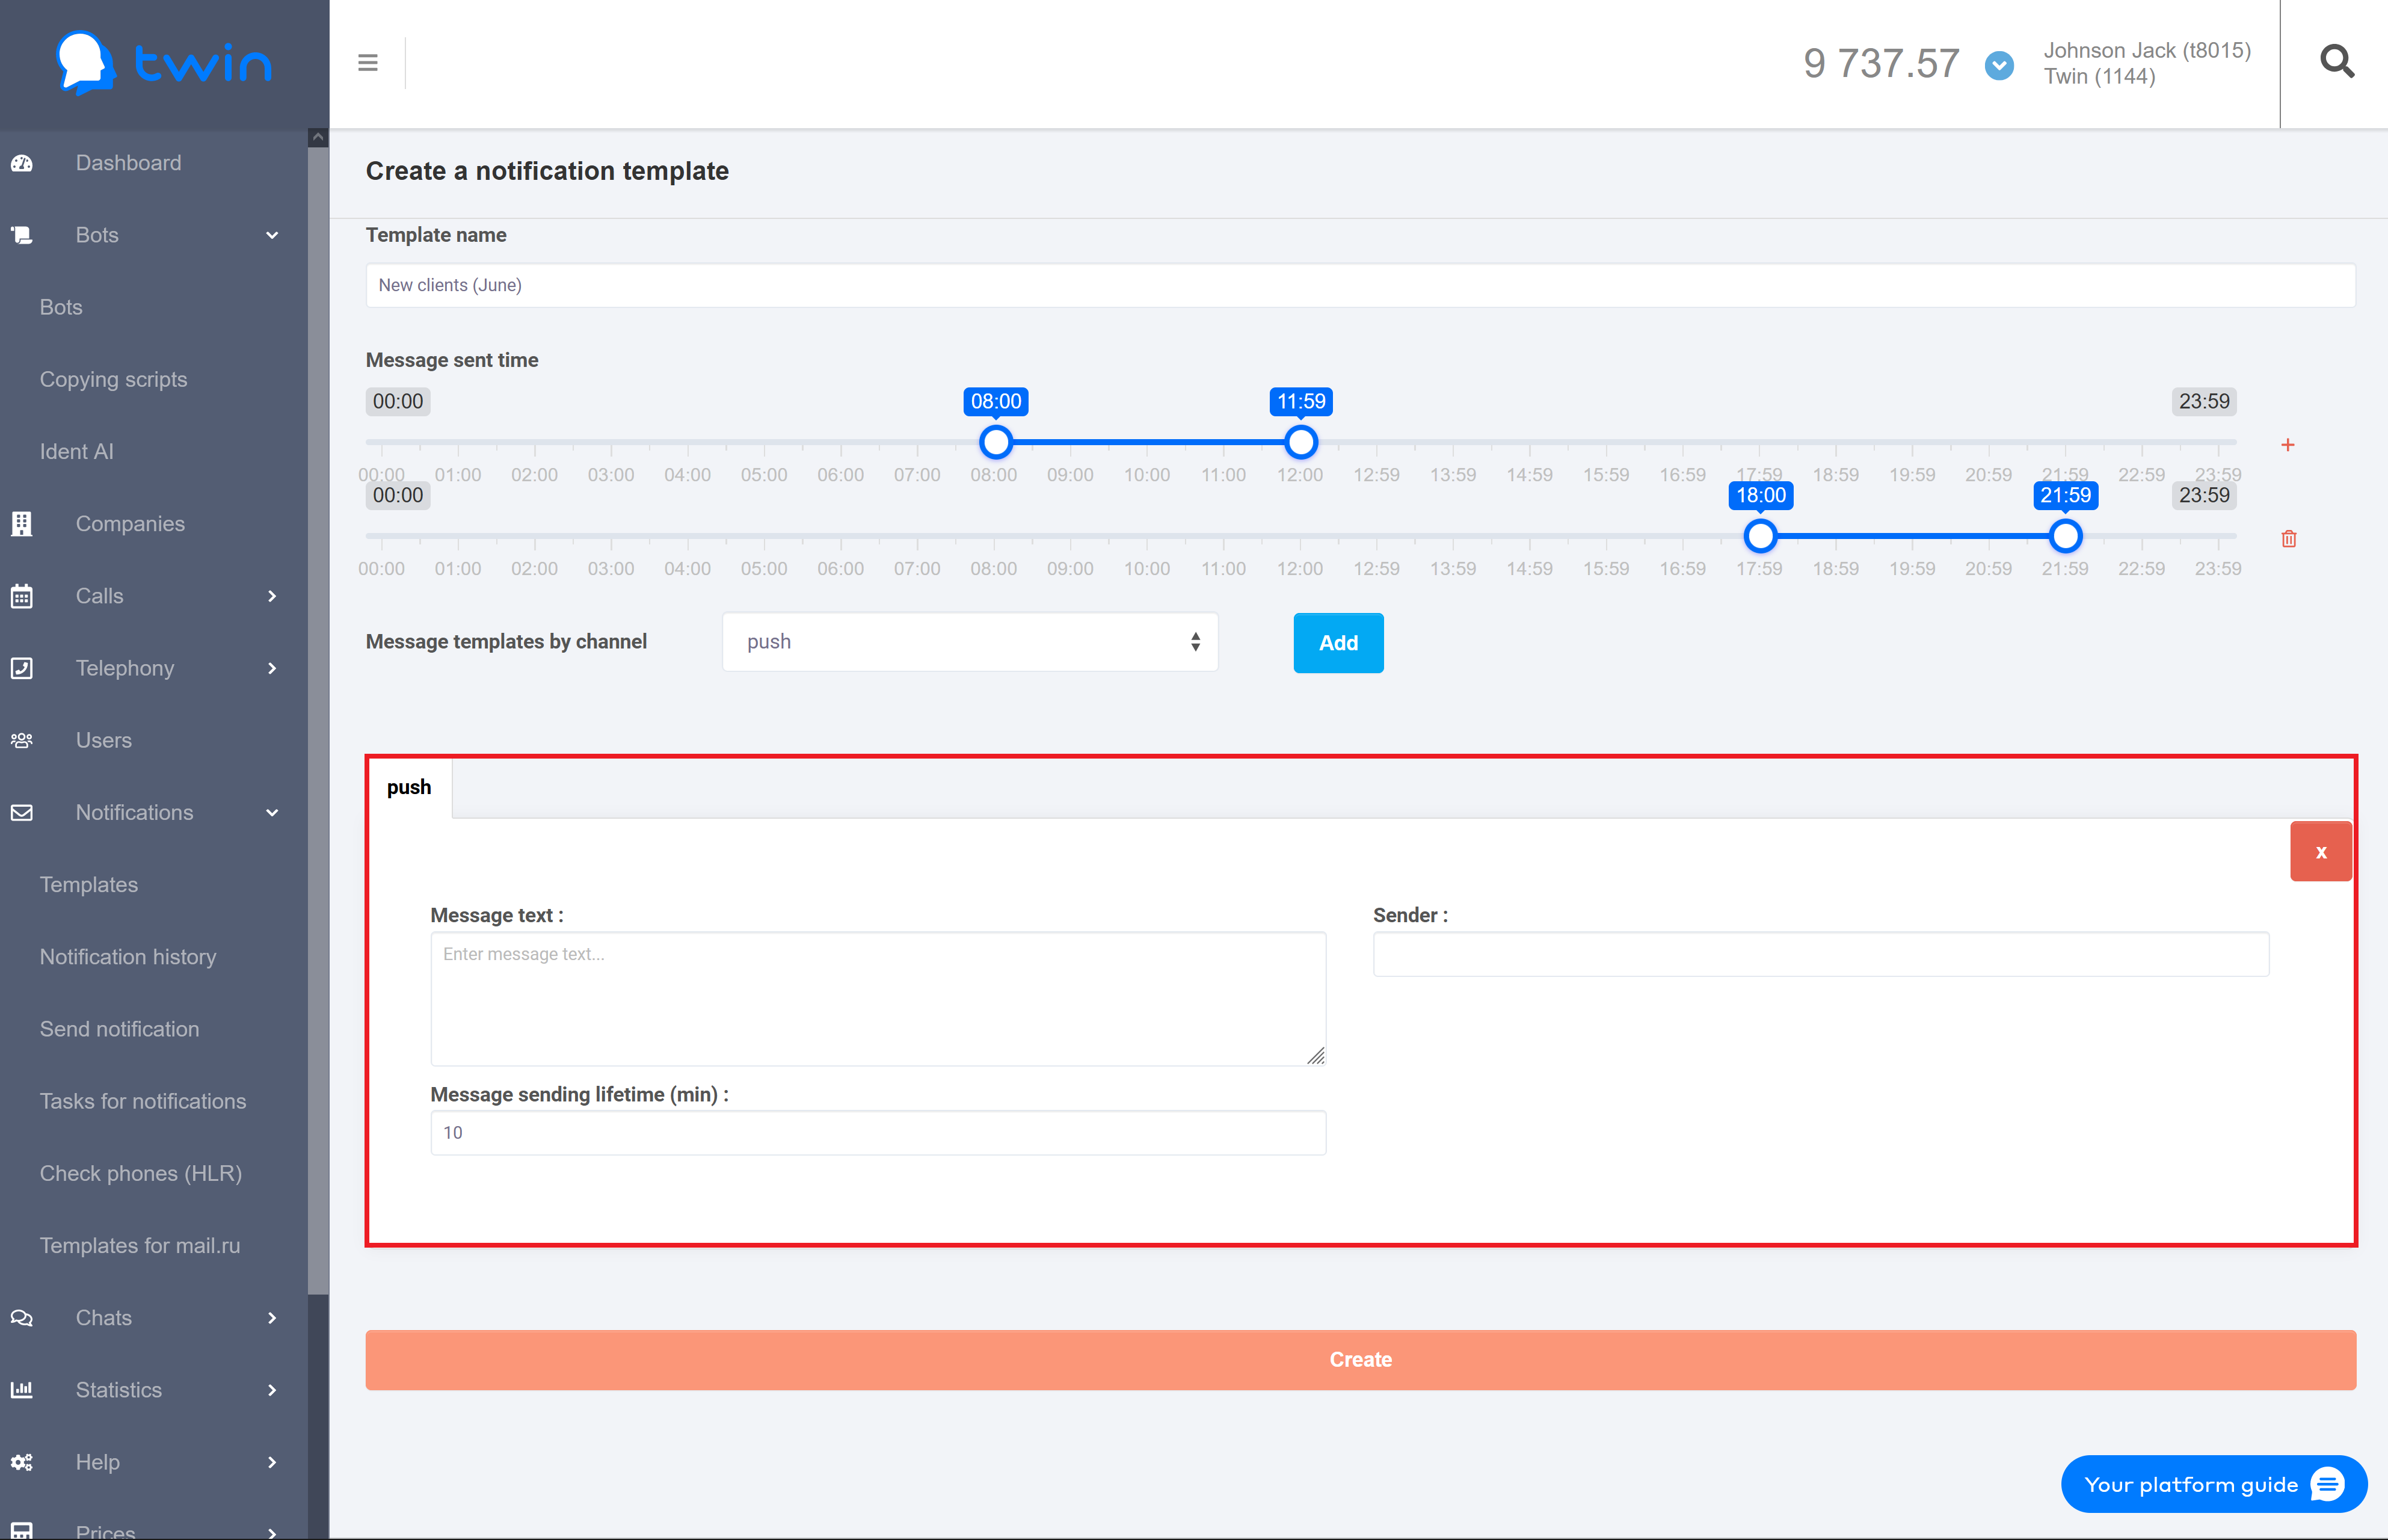
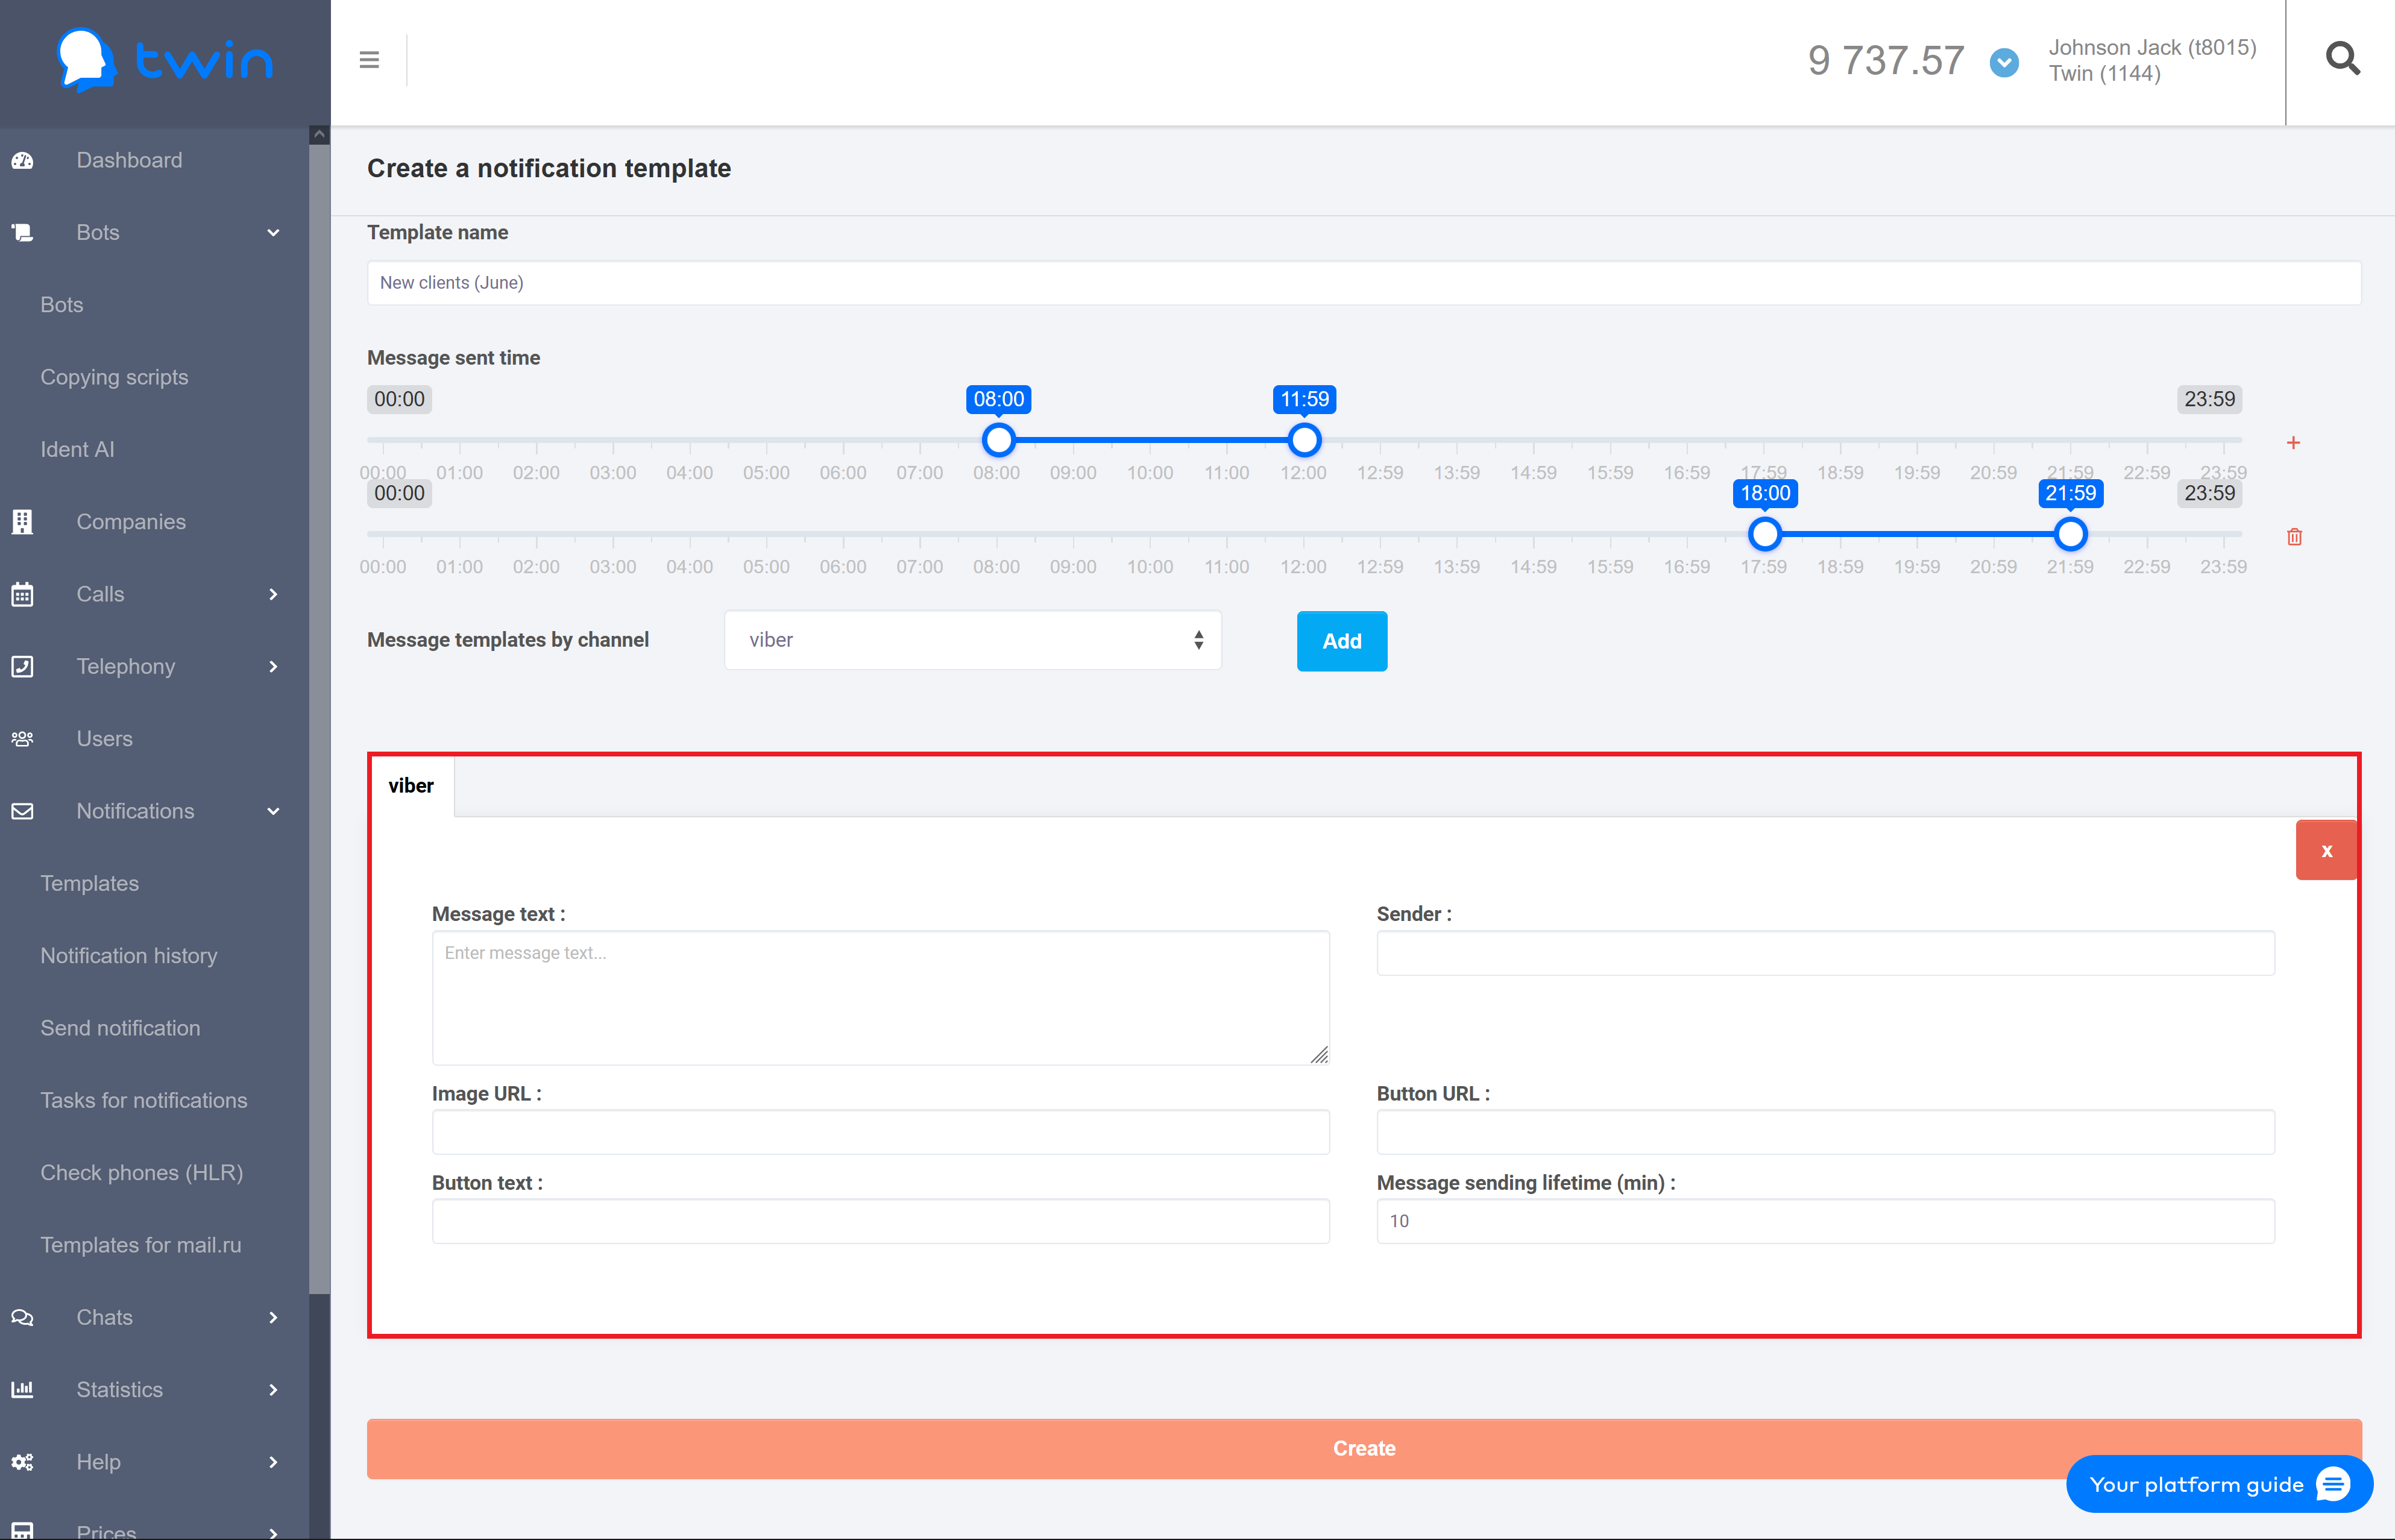
3. In the Message templates by channel field select the necessary communication channel and click Add. The system will use this communication channel to send notifications to your clients. As a result the section with parameters of the selected communication channel will open.
...
| Информация | ||||||||||||||||||||||||||||||||||||||
|---|---|---|---|---|---|---|---|---|---|---|---|---|---|---|---|---|---|---|---|---|---|---|---|---|---|---|---|---|---|---|---|---|---|---|---|---|---|---|
| ||||||||||||||||||||||||||||||||||||||
|


...
| Подсказка |
|---|
When you are searching by ID, enter the full template ID of the template in the search field. When you are searching by name, you can enter the full template name or its part in the search field. |
The search results will be displayed automatically.
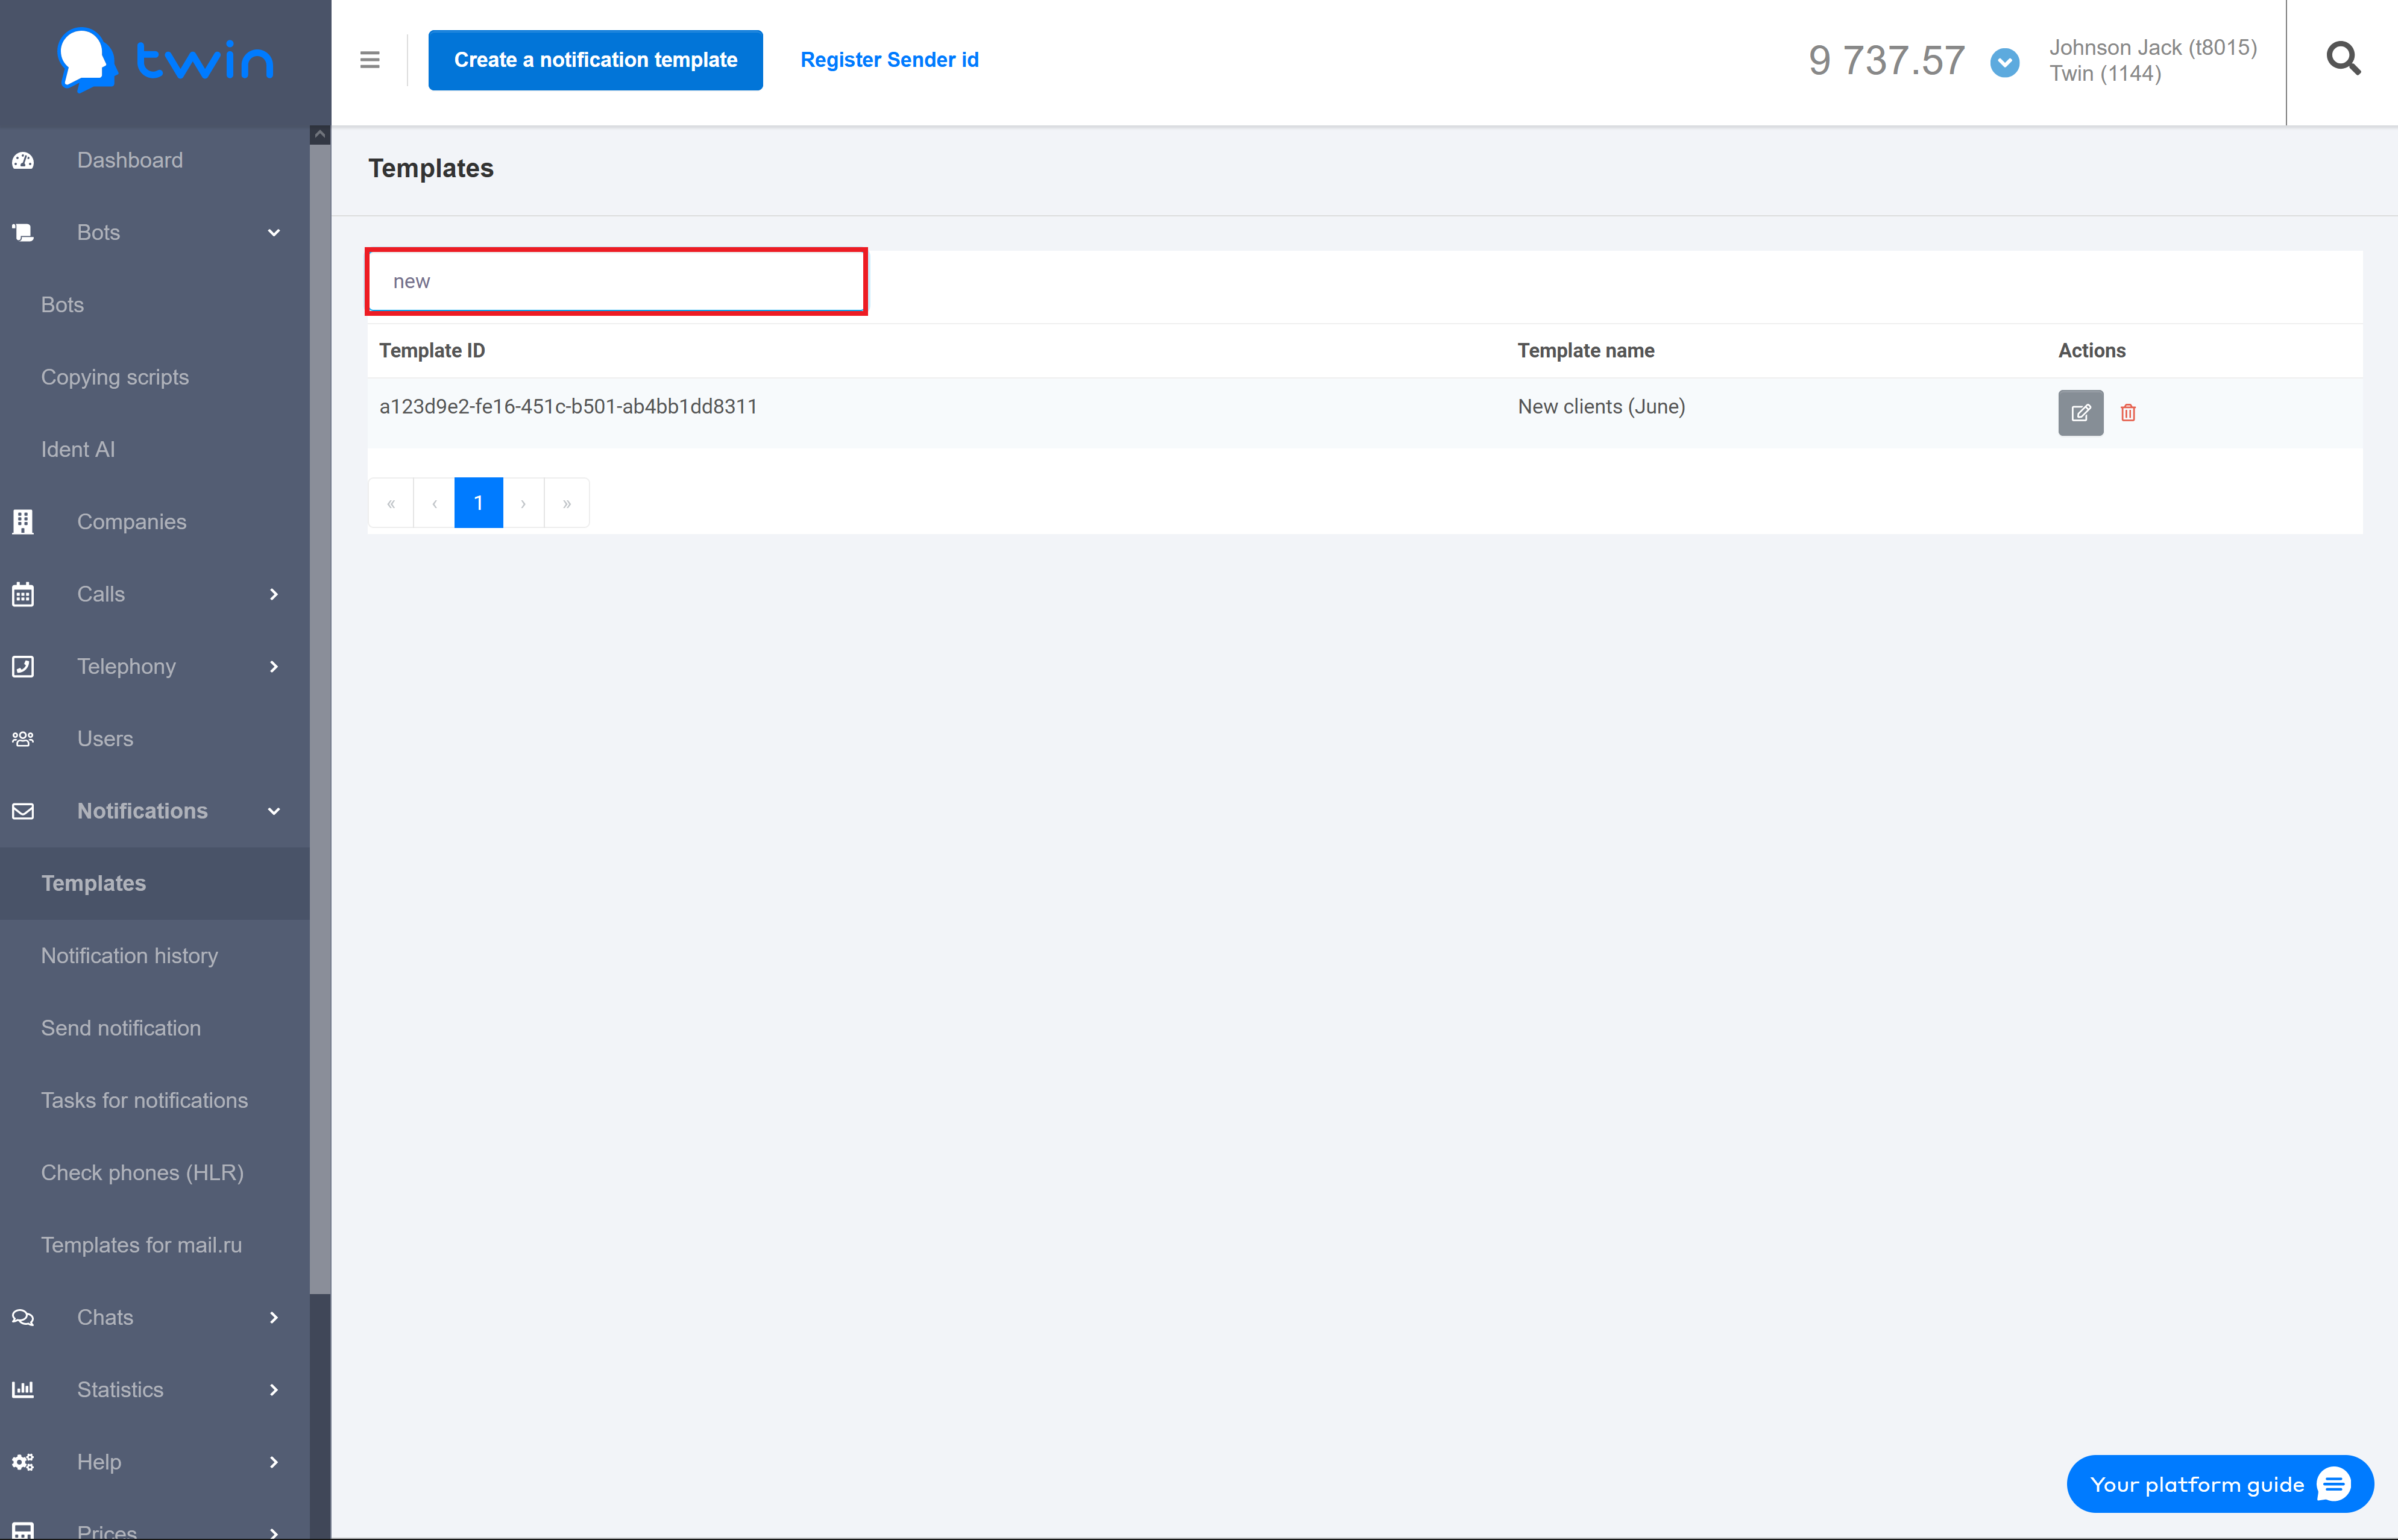
To delete the specified search and filter values use the Clear button.
...
Steps for editing a notification template are similar to those described in this section.
Deleting notification templates
...
For this select the necessary template on the list and click ![]() .
.
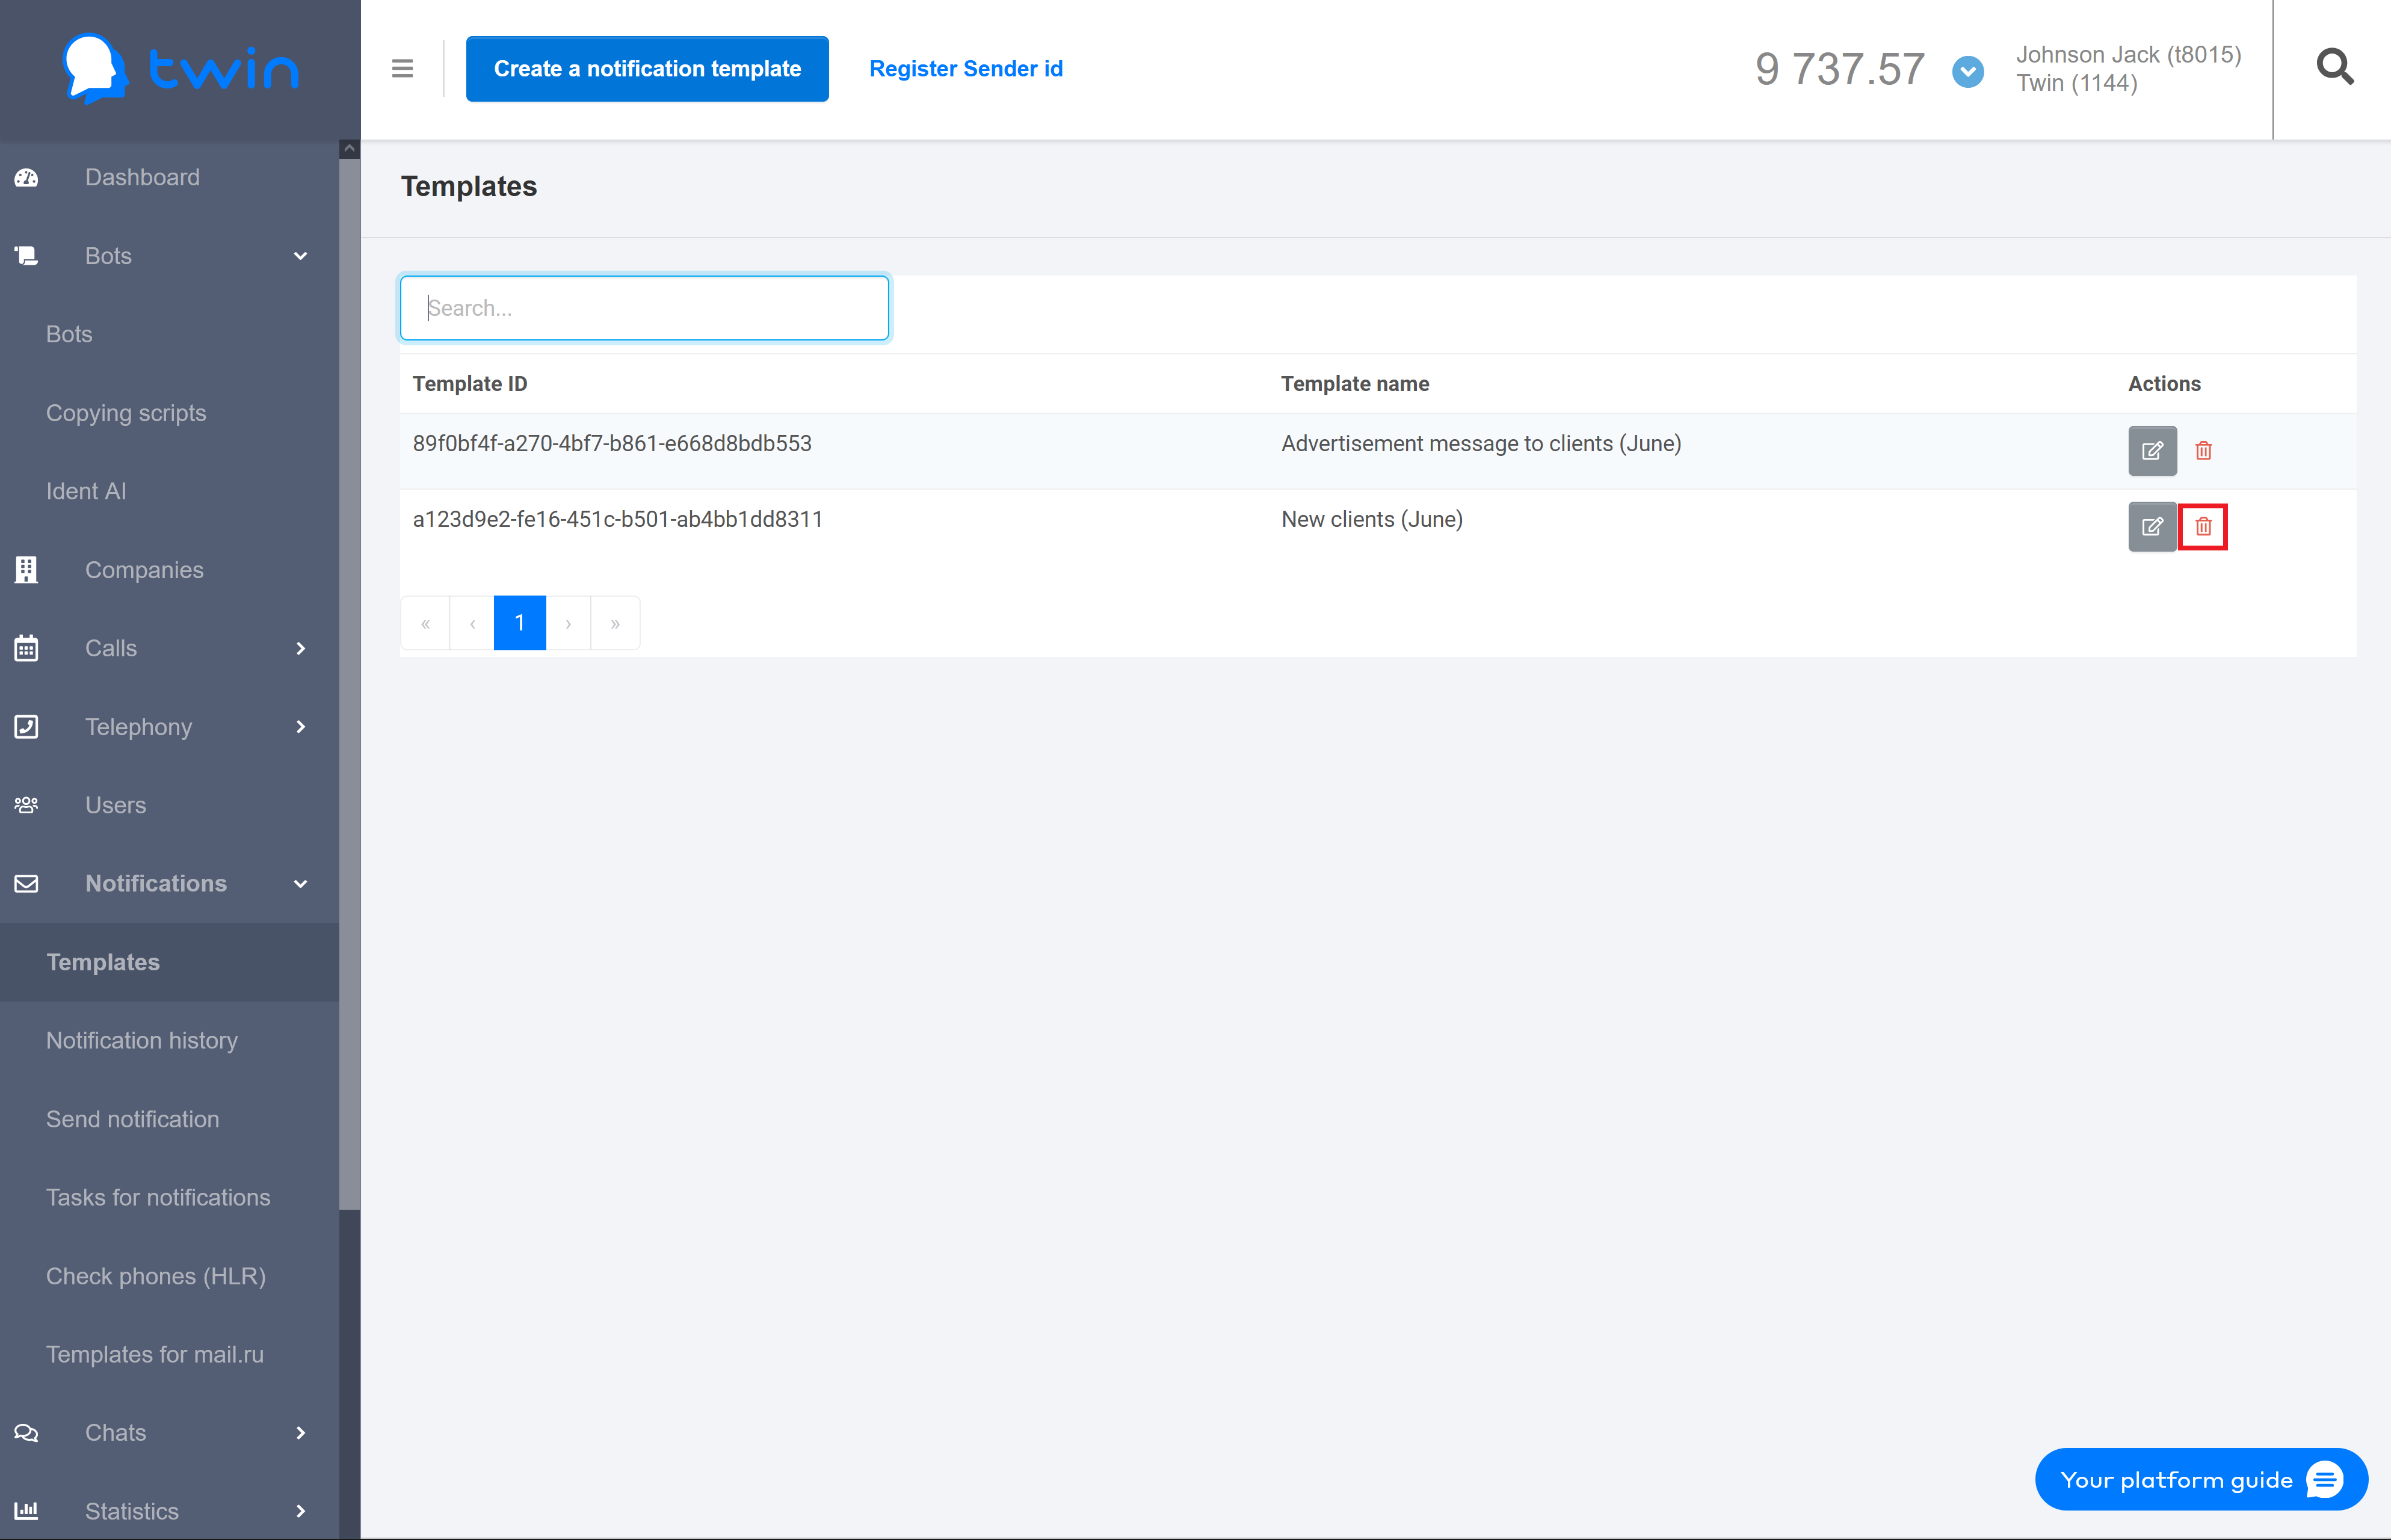
As a result the selected message notification will be deleted.
Sending notifications
...
- External ID – recipient ID used in an external CRM system.
- Phone – recipient's phone number that the . The system will use this phone number to send notifications via all communication channels except for email.
- Email – recipient's email address for sending notifications by email
...
3. In the Variables section enter variable names and their values that are used in the message text. Variables can only be used when you send notifications in Viber and as SMS.
| Подсказка |
|---|
You will need to enter variable names and their values only only in case the variables are used specified in the message text. Otherwise this section is not displayed. |
4. To send notifications click Send.
Working
...
В разделе Задания на отправку можно просматривать информацию о текущих заданиях на отправку клиентских рассылок, выполнять поиск и администрирование заданий (создавать, редактировать и удалять задания), а также управлять выполнением заданий на отправку.
| Информация |
|---|
Отправка клиентских рассылок в этом разделе выполняется с помощью Twin API. |

В левом верхнем углу рабочей области страницы расположена кнопка, при помощи которой можно создавать новые задания на отправку (подробнее о том, как добавить новое задание см. Создание нового задания на отправку сообщений).

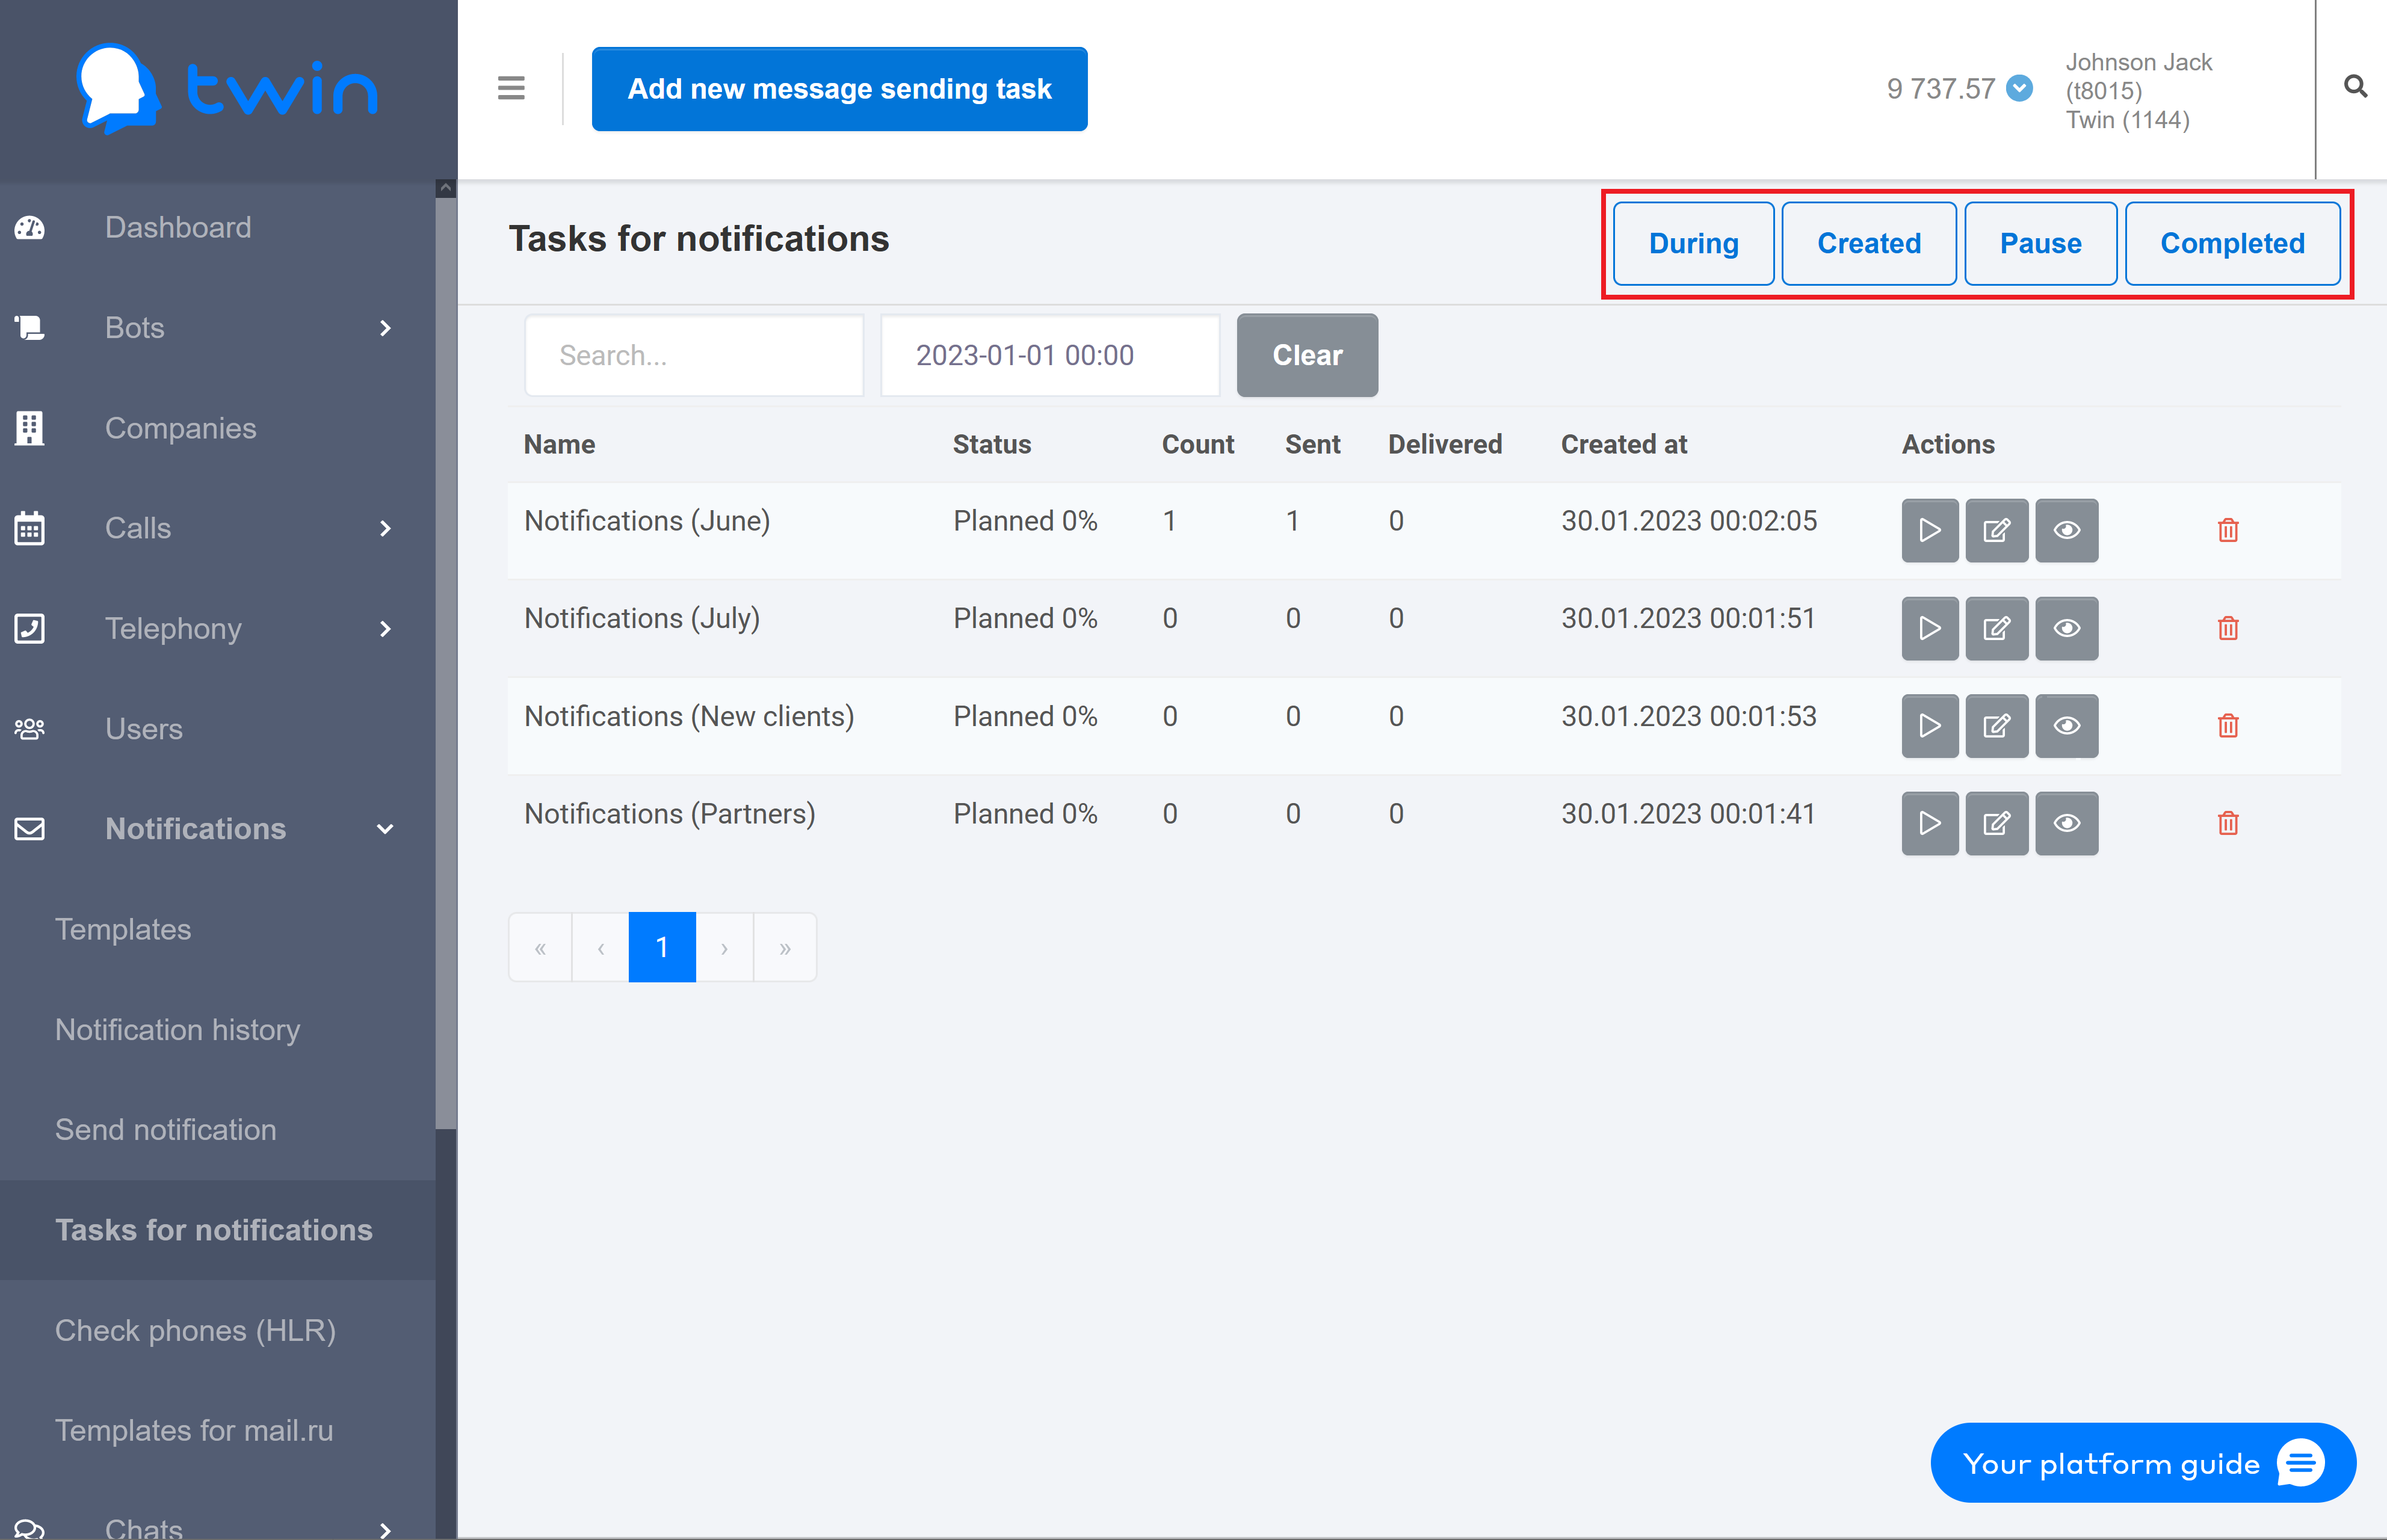
В правом верхнем углу расположены кнопки для фильтрации списка заданий по категориям (подробнее см. Фильтрация заданий на отправку сообщений).

Ниже расположены поля для поиска заданий на отправку сообщений (подробнее см. Поиск заданий на отправку сообщений).

В центре страницы отображается список заданий на отправку сообщений. В списке содержится следующая информация:
- Наименование задания - имя, которое вы присвоили заданию при его создании. По имени вы можете быстро идентифицировать нужное задание в списке.
- Статус – показывает, в каком статусе находится задание на отправку сообщений. Возможны следующие статусы:
- Запланированные;
- Выполненные.
- Количество – общее число сообщений в рассылке;
- Отправлено – число отправленных сообщений;
- Доставлено – число сообщений, которые были доставлены получателям;
- Создано – дата создания задания на отправку;
- Действия – здесь отображаются кнопки для работы с заданием и управления рассылкой. В зависимости от статуса задания могут отображаться кнопки для выполнения следующих действий: просмотр, редактирование и удаление заданий, а также запуск и приостановка рассылки.
Поиск заданий на отправку сообщений
Если список заданий очень большой, то при помощи элементов управления, которые расположены в верхней части страницы, вы можете быстро найти нужное задание.
В системе существует 2 варианта поиска заданий на отправку сообщений:
- Поиск заданий по имени;
- Поиск заданий по дате.

Чтобы выполнить поиск заданий по имени, введите нужное значение в первом поле. Для поиска заданий по дате введите нужную дату и время во втором поле. Результаты поиска отображаются автоматически.
Для очистки полей поиска от заданных значений используйте кнопку Clear.
Фильтрация заданий на отправку сообщений
На странице Задания на отправку можно выполнять фильтрацию списка заданий по категориям.
| Подсказка |
|---|
При помощи данной функции можно быстро отображать нужные задания на отправку (например, задания, по которым в текущий момент выполняются клиентские рассылки, или задания, по которым клиентские рассылки запланированы, но еще не выполнялись). |
Для фильтрации списка заданий предназначены кнопки, которые расположены в правом верхнем углу страницы.

При нажатии на кнопку в списке заданий отображаются только те задания, которые относятся к выбранной категории.
Для фильтрации заданий доступны для выбора следующие категории:
- В процессе - отображаются только такие задания, по которым в текущий момент выполняются клиентские рассылки;
- Создано - отображаются все созданные в системе задания со статусом Запланированные, по которым рассылка сообщений клиентам запланирована, но еще не выполнялась;
- Пауза - отображаются задания, по которым рассылка сообщений клиентам была прервана;
- Завершенные - отображаются все задания, по которым рассылка сообщений клиентам была завершена.
Создание нового задания на отправку сообщений
Чтобы создать задание на отправку сообщений, выполните следующие действия:
...

В результате откроется окно, как показано на рисунке ниже.

2) В поле Наименование задание укажите имя нового задания.

| Информация |
|---|
Рекомендуется использовать краткие и понятные имена, по которым будет легко идентифицировать задания в списке. Данное поле является обязательным для заполнения. |
...
| Информация |
|---|
При помощи ссылок, расположенных под кнопкой выбора файла шаблона, можно загрузить следующие шаблоны заданий:
|
4) В поле Ограничитель по времени отправки текстовых сообщений выберите желаемый временной диапазон, в течение система выполнит рассылку сообщений.

5) Для сохранения изменений нажмите кнопку Создать.
В результате выполненных действий в списке заданий на отправку сообщений появится новая запись.
Редактирование заданий на отправку сообщений
Для редактирования здания на отправку сообщений нажмите кнопку ![]() в строке нужного задания.
в строке нужного задания.

В результате откроется страница для редактирования выбранного задания.

Действия по редактированию задания на отправку сообщений аналогичны тем, которые описаны в разделе Создание нового задания на отправку сообщений.
Удаление заданий на отправку сообщений
Если какое-либо задание на отправку сообщений больше не требуется для клиентских рассылок, вы можете его удалить. Для этого нажмите кнопку ![]() в конце строки этого задания.
в конце строки этого задания.

Выбранное задание будет удалено.
Просмотр информации о сообщениях
Чтобы посмотреть информацию о сообщениях, нажмите кнопку ![]() напротив нужного задания.
напротив нужного задания.

| Информация |
|---|
Подробнее о просмотре отправленных сообщений можно узнать в этой статье. |
Проверка номеров
В разделе Проверка номеров отображается список с общей информацией обо всех сообщениях, которые были отправлены клиентам с помощью Twin API.
На странице содержится следующая информация:
- Номер телефона клиента, на который было отправлено сообщение
- Статус отправки
- Дата создания сообщения
- Стоимость отправки
В верхней части страницы расположены элементы управления, при помощи которых можно выполнять фильтрацию и поиск записей на странице.

В первом поле можно указать номер телефона клиента, на который было отправлено сообщение. Во втором поле можно выбрать желаемый период и указать время, в которое было создано сообщение. В результате в списке отобразятся только те записи, которые соответствуют заданным критериям.
| Подсказка |
|---|
В разделе Проверка номеров можно сформировать отчет с подробной информацией об отправленных сообщениях. Для этого при помощи полей поиска отобразите желаемые записи и нажмите кнопку Экспорт. Отчет будет сформирован и загружен автоматически в виде файла в формате Excel. |
Просмотр отправленных сообщений
В разделе Просмотр сообщений отображается список, в котором представлена общая информация по всем клиентским рассылкам (номер получателя, статус сообщения, канал связи, который система использовала для отправки сообщения, время создания сообщения и др.).
В верхней части страницы расположены элементы управления для фильтрации и поиска сообщений.
...
При помощи поля Поиск вы можете выполнять поиск по номеру получателя, а также по имени канала связи, который система использовала для рассылки сообщений.
В следующем поле можно задать желаемый период, в течение которого были созданы сообщения, а также указать время создания. В результате в списке будут отображаться только те сообщения, которые отвечают заданным условиям.
В поле Все каналы можно выбрать канал, который система использовала для рассылки. После этого в списке будут отображаться все сообщения, отправленные по этому каналу.
В поле Все статусы можно выбрать желаемый статус сообщений.
...
| title | Доступные статусы |
|---|
...
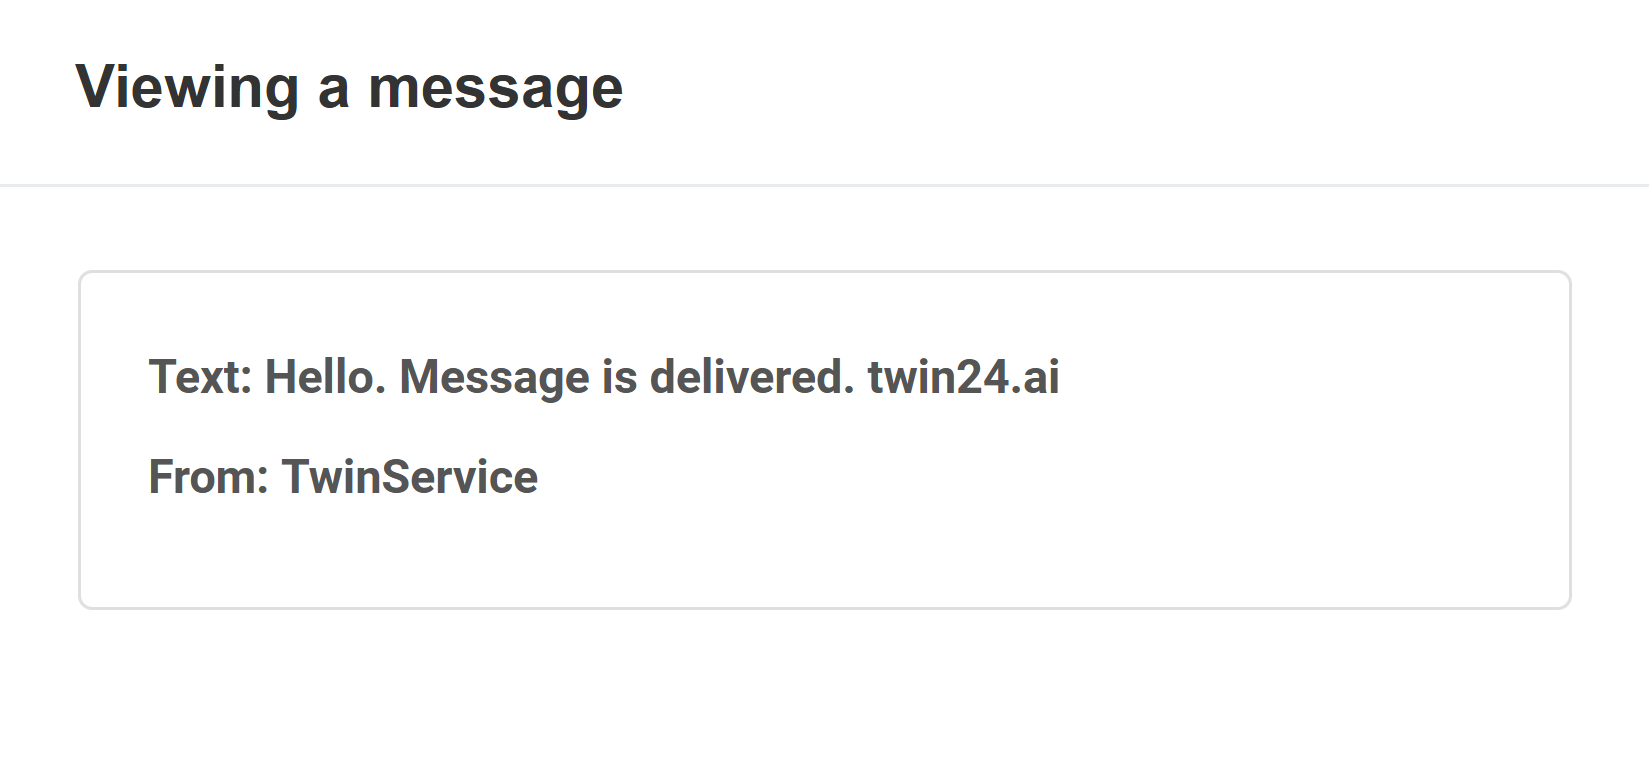
Для просмотра текста сообщения нажмите кнопку ![]() напротив нужного сообщения.
напротив нужного сообщения.

Откроется окно просмотра сообщения.
...
В разделе Просмотр сообщений вы также можете сформировать отчет с полной информацией обо всех сообщениях компании, согласно установленным настройкам, о которых говорилось выше. По умолчанию, если не устанавливать настройки даты, отчет включает в себя сообщения с начала месяца. Для этого нажмите кнопку Экспорт.
...
| title | Информация в отчете |
|---|
...
| Раскрыть | ||
|---|---|---|
| ||
DELIVERED – сообщение успешно обработано и доставлено получателю. UNDELIVERED – сообщение успешно отправлено, но не доставлено получателю. PENDING – сообщение успешно отправлено получателю, но отчет о доставке еще не получен. PAUSED – сообщение успешно обработано, но еще не отправлено. READ – сообщение прочитано. ERROR – при отправке сообщения произошла ошибка. CREATED – сообщение успешно создано, но еще не отправлено. SENT – сообщение принято к отправке. QUEUED – сообщение, которое находится в очереди. SKIPPED – сообщение из очереди, которые не были доставлены. CANCELED – отмененное сообщение, которое должно было отправиться через некоторое время. DELAYED – сообщение из очереди, которое отправится через некоторое время. |
...
| Примечание |
|---|
Указывается только для канала отправки SMS |
...
| Примечание |
|---|
Практически всегда остается пустым по той причине, что большинство провайдеров не предоставляют эту информацию. |
...
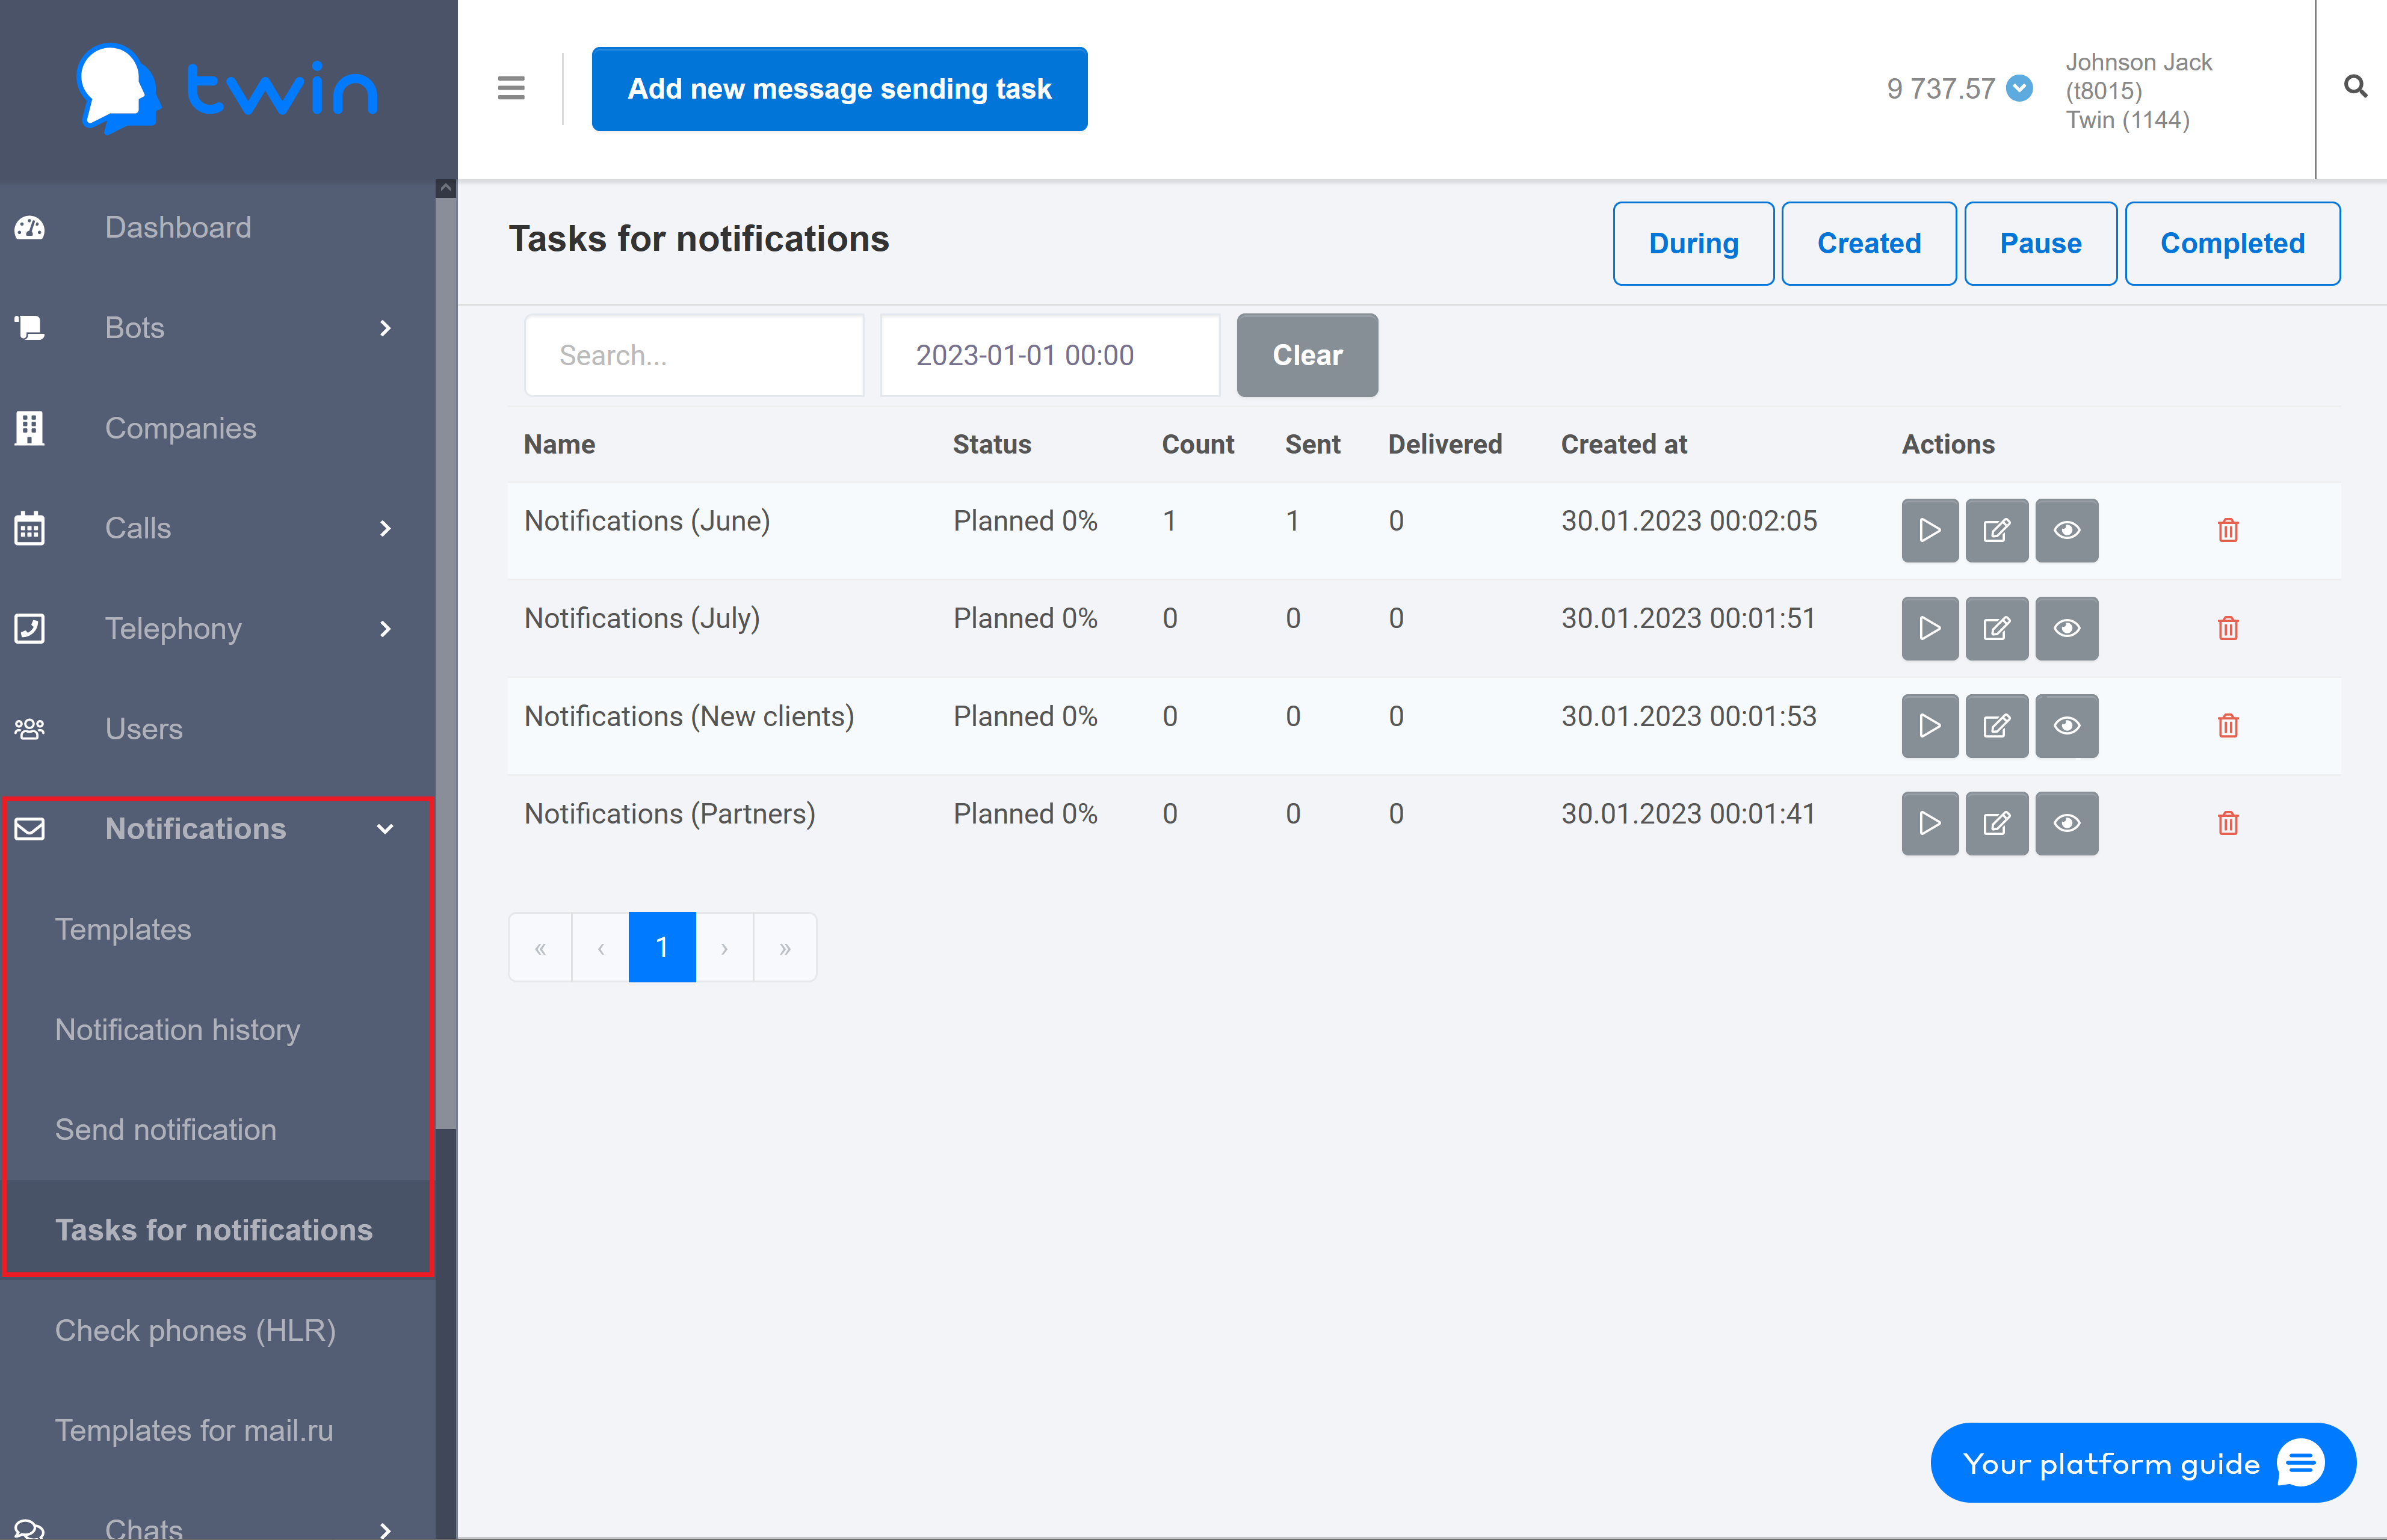
with notification tasks
On the side menu click Notifications – Tasks for notifications. As a result a page will open with a list of notification tasks.
| Информация |
|---|
Notifications are sent using Twin API. |
Searching for notification tasks
If there are a lot of notification tasks on the list, you can filter records you need or search for the necessary record by a task name or creation date.
For this use the search fields at the top of the page.

To search for notification tasks by name enter the necessary value in the first field.
To search for notification tasks by creation date enter the necessary value in the second field.
Results are displayed automatically.
To delete specified values use the Clear button.
Filtering notification tasks by category
On the Task for notifications page you can filter notification tasks by the following categories:
- During – notification tasks that are currently in progress
- Created – all created notification tasks that are scheduled for execution
- Paused – notification tasks that are on pause
- Completed – all completed notification tasks
To filter notification tasks by category use the buttons located at the top right corner of the page.
Creating a new notification task
On the Task for notifications page click Add new message sending task.
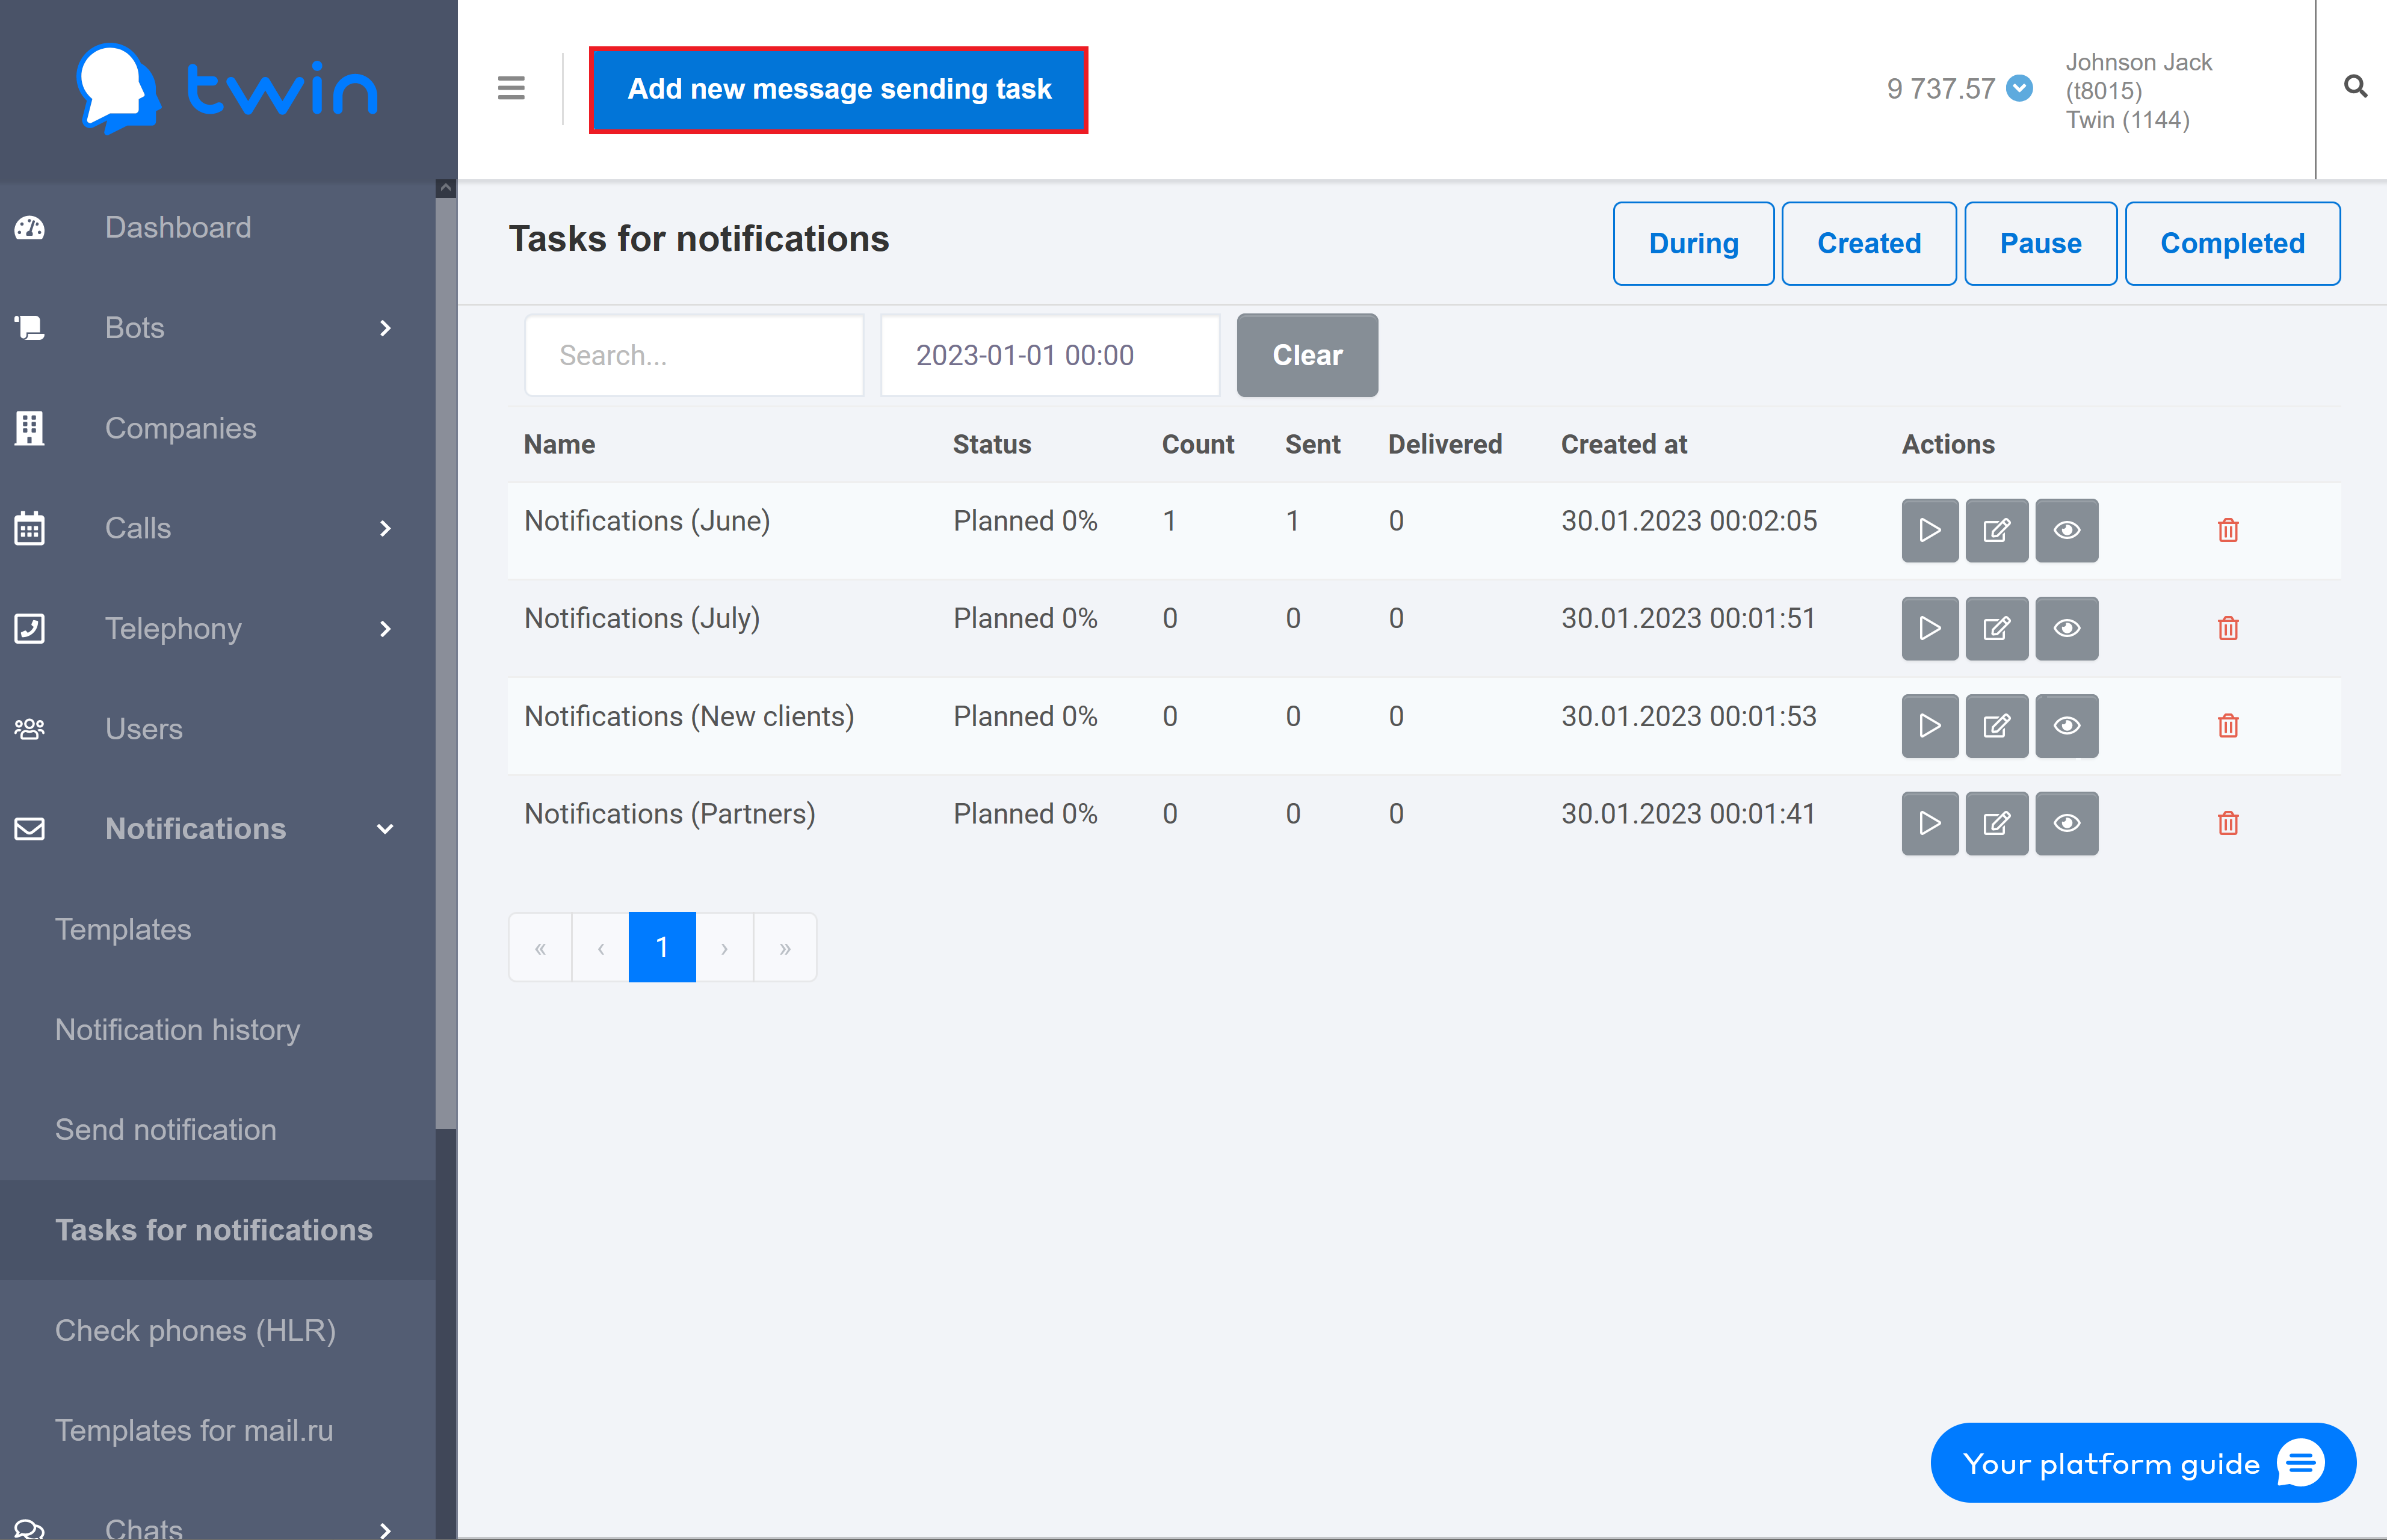
As a result the Add new message sending task dialog window will open.
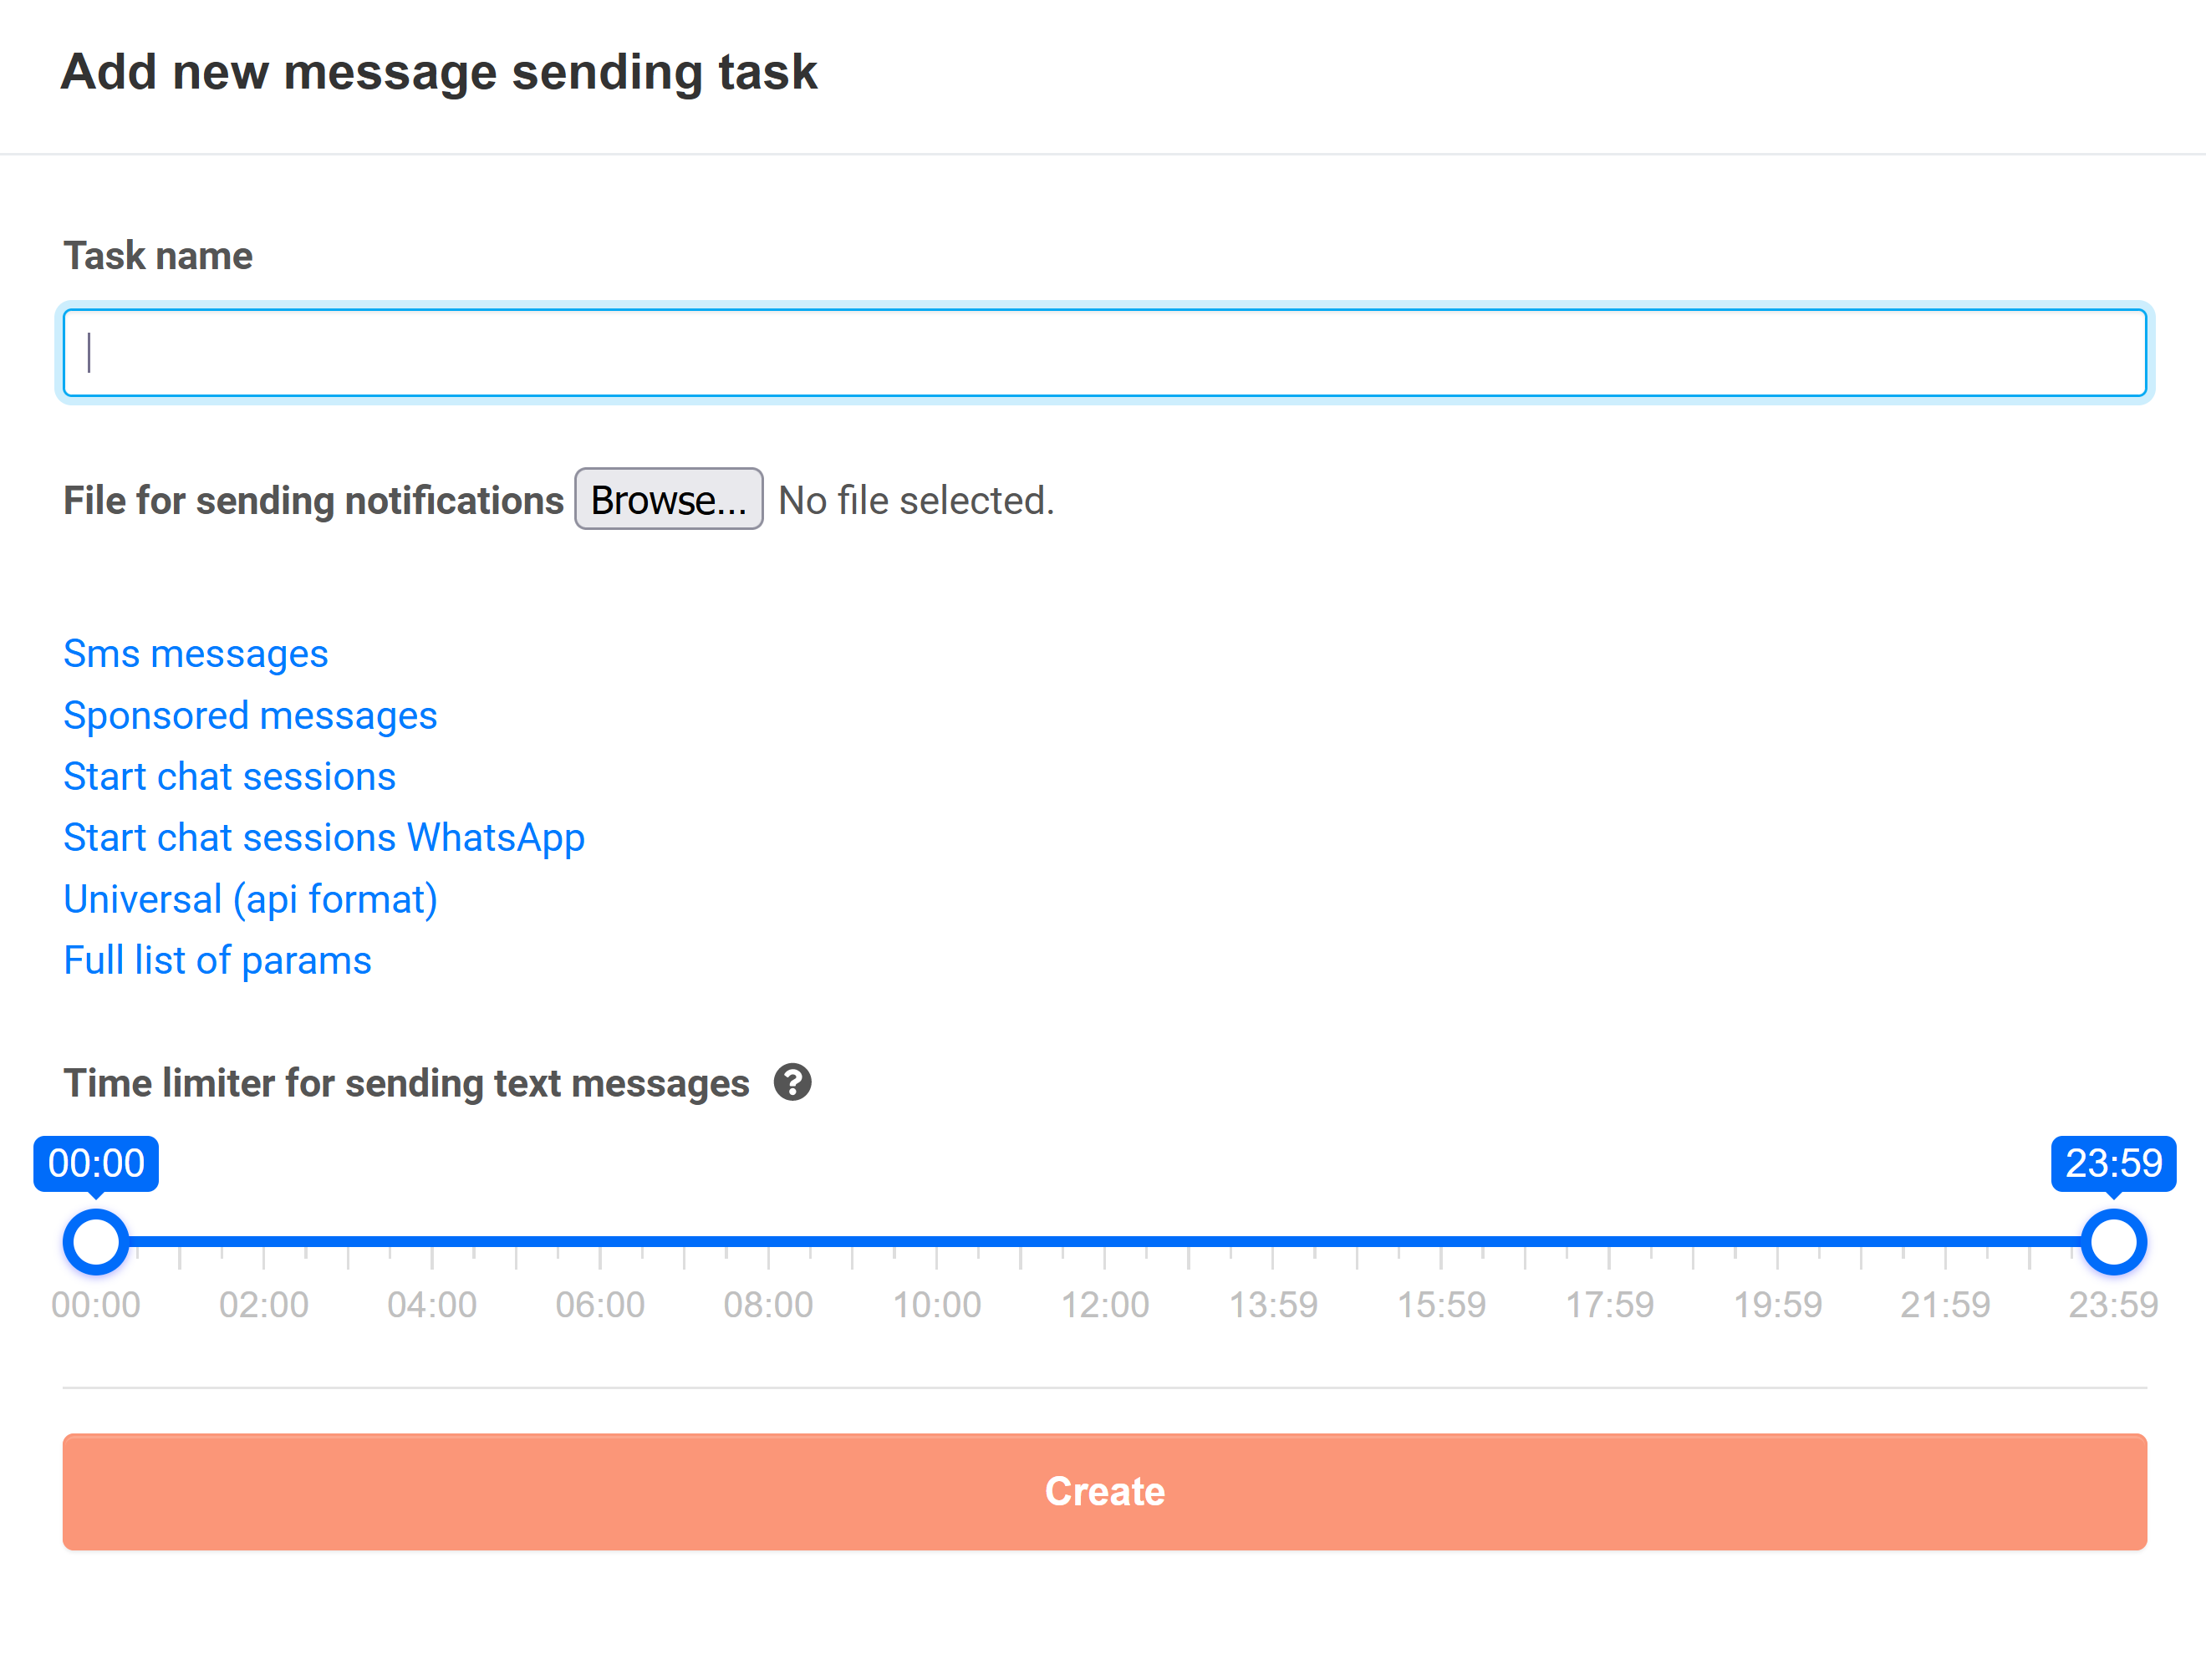
To create a new notification task, do the following:
- In the Task name field enter a name for a new notification task.
| Информация |
|---|
It is recommended to use simple and concise names for notification tasks. Later these names will help you remember why you created a certain notification task. |
2. Click the Browse button and select the necessary template for the notification task. The template is stored as an Excel file.
| Информация |
|---|
You can download the following types of notification templates:
|
3. In the Time limiter for sending text messages field select a period of time for the system to send notifications.

4. To save changes click Create.
As a result a new notification task will appear on the list.
Editing notification tasks
To edit a notification task click ![]() in the line for the necessary record.
in the line for the necessary record.

As a result the Change new message sending task dialog window will open.

Steps for editing a notification task are similar to those described in this section.
Deleting notification tasks
If you do not use a certain notification task, you can delete it.
For this select the necessary record on the list and click ![]() .
.
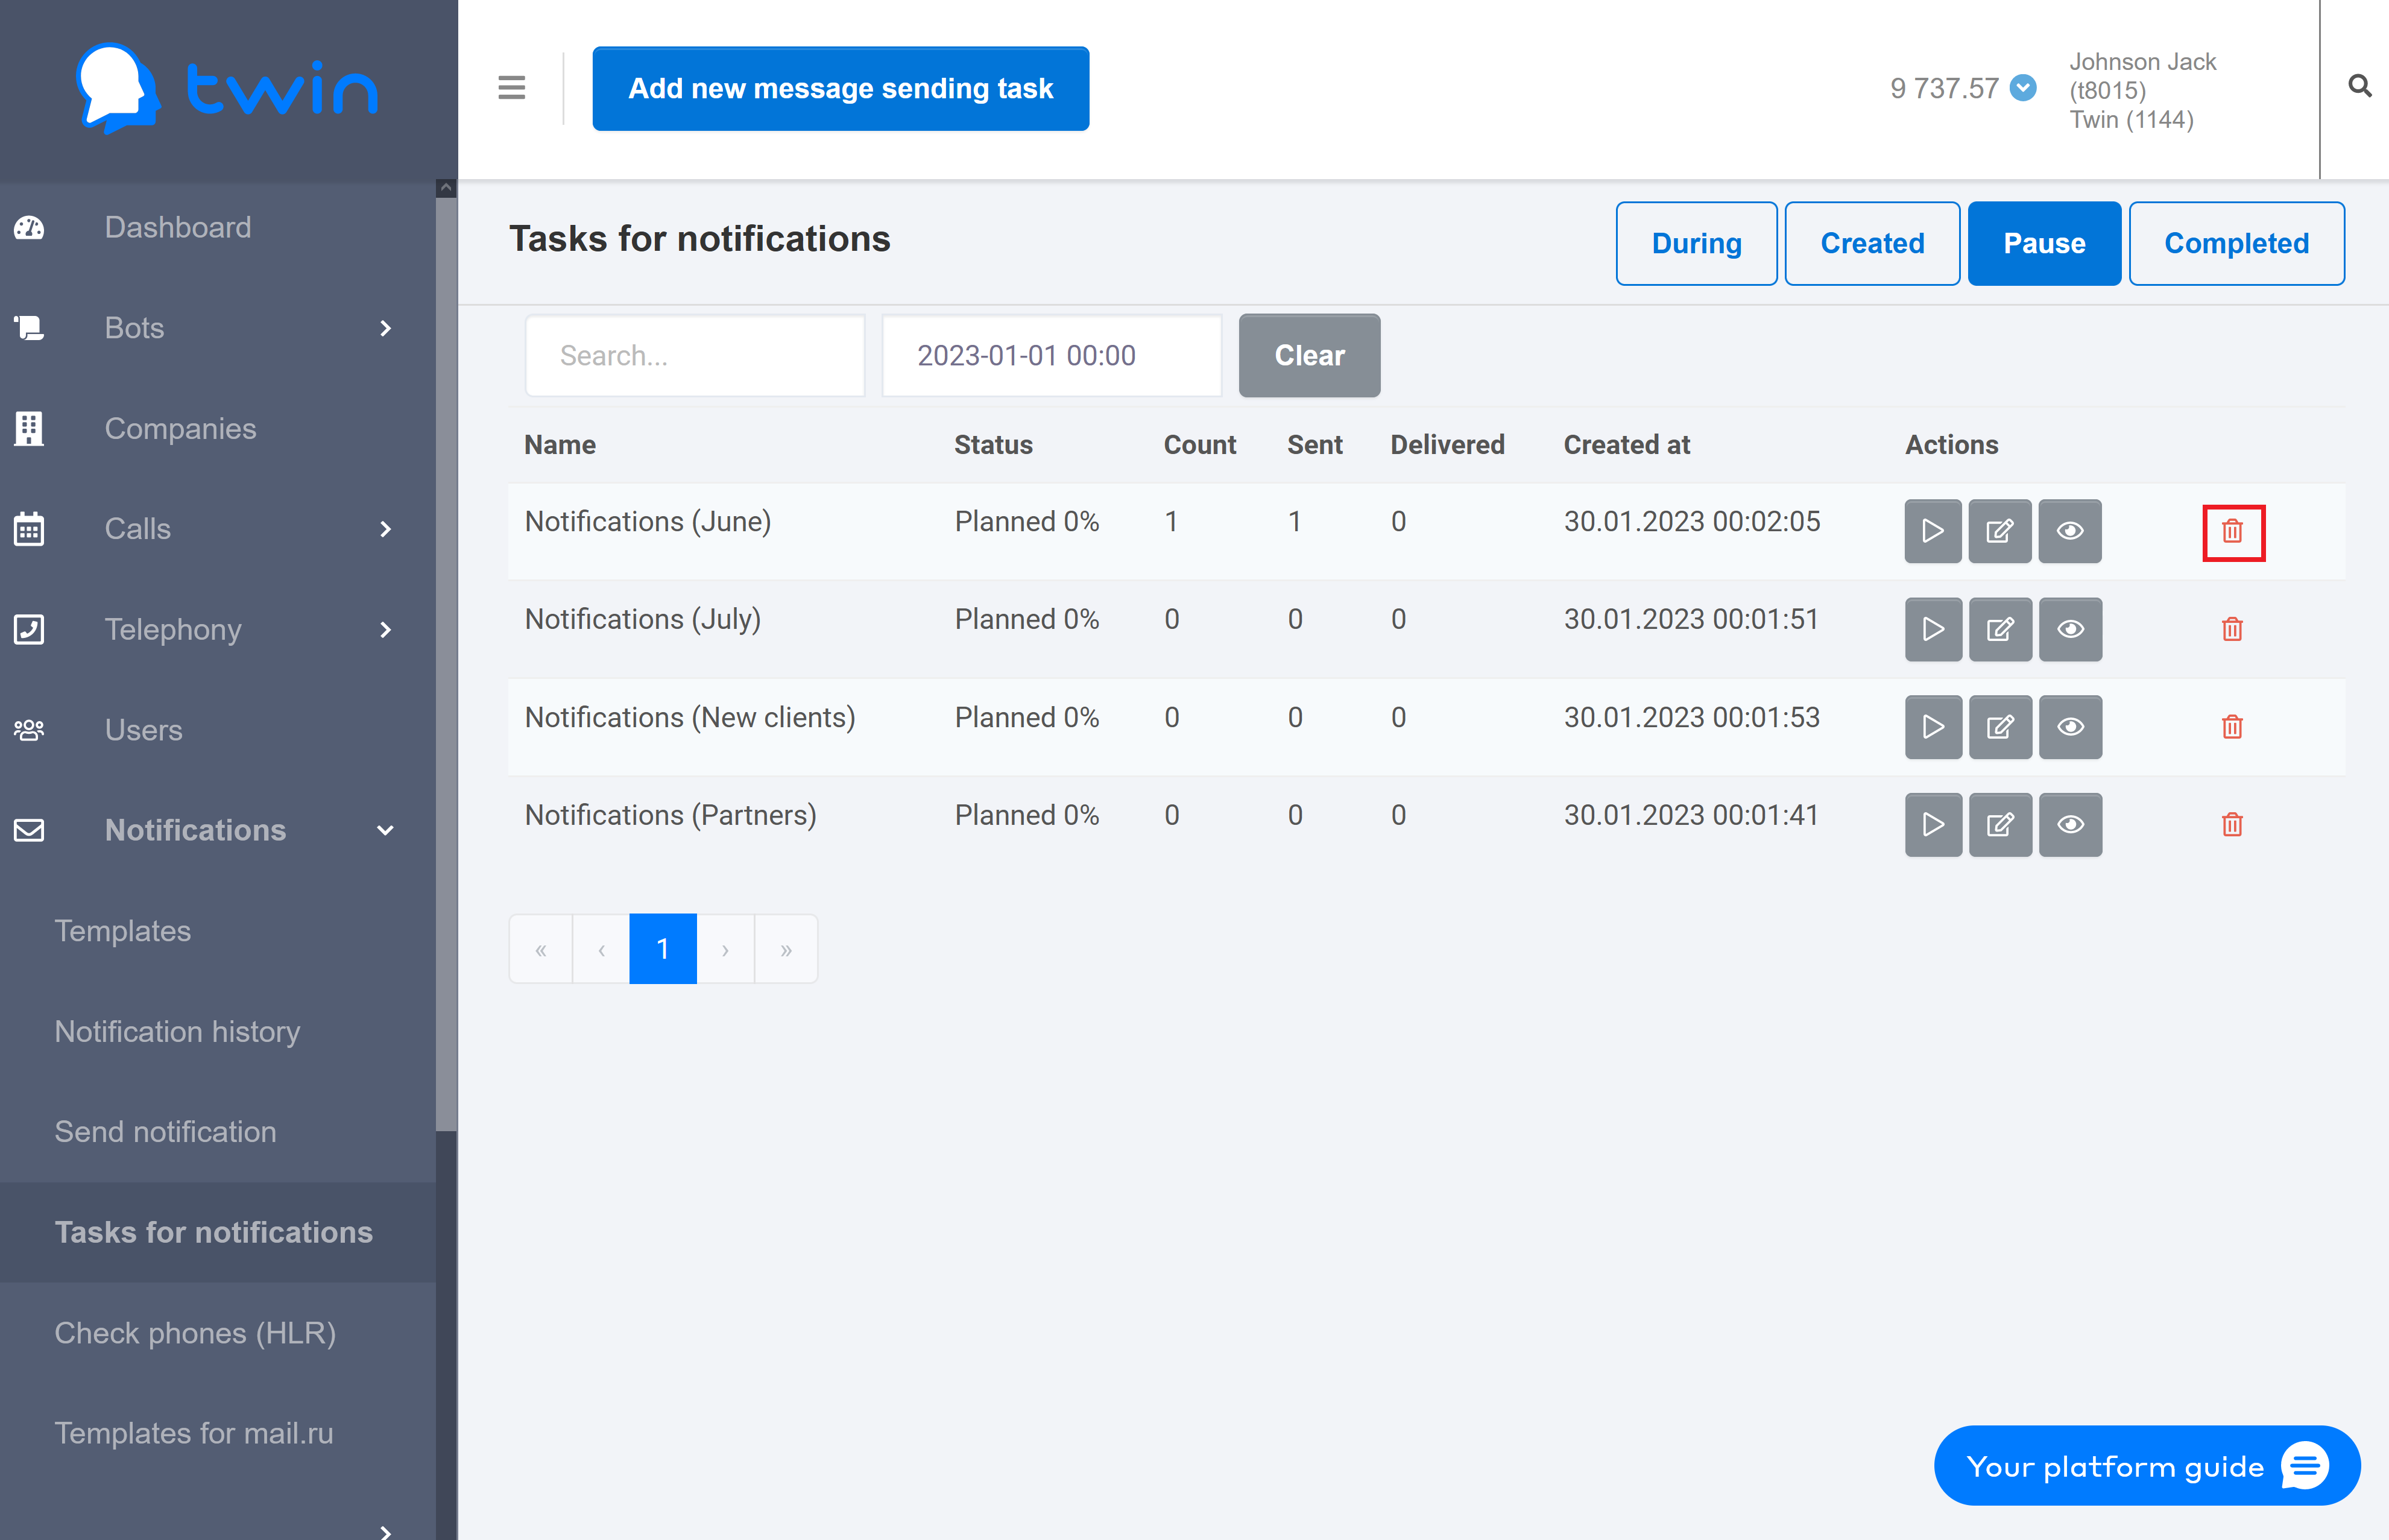
As a result the selected notification task will be deleted.
Viewing information about notifications sent using Twin API
On the side menu click Notifications – Check phones (HLR). As a result the Check phones (HLR) page will open.
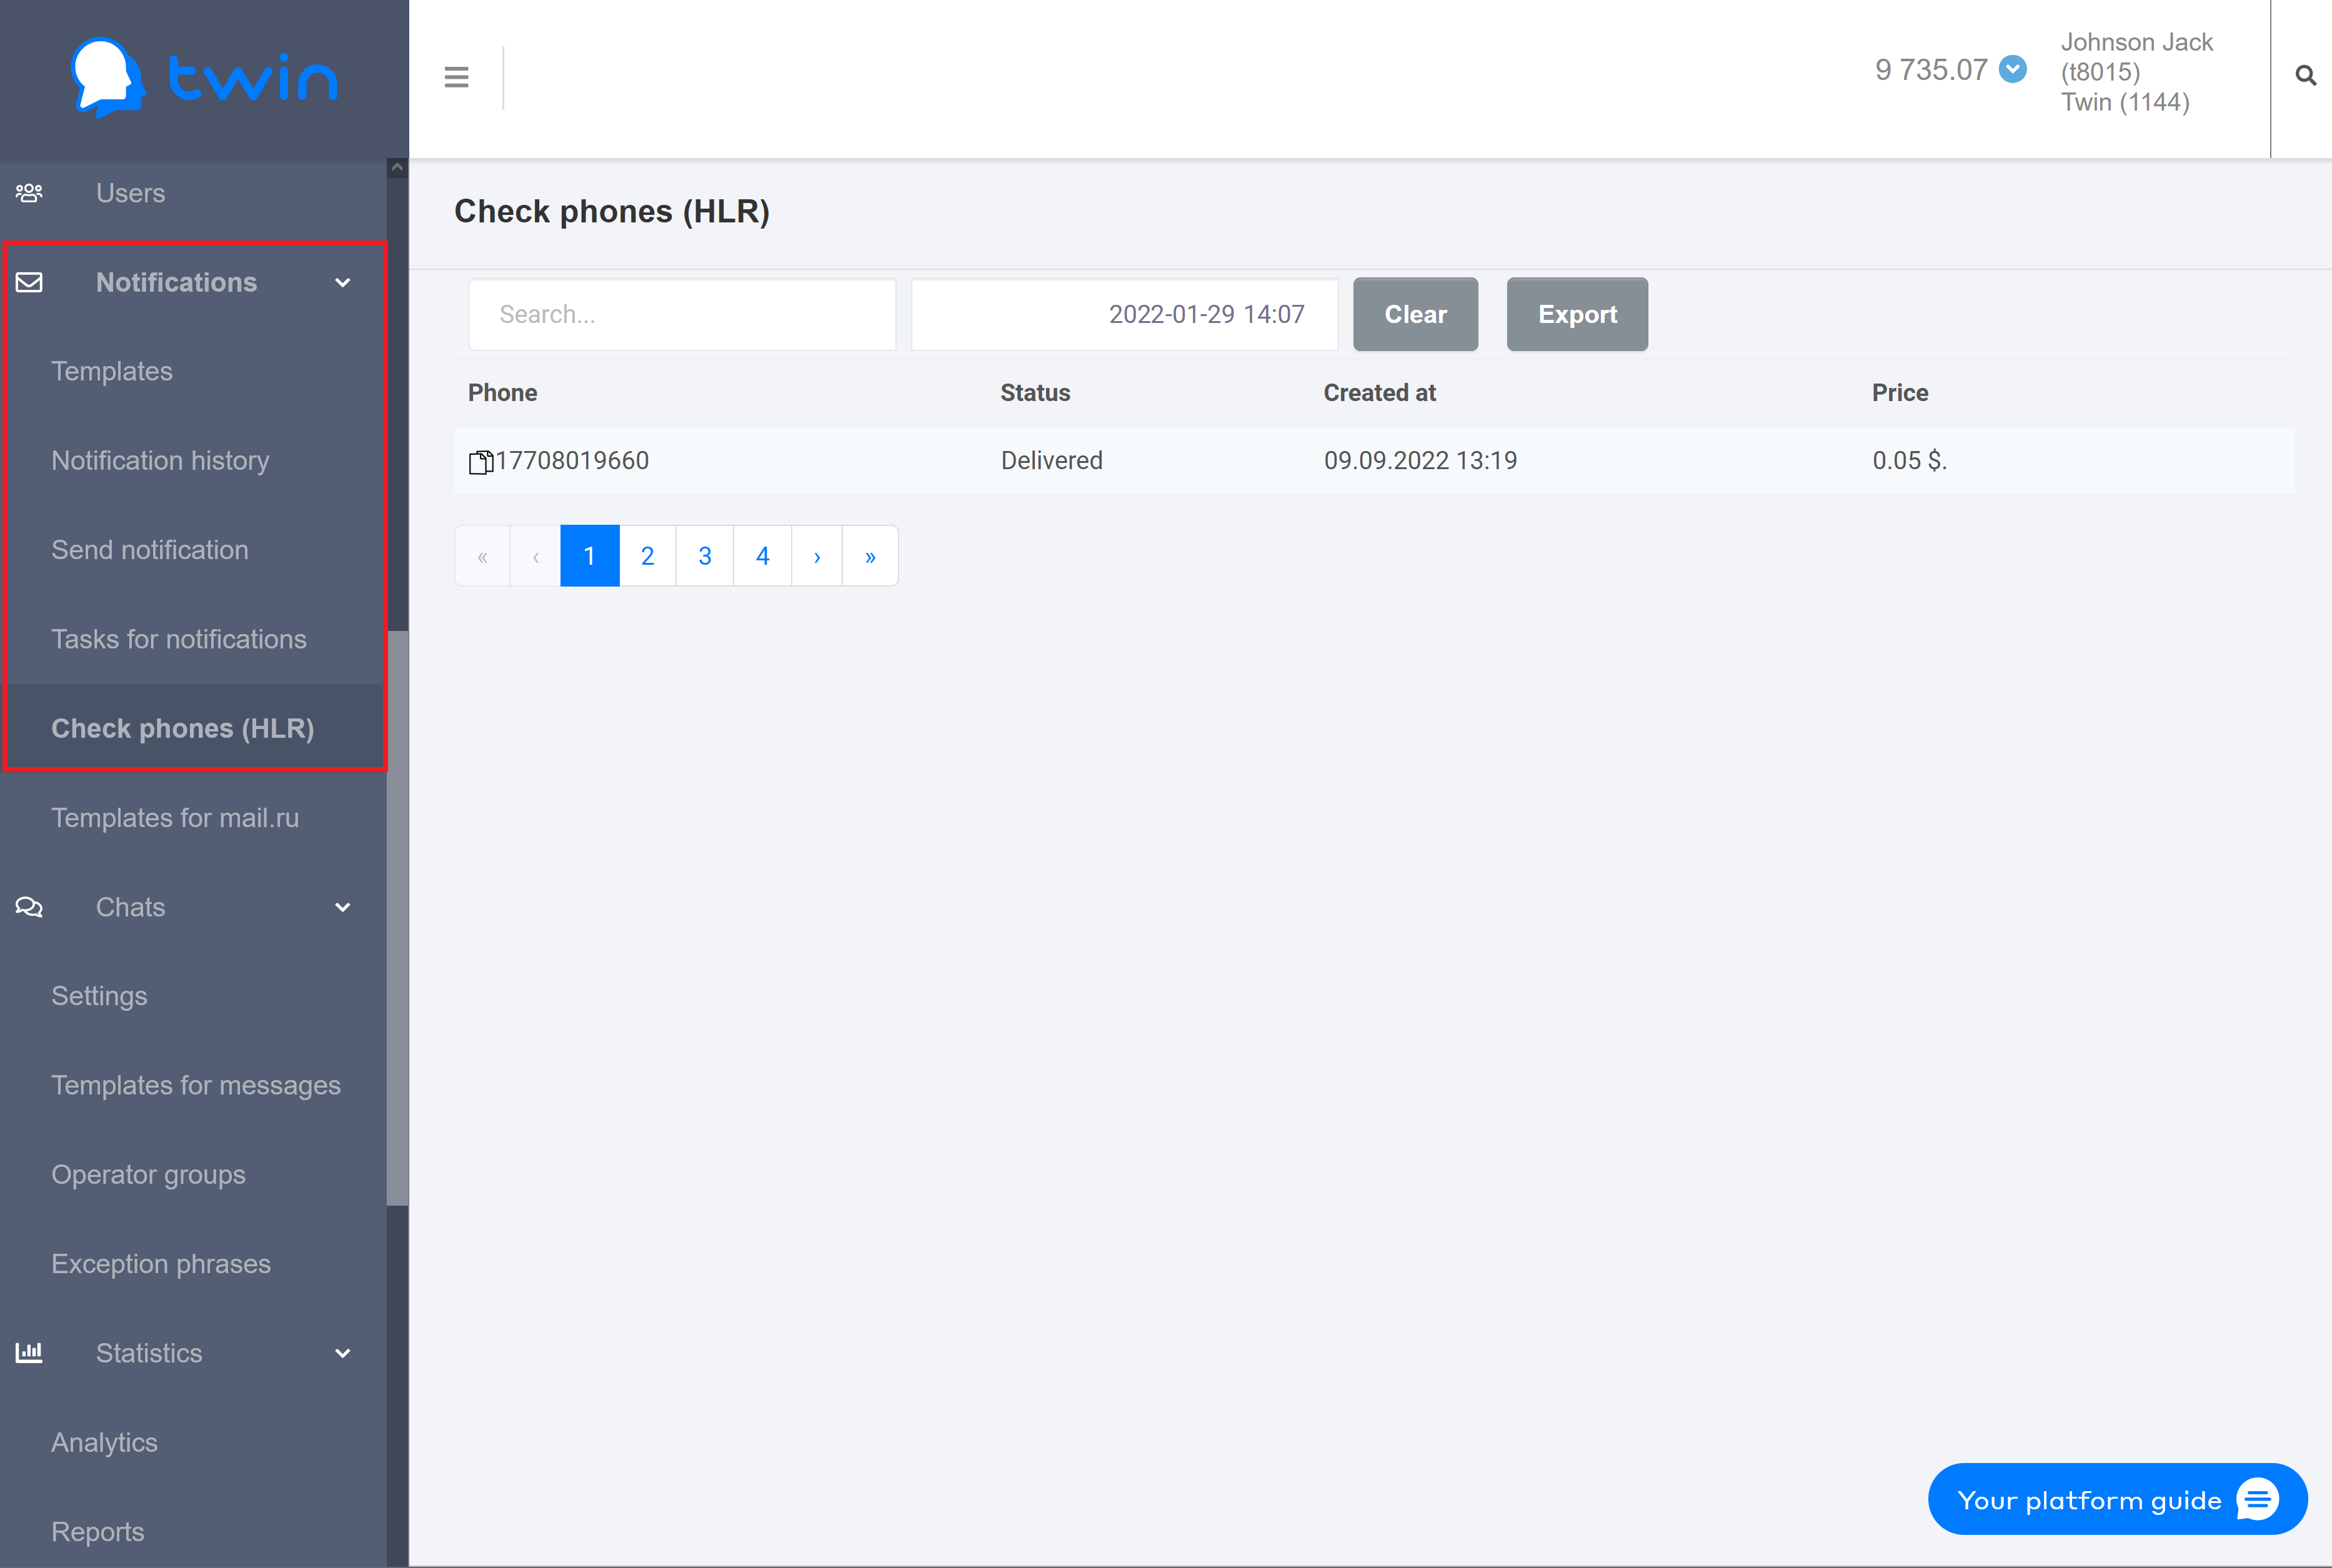
This page contains information about all notifications that were sent to clients using Twin API.
The page contains the following information:
- Client phone number
- Delivery status
- Creation date and time
- Cost
Searching for notifications sent using Twin API
If there are a lot of records on the list, you can filter records you need or search for the necessary record by a phone number or creation date and time.
For this enter the necessary value in the search fields at the top of the page.
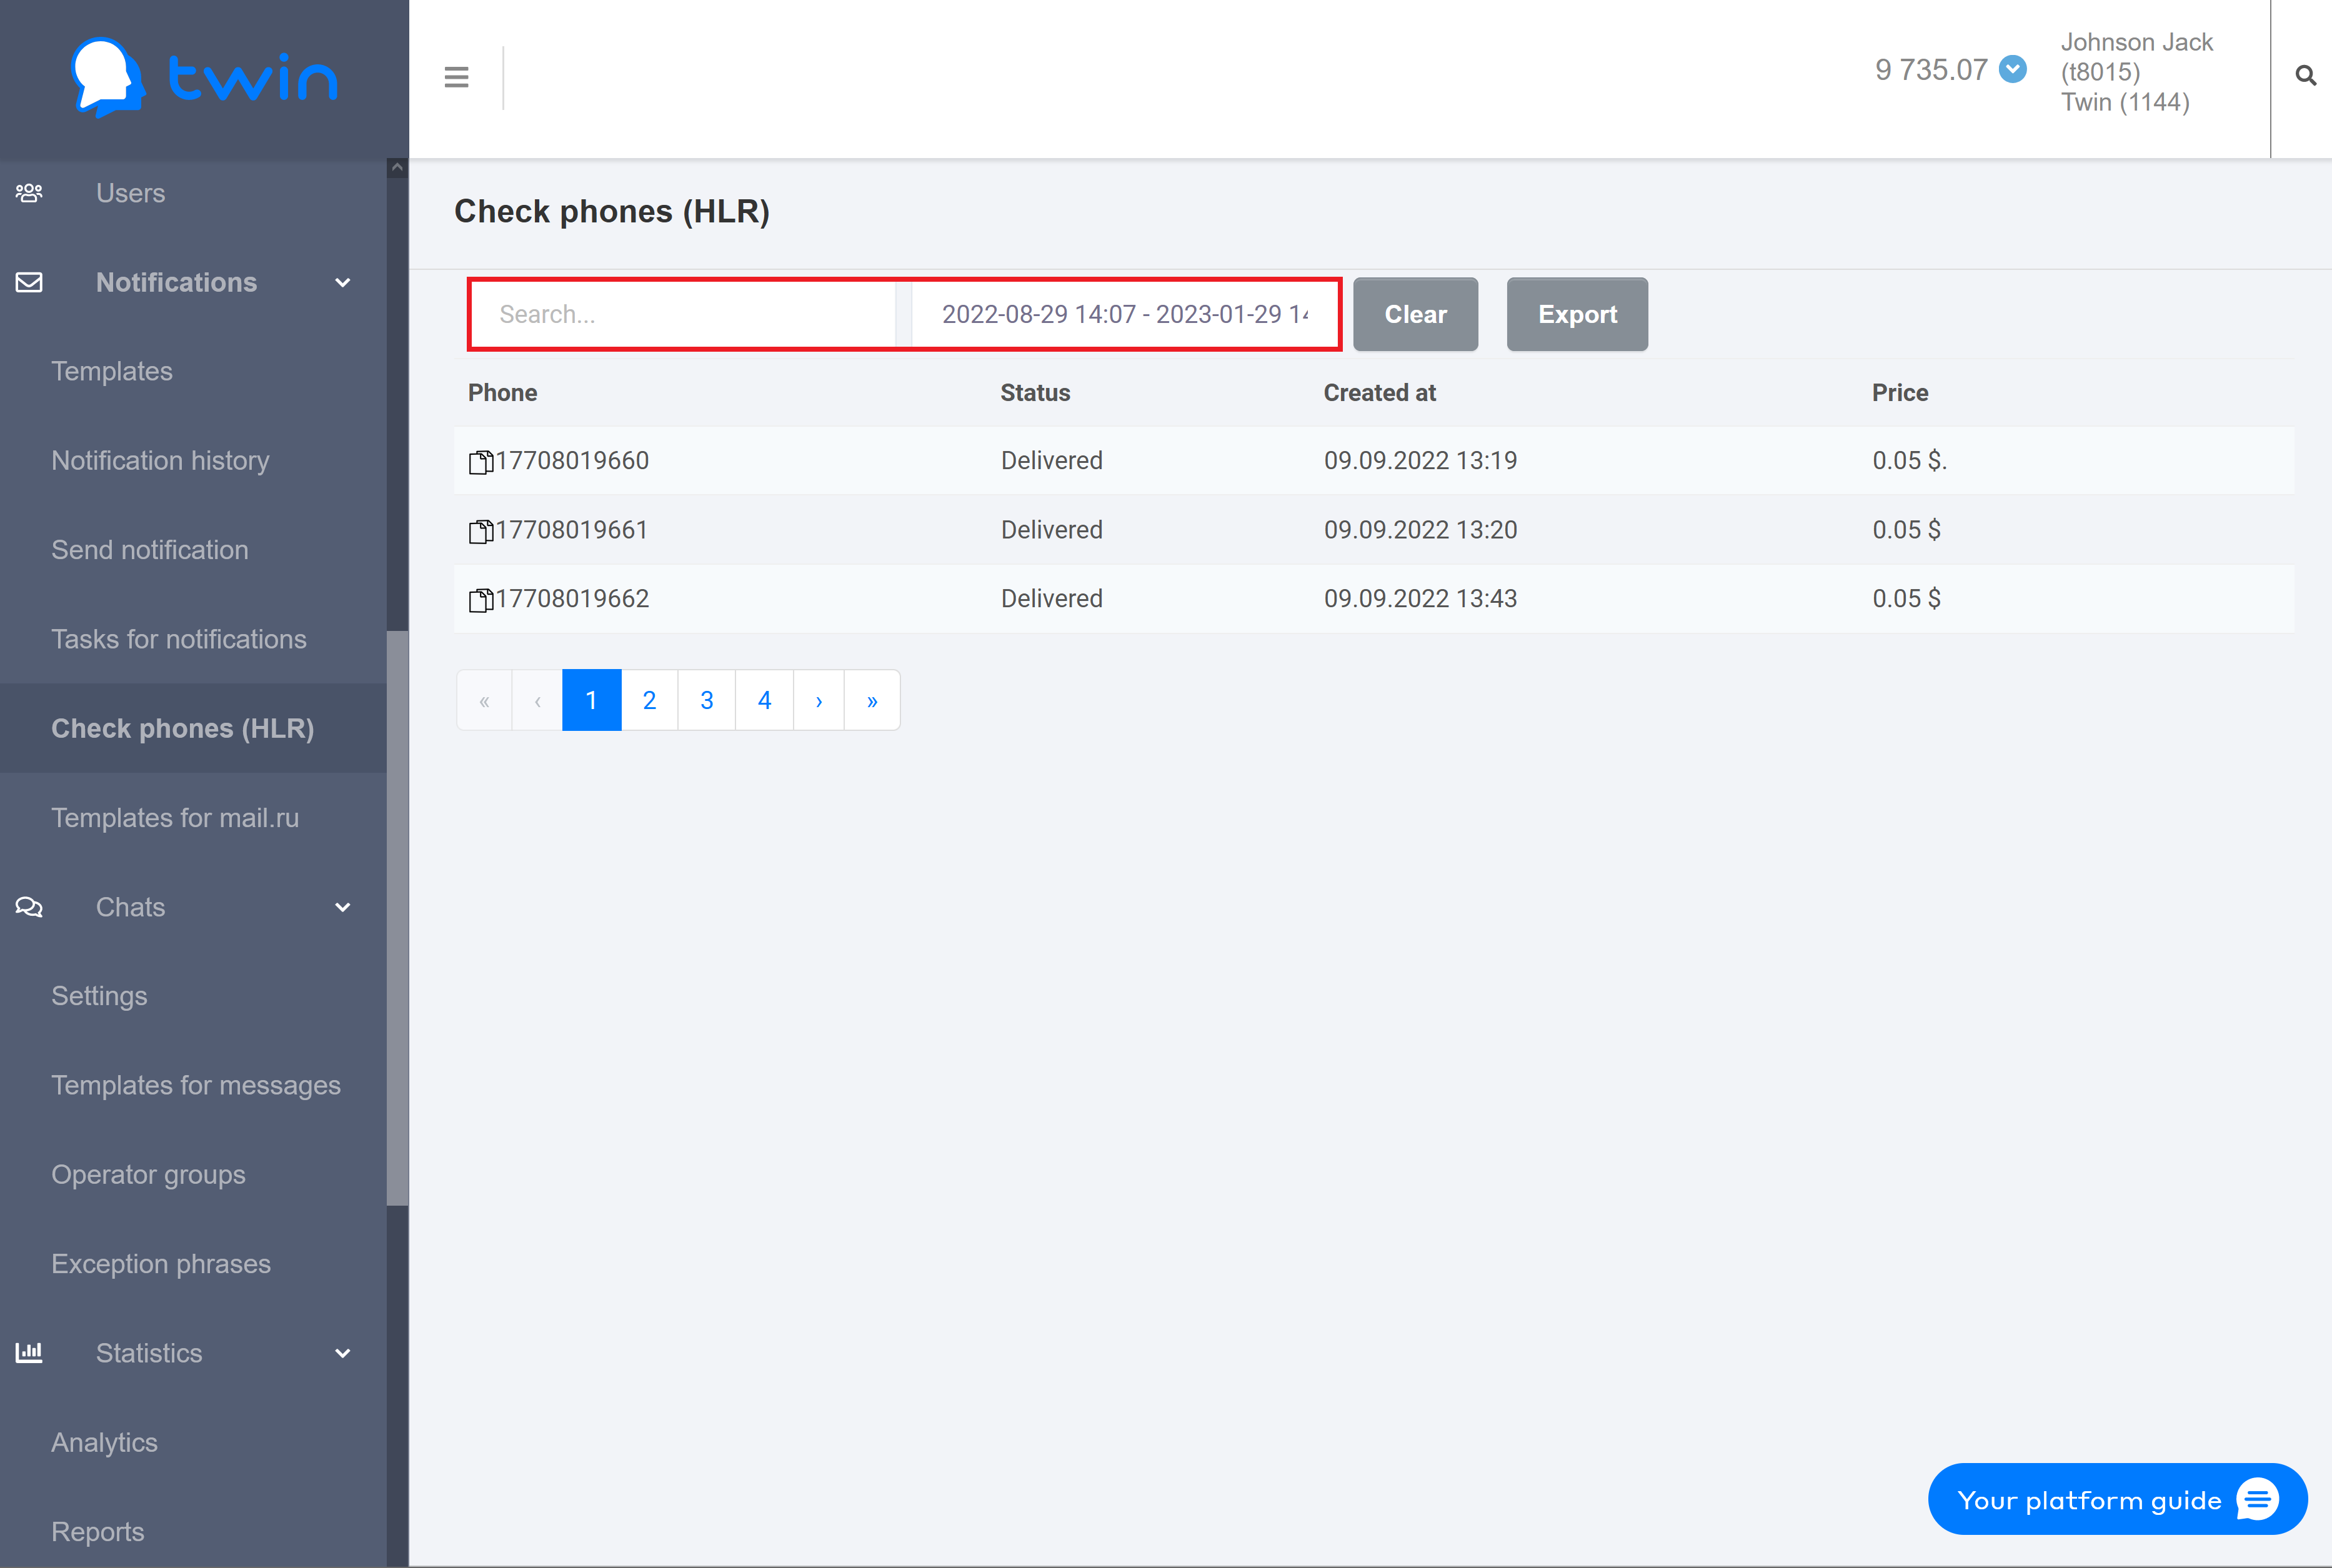
To search for records by a phone number enter the necessary number or its part in the first search filed.
To search for records by time select the necessary period of time in the second search filed.
Search results are displayed automatically.
To delete specified values use the Clear button.
Viewing information about notifications sent using different communication channels
On the side menu click Notifications – Notification history. As a result the Notification history page will open.
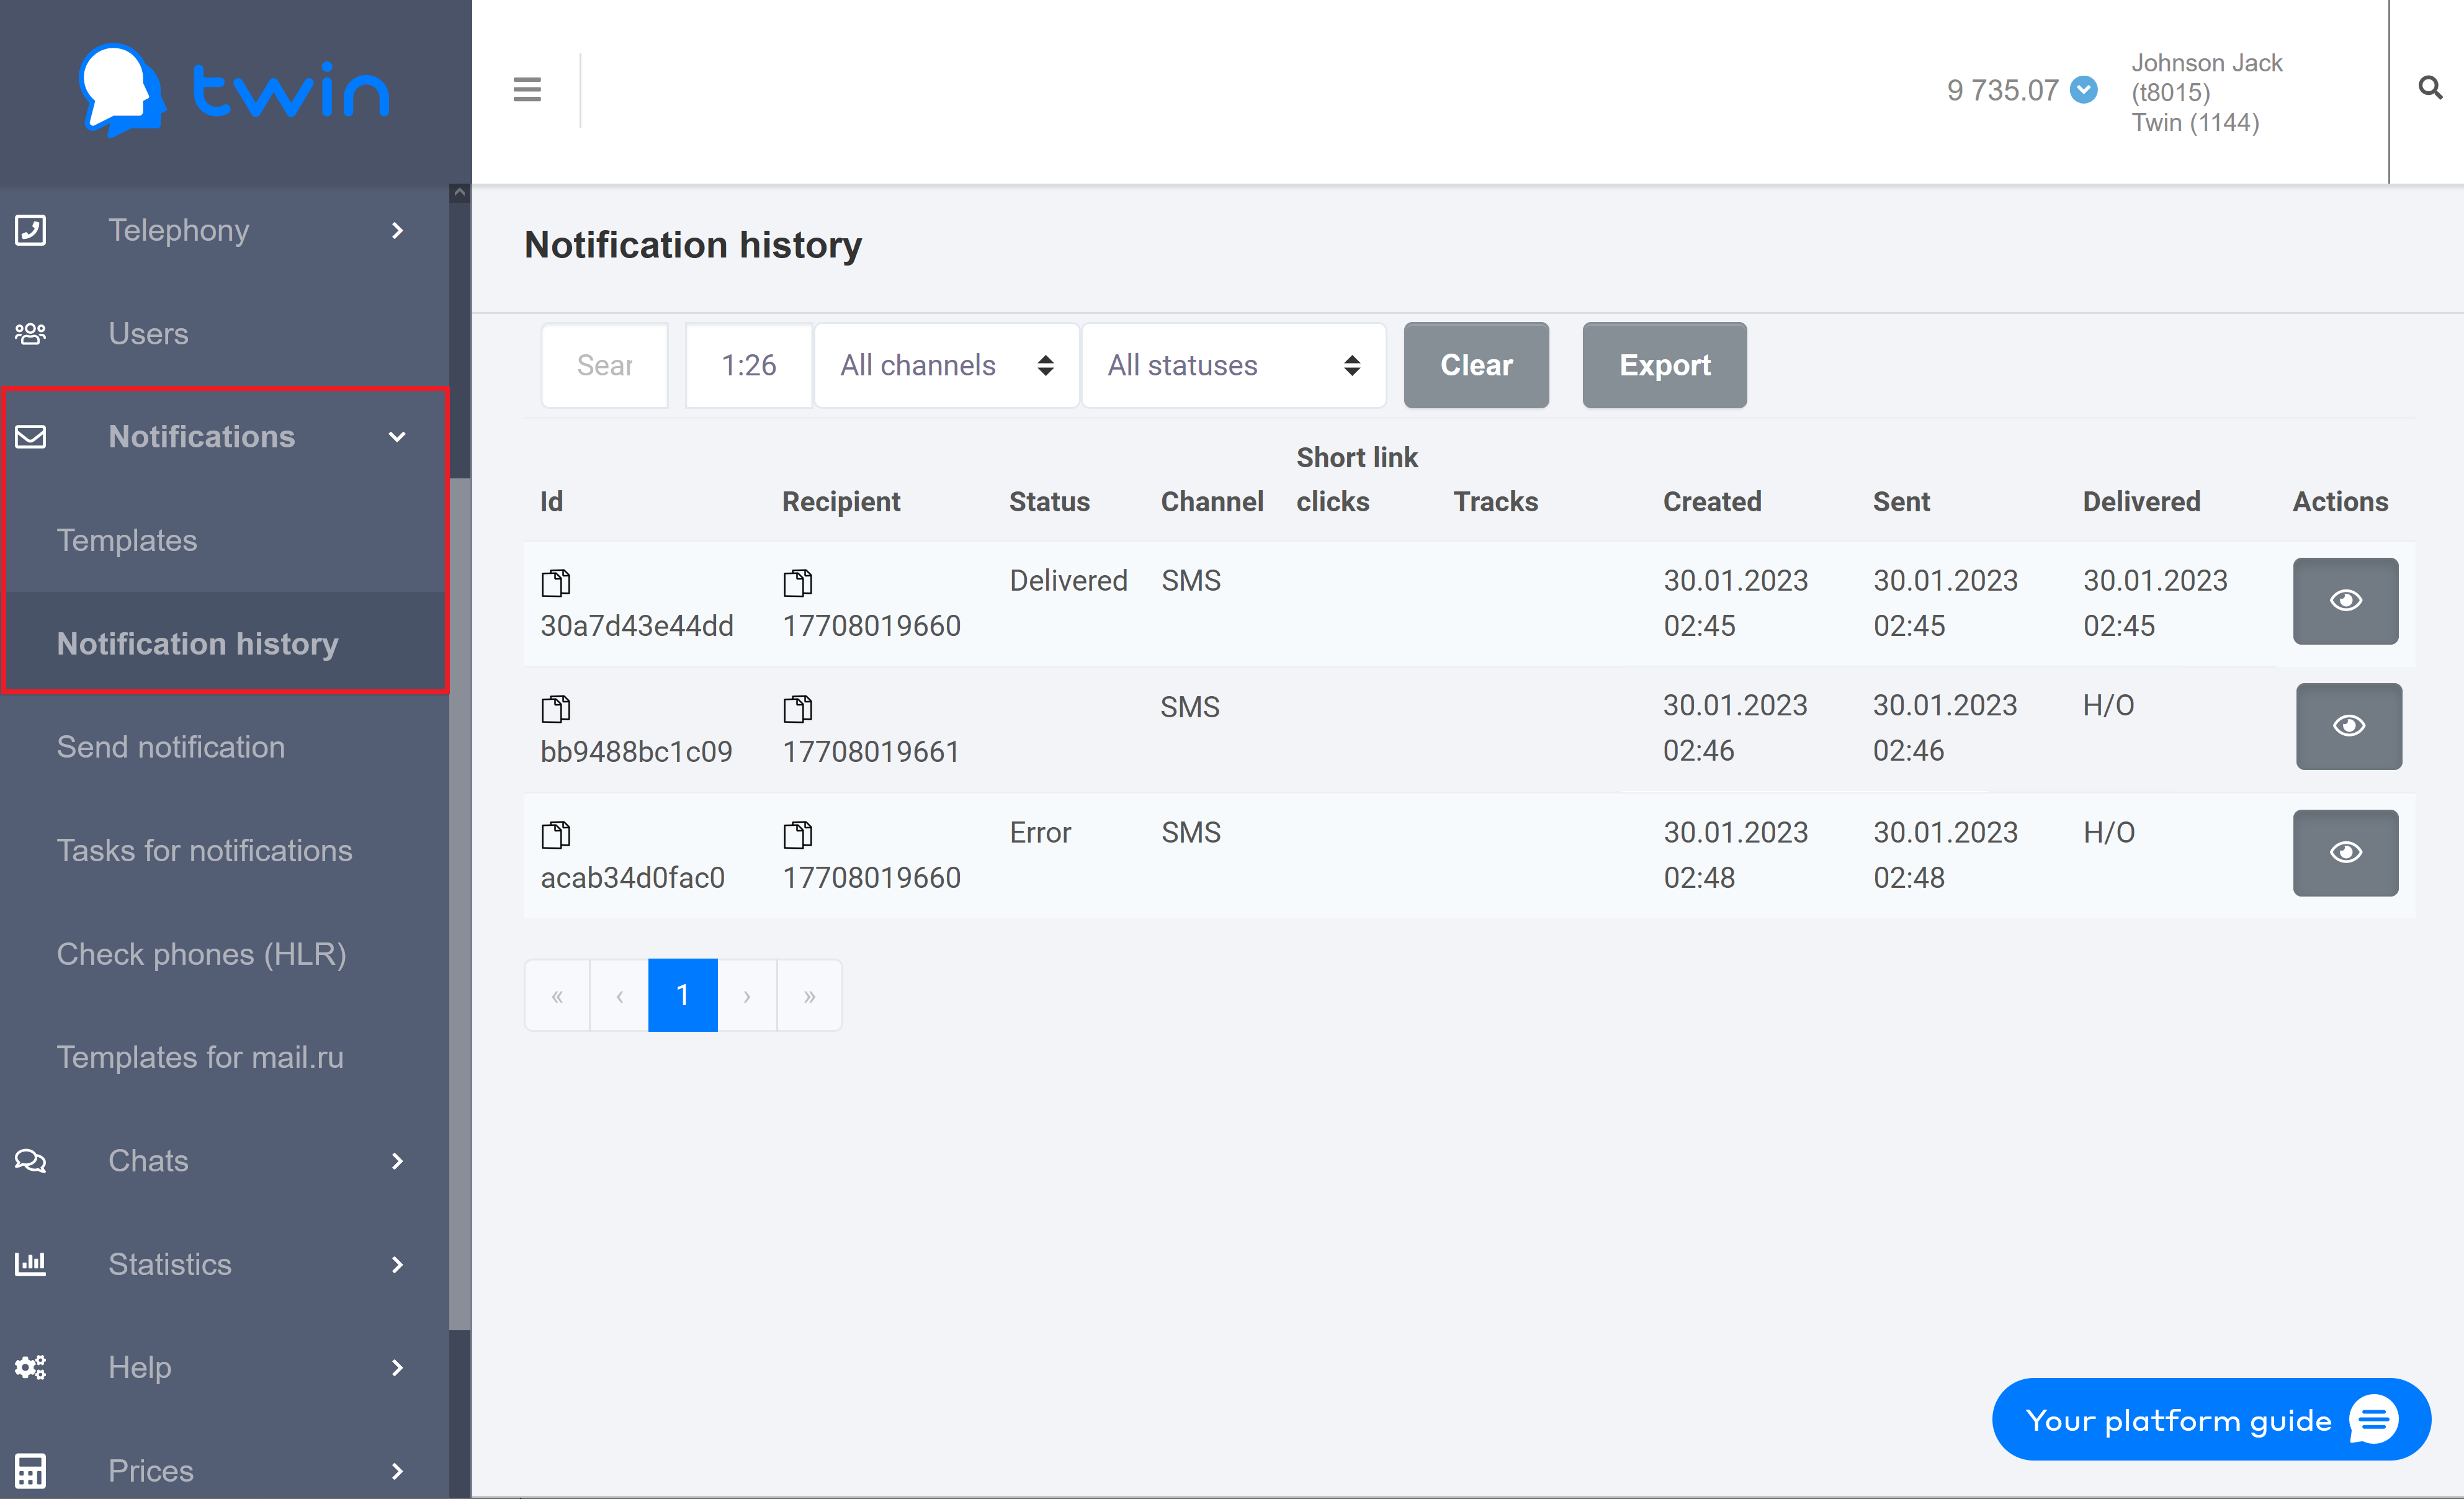
This page contains a list of records with the following information:
- Id – notification ID
- Recipient – recipient's phone number
- Status – delivery status
- Channel – communication channel that was used to send a notification
- Short link clicks – number of times clients clicked links in the message
- Tracks – number of tracks for notifications by email
- Created – date and time when a notification was created
- Sent – date and time when notification was sent
- Delivered – date and time when notification was delivered
With control elements at the top of the page you can filter and search for notifications.
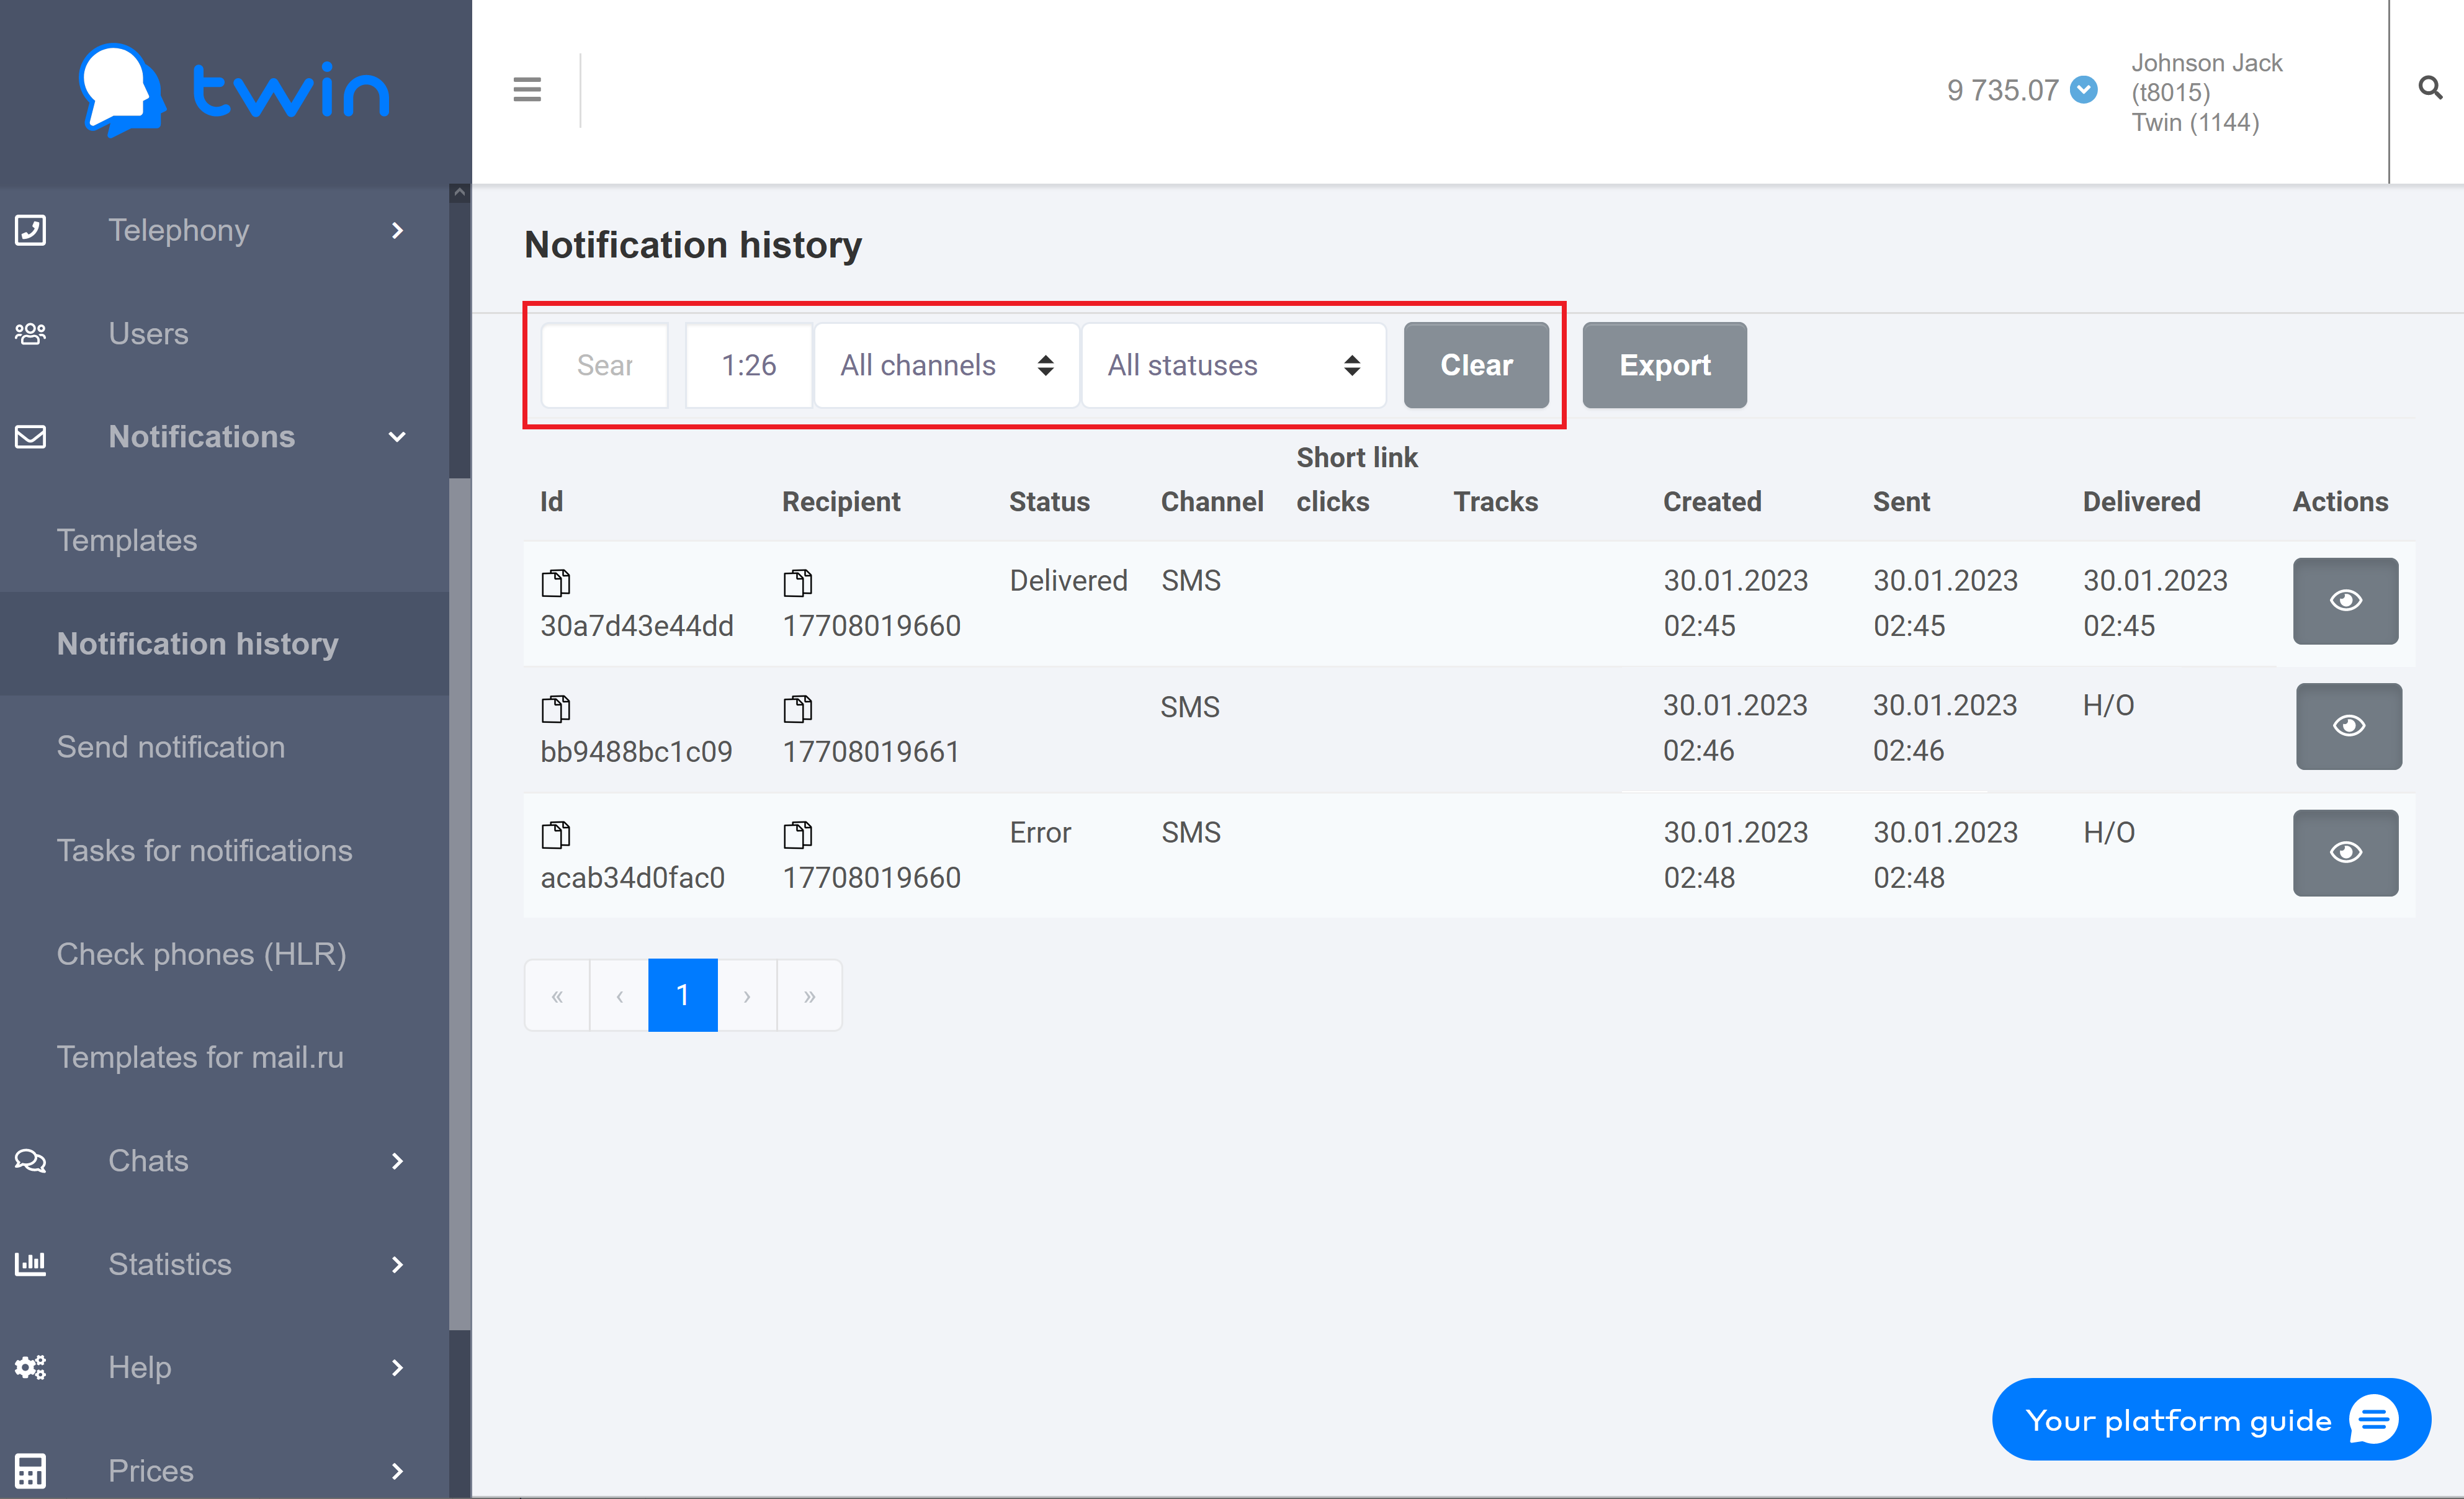
Using the Search field you can search for notifications by a recipient's phone number and the communication channel that was used to send notifications.
In the next field you can set the necessary period for the system to display notifications.
In the All channels field you can select the communication channel that the system used to send notifications.
In the All statuses field you can select the necessary delivery status. The following statuses are available:
- All statuses – all notifications are displayed.
- Created – notifications that were created but not yet sent to clients.
- Pending – notifications that the system is trying to send to clients.
- Delivered – notifications that were delivered to clients.
- Undelivered - notifications that were not delivered to clients due to an error.
- Canceled – notifications that were canceled by the user.
- Error – notifications that generated an error when the system attempted to send them (for example, a technical error that occurred due to a mobile network failure).
Delayed – notifications that will be sent within the time period specified in the notification template.
Created, optional – notifications that were created but were not sent. These notifications have the Required checkbox selected.
Omitted, optional – notifications that were not delivered via the specified communication channel (for example, Viber) due to technical problems. The system used an alternative communication channel to send these notifications (for example, SMS).
To view information about a sent notification select the necessary record on the list and click ![]() .
.
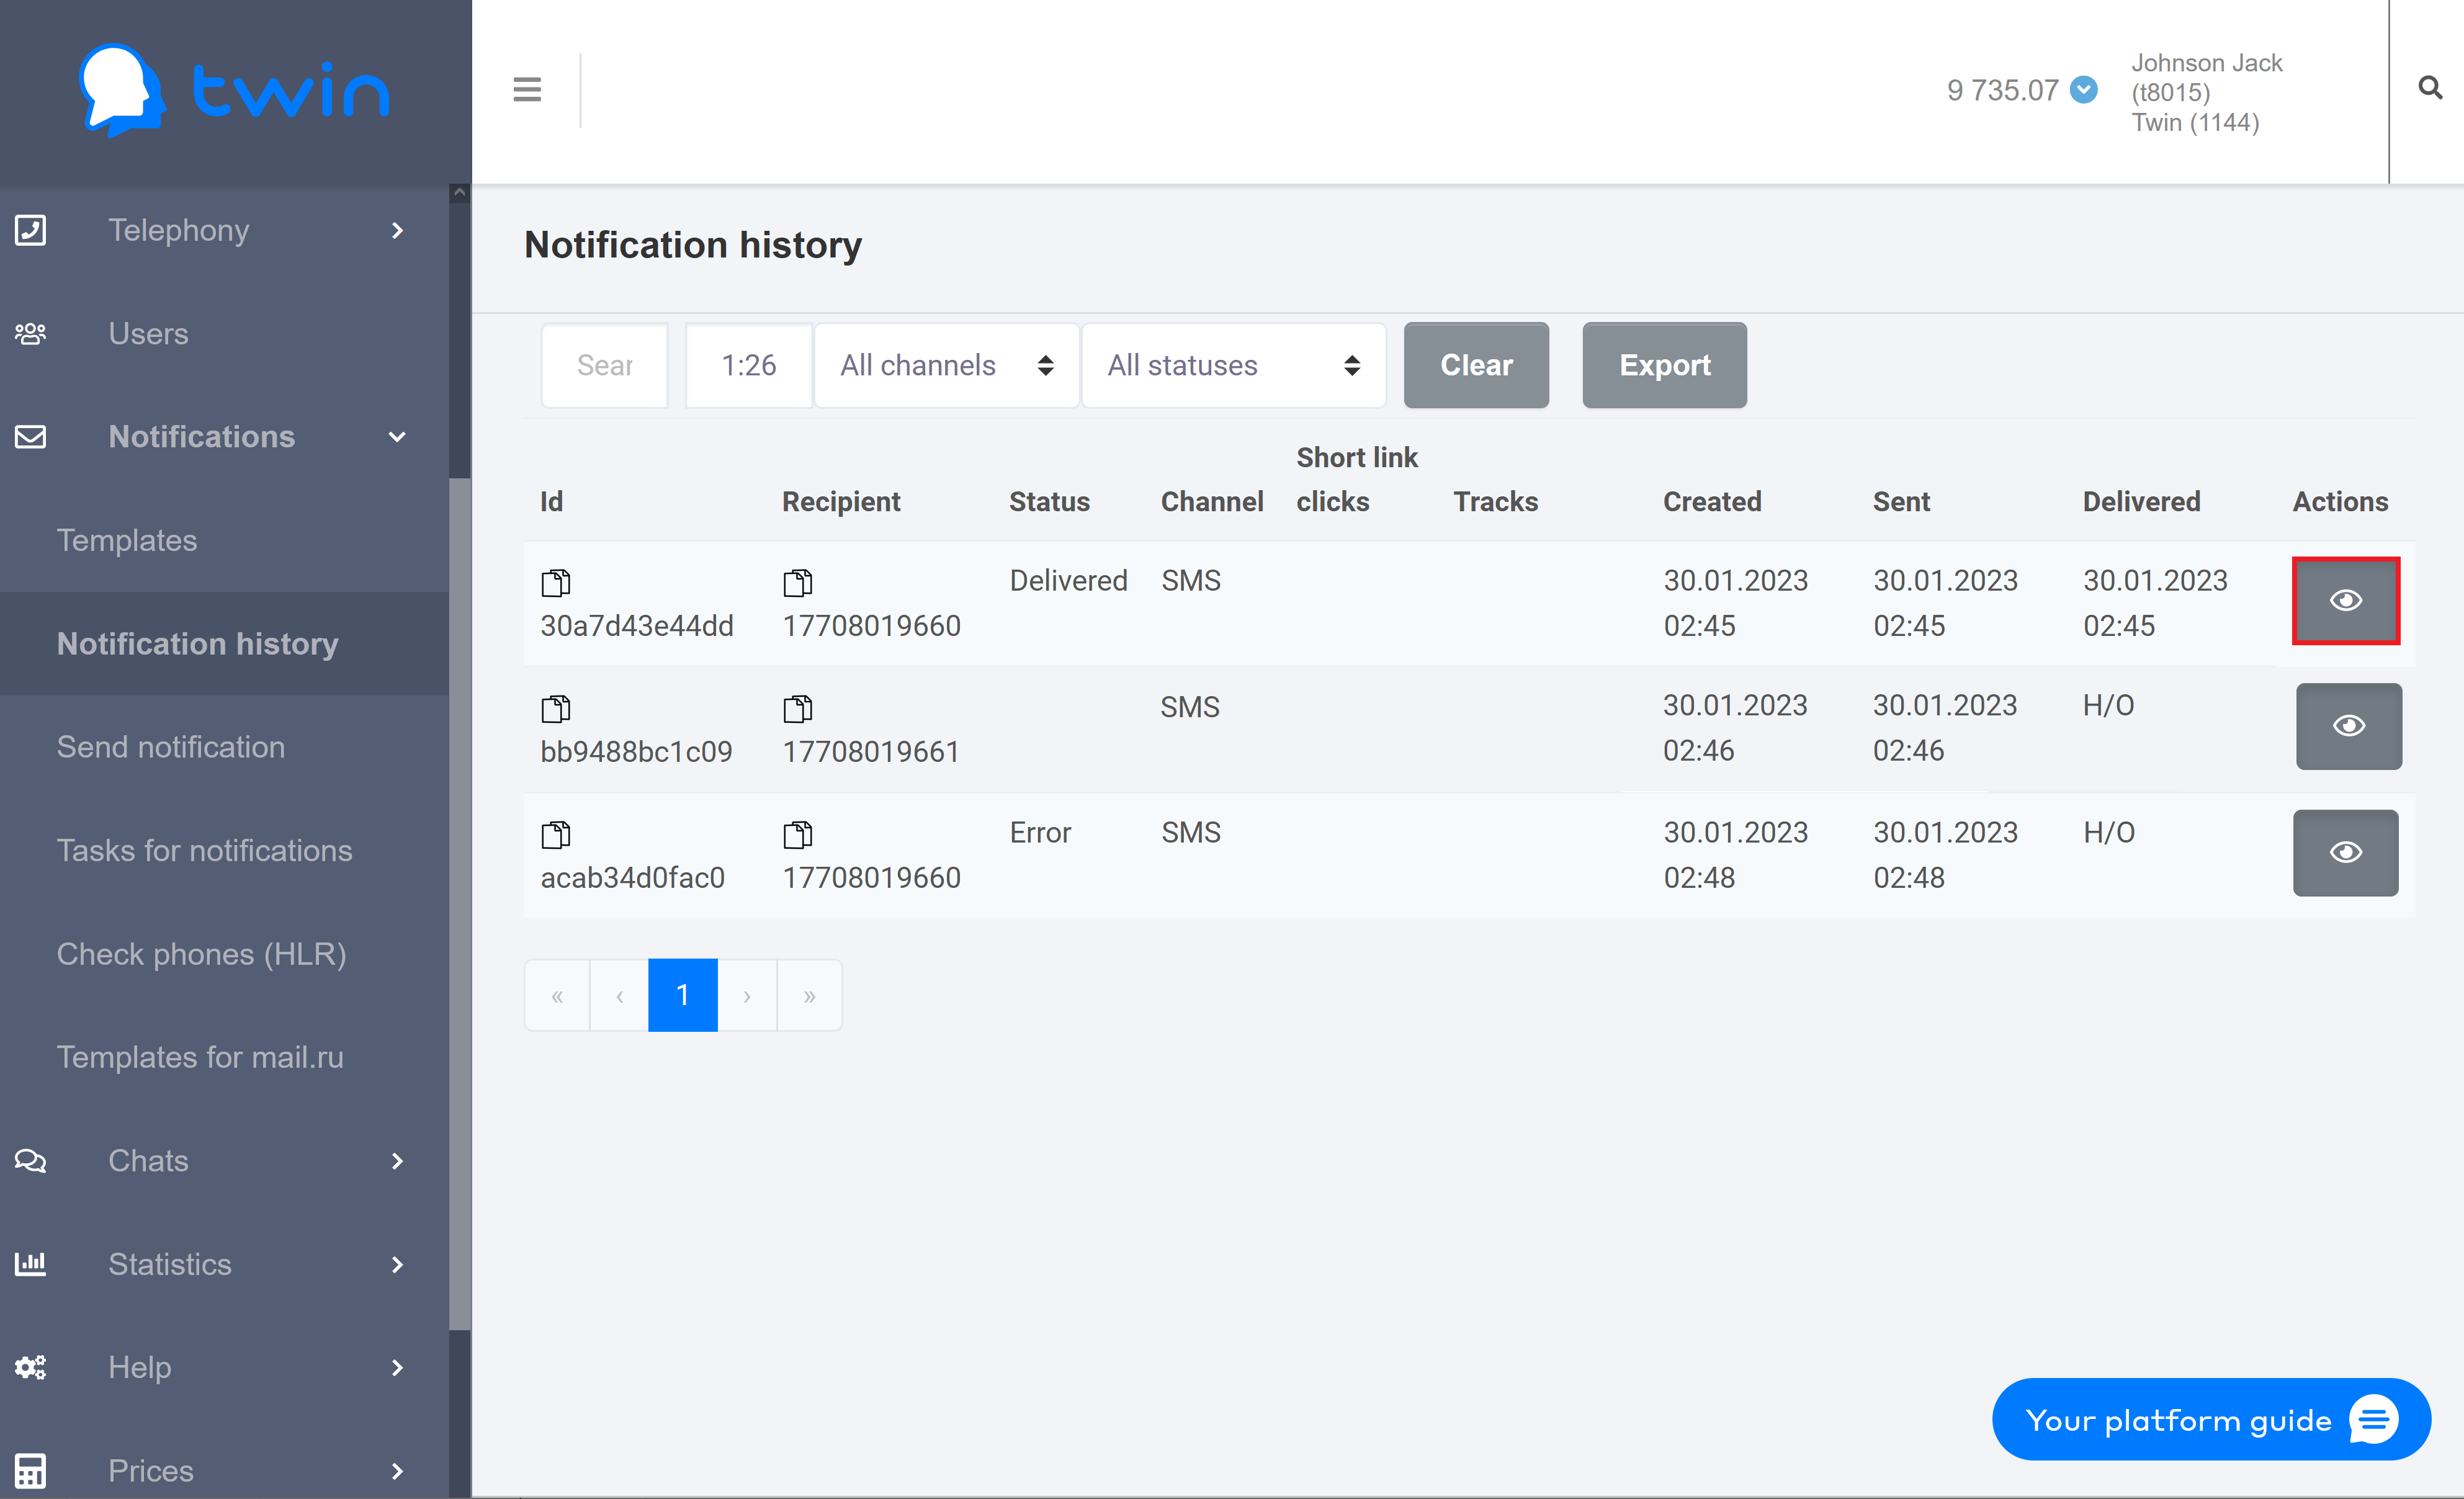
As a result the following dialog box will open.
Creating reports
Creating a report for notifications sent using different communication channels
On the Notification history page you can create reports with detailed information about all notifications that you sent to your clients.
Use the filter at the top of the page to select the communication channel and choose the necessary period of time.
To create a report click Export.
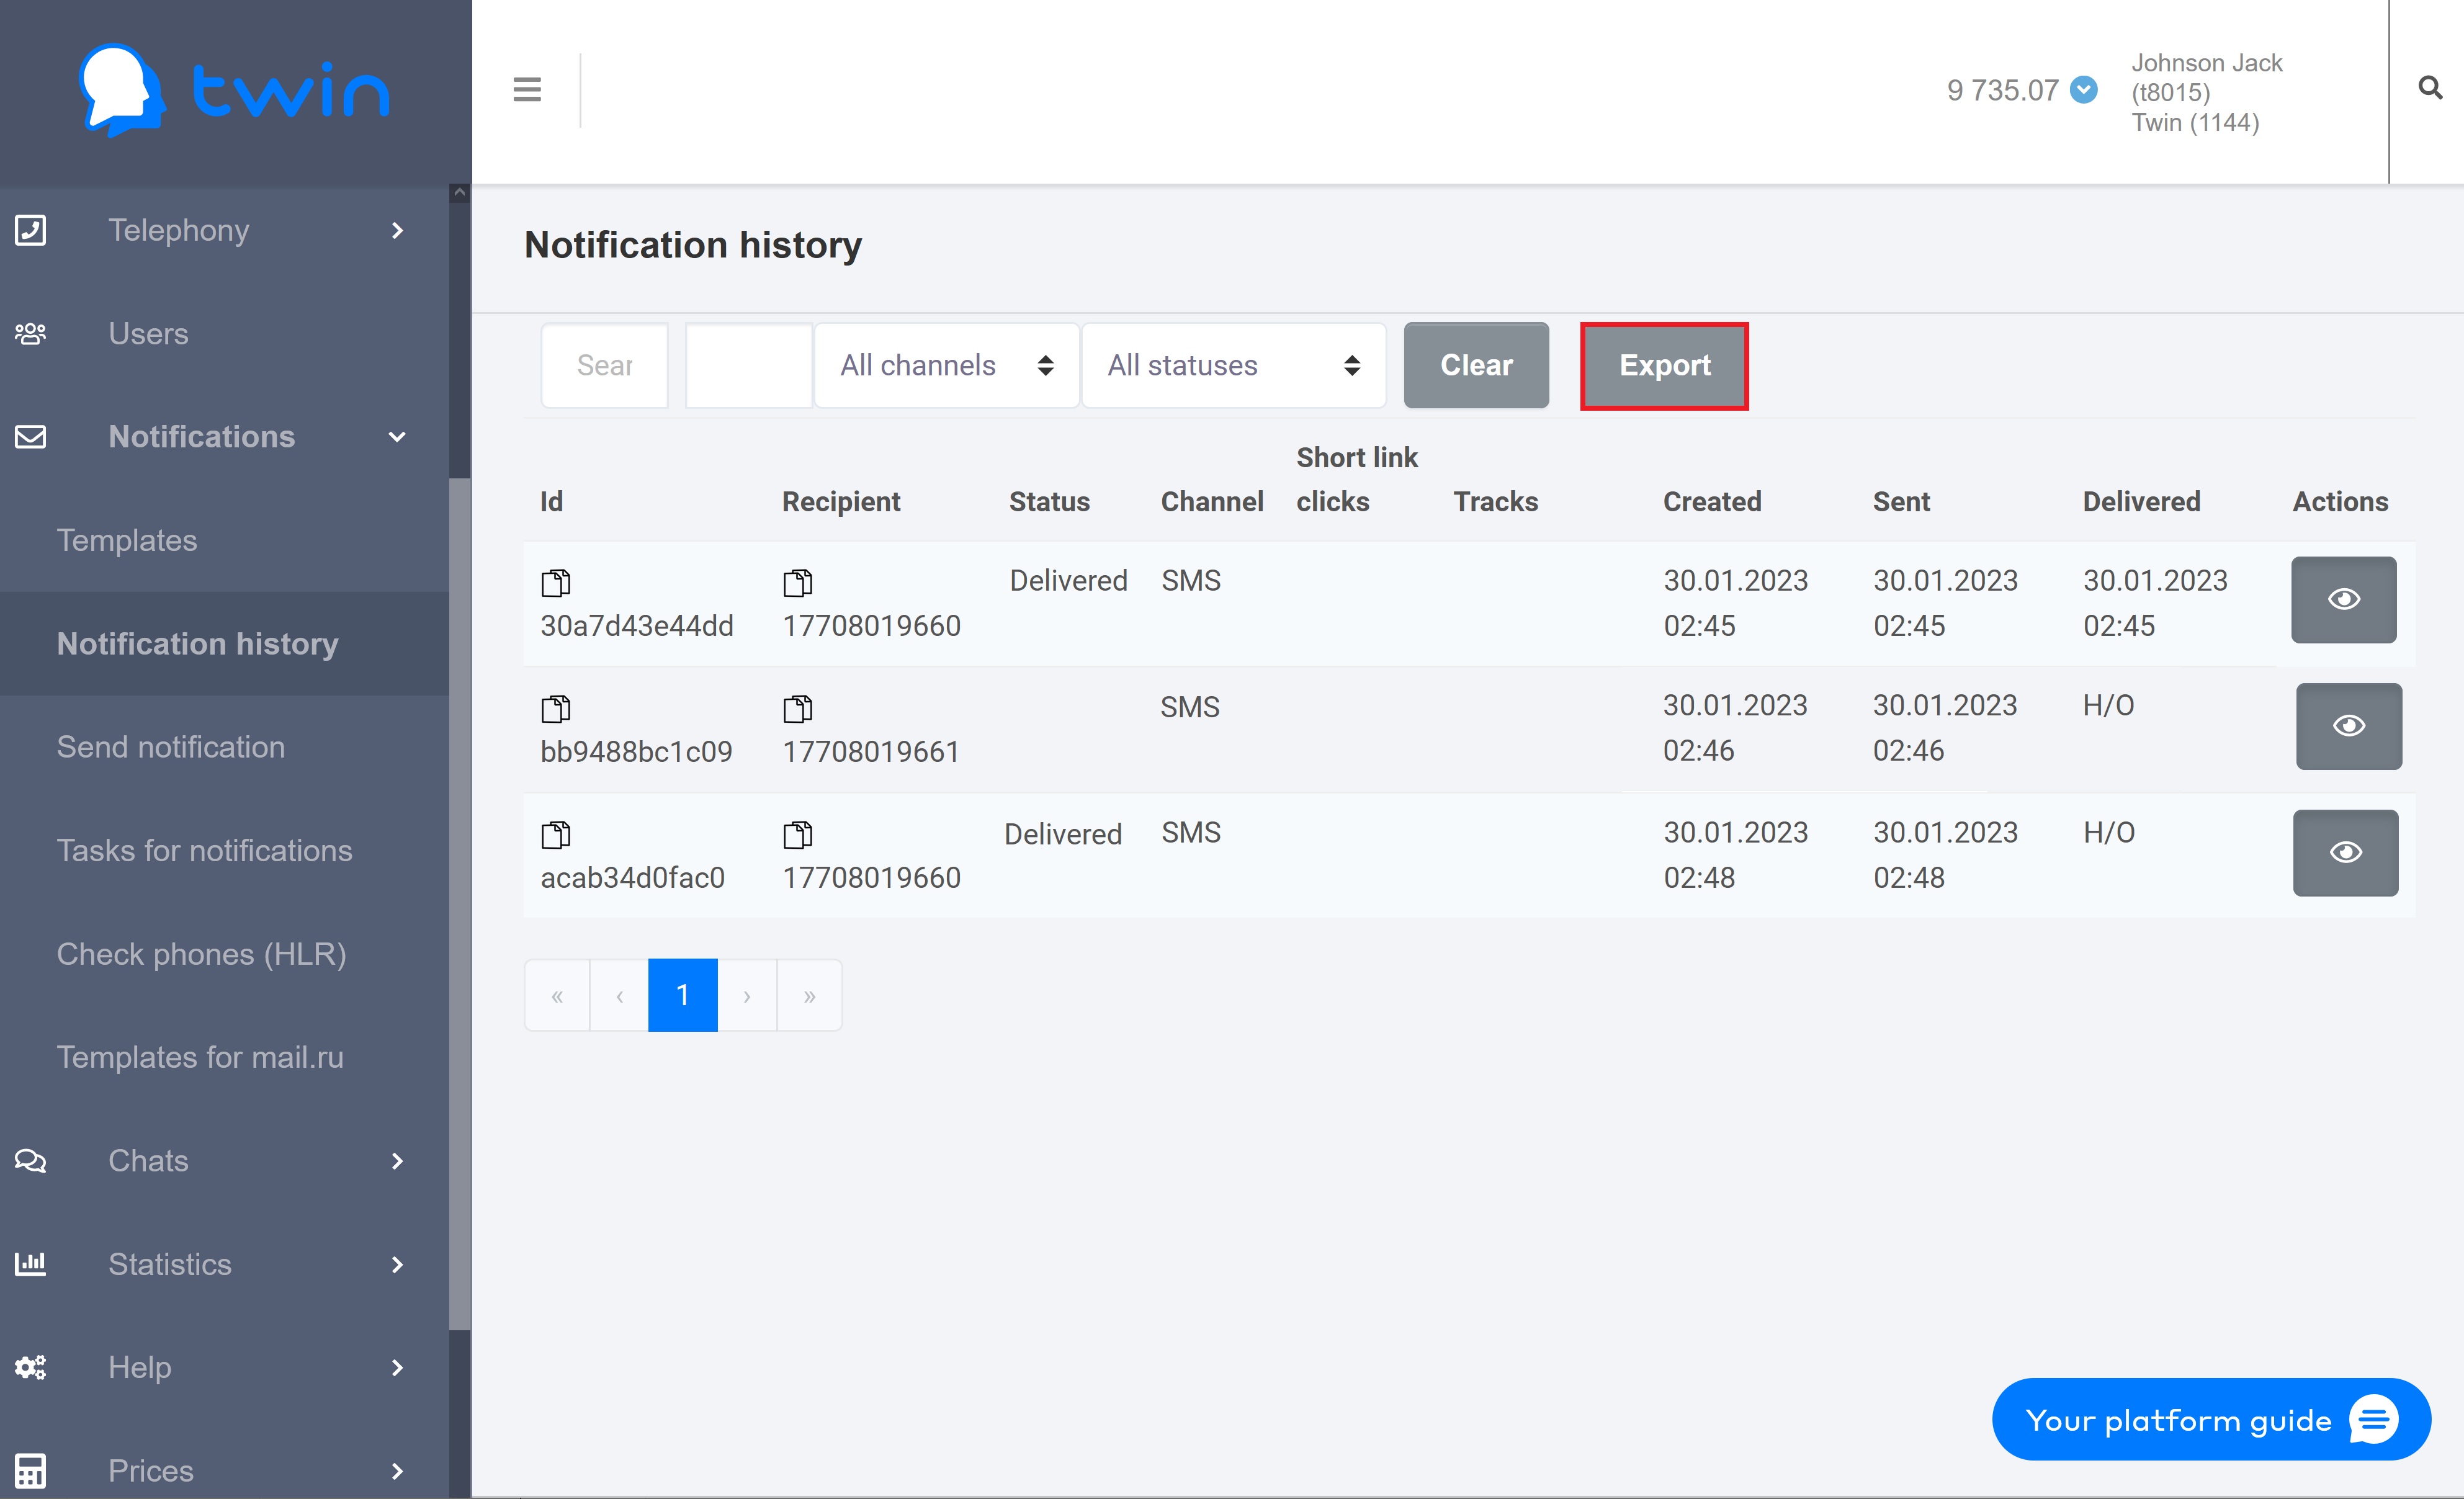
As a result the system wil generate the report.
The report contains the following information:
- Message identifier – unique identifier of the message.
- Bulk identifier – unique identifier for a batch of messages. Associated with every message in the batch.
- Group identifier – unique identifier for a batch of messages. The system uses this parameter to group notifications.
- Message flow identifier – unique identifier for a batch of messages that prevents messages from being sent to the same channel. Associated with every message in the batch.
- Message delivery status – delivery status. The following statuses are available:
- DELIVERED – notification was processed and delivered to the recipient.
- UNDELIVERED – notification was sent but not delivered to the recipient.
- PENDING – notification was sent to the recipient but the delivery report was not received.
- PAUSED – notification was successfully processed but was not sent.
- READ – notification was read.
- ERROR – error occurred while sending the notification.
- CREATED – notification was created but was not sent.
- SENT – notification was accepted for sending.
- QUEUED – notification that is in the queue.
- SKIPPED – notification from the queue that was not delivered.
- CANCELED –canceled notification.
- DELAYED – a notification from the queue that will be sent soon.
- Status description – status of the notification.
- Messaging channel – communication channel that the system used to send the notification.
- Sender – the sender name.
| Примечание |
|---|
The sender name is used only for the SMS channel. |
- Recipient – client phone number that the system used to send the notification.
- Message body – notification text.
- Message fee – price for sending the notification to a client.
- Mobile network operator – mobile network carrier that the system used to send the notification.
| Примечание |
|---|
In most cases the value of this parameter is not displayed since many mobile network carriers does not provide this information. |
- Message template identifier – ID of the notification template that was used to send the notification.
- Message template name – name of the notification template that was used to send the notification.
- Variables – variables that are used in the message text.
- Message part count – before the system sends a notification, it divides it into several parts. The price for sending a notification is calculated with regard to the number of these parts.
- Count of message views and clicks Email – number of views and clicks for the notification by email
- Short link – shortened link displayed in the message text.
- Short link count clicks – how many times the client clicked the link.
| Примечание |
|---|
This parameter is not used when notifications are sent using notification templates. |
- Date of the message registration in the system – date and time when the notification was created.
- Sending date – date and time when the notification was sent.
- Delivery date – date and time when the notification was delivered.
- Date of the start sending (for DELAYED messages) – date and time when the system started to send the scheduled notification.
- Delivery expiration date – date and time when the delivery of the notification ends.
When the report is generated, you can download it from the Reports page.
Creating a report for notifications sent using Twin API
On the Check phones (HLR) page you can create reports with information about all notifications that you sent to clients using Twin API.
Use the filter at the top of the page to specify the phone number and select the necessary period of time.
To create a report click Export.

As a result the system wil generate the report that contains all displayed information.
The generated report contains the following information:
- Identifier check – unique ID
- Check status – message delivery status
- Status decription – description of message delivery status
- Phone – client phone number
- Check date – sent date
- Check price – price
When the report is generated, you can download it from the Reports page
...
| Примечание |
|---|
Не отображается при отправке через шаблоны сообщений. |
...
.
...
Button Hyperlink custom-icon top-button id top-button title . type standard class top-button url #Top
...