-
Создана пользователем
 Кадубовский Андрей (Twin). Последнее обновление: 23 янв., 2023
Время чтения: 44 мин.
Кадубовский Андрей (Twin). Последнее обновление: 23 янв., 2023
Время чтения: 44 мин.
Script
Creating a new script
Creating a new script
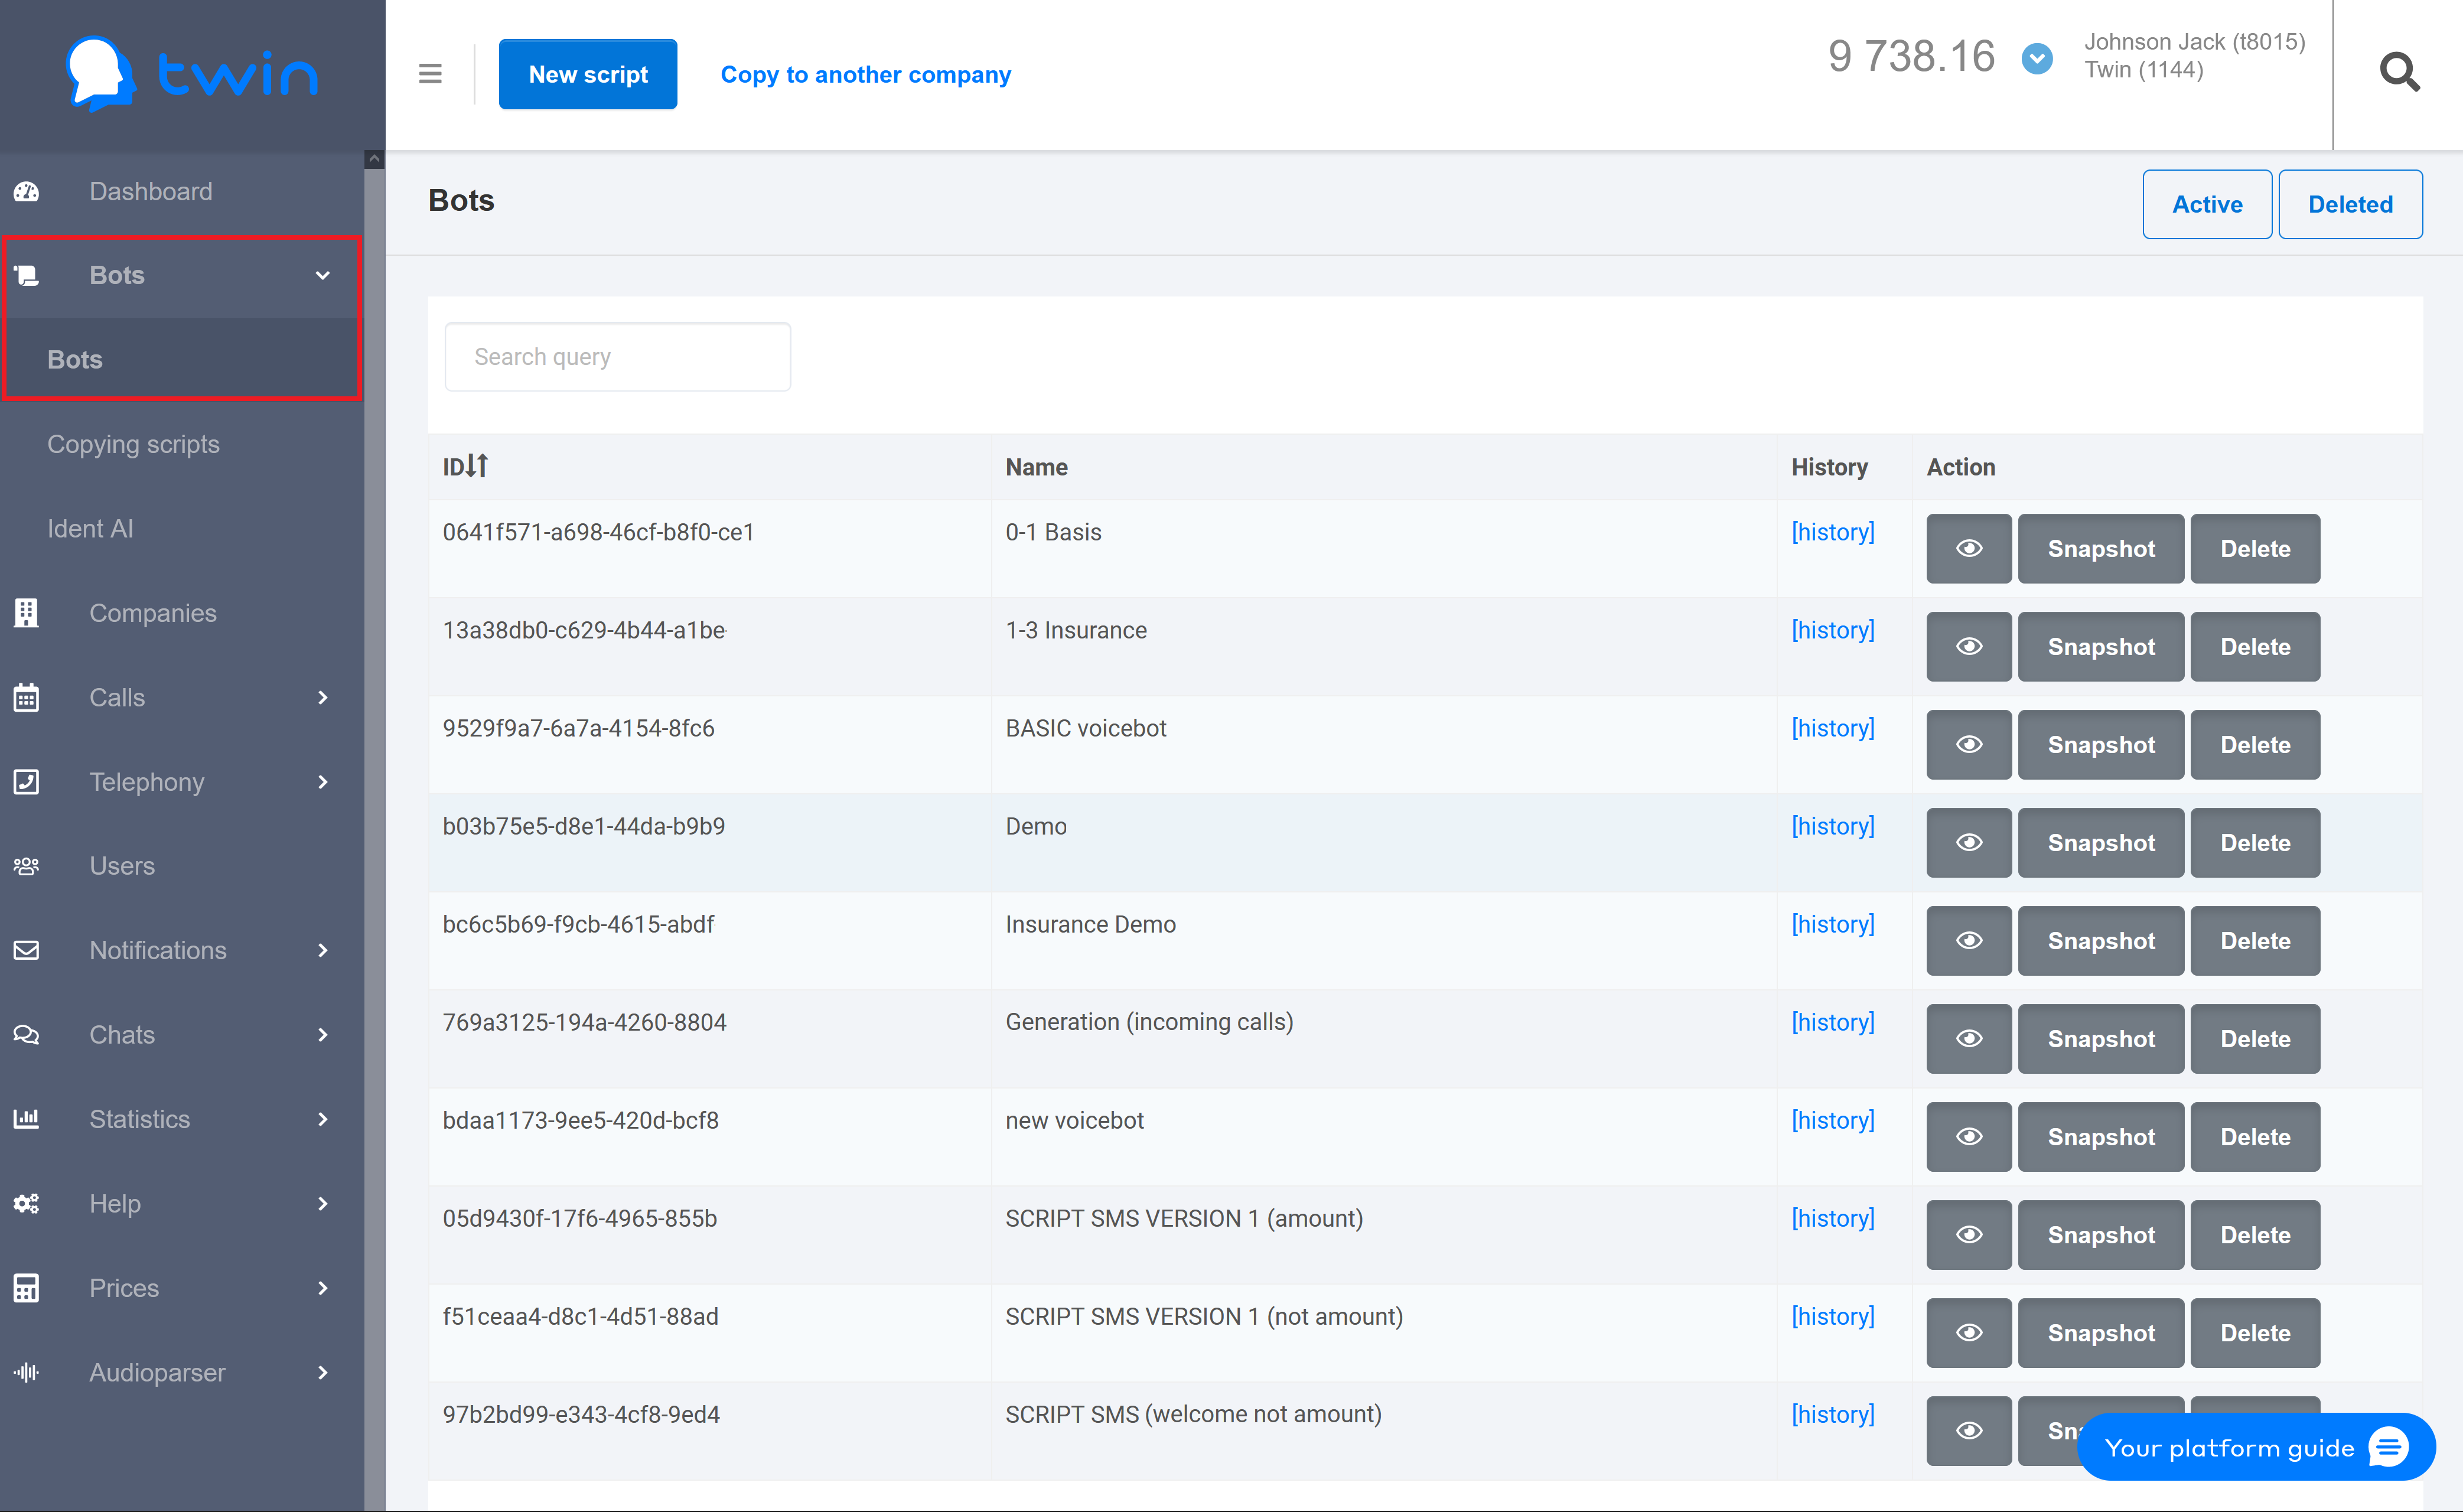
To create a new script on the side menu click Bots – Bots and then click the New script button.
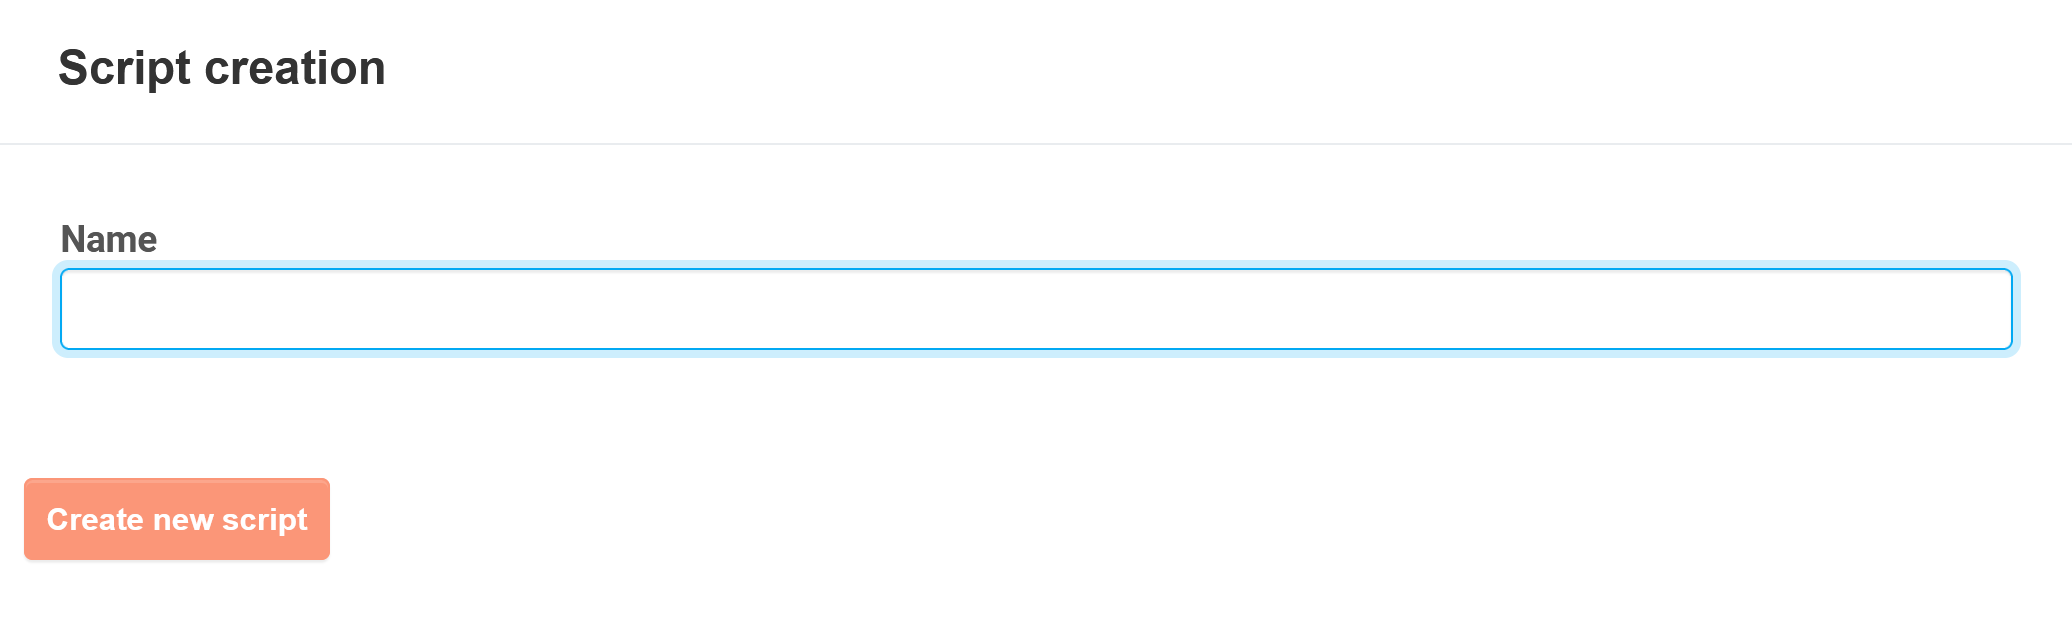
In the Script creation dialogue box enter a name for a new script and click Create new script.
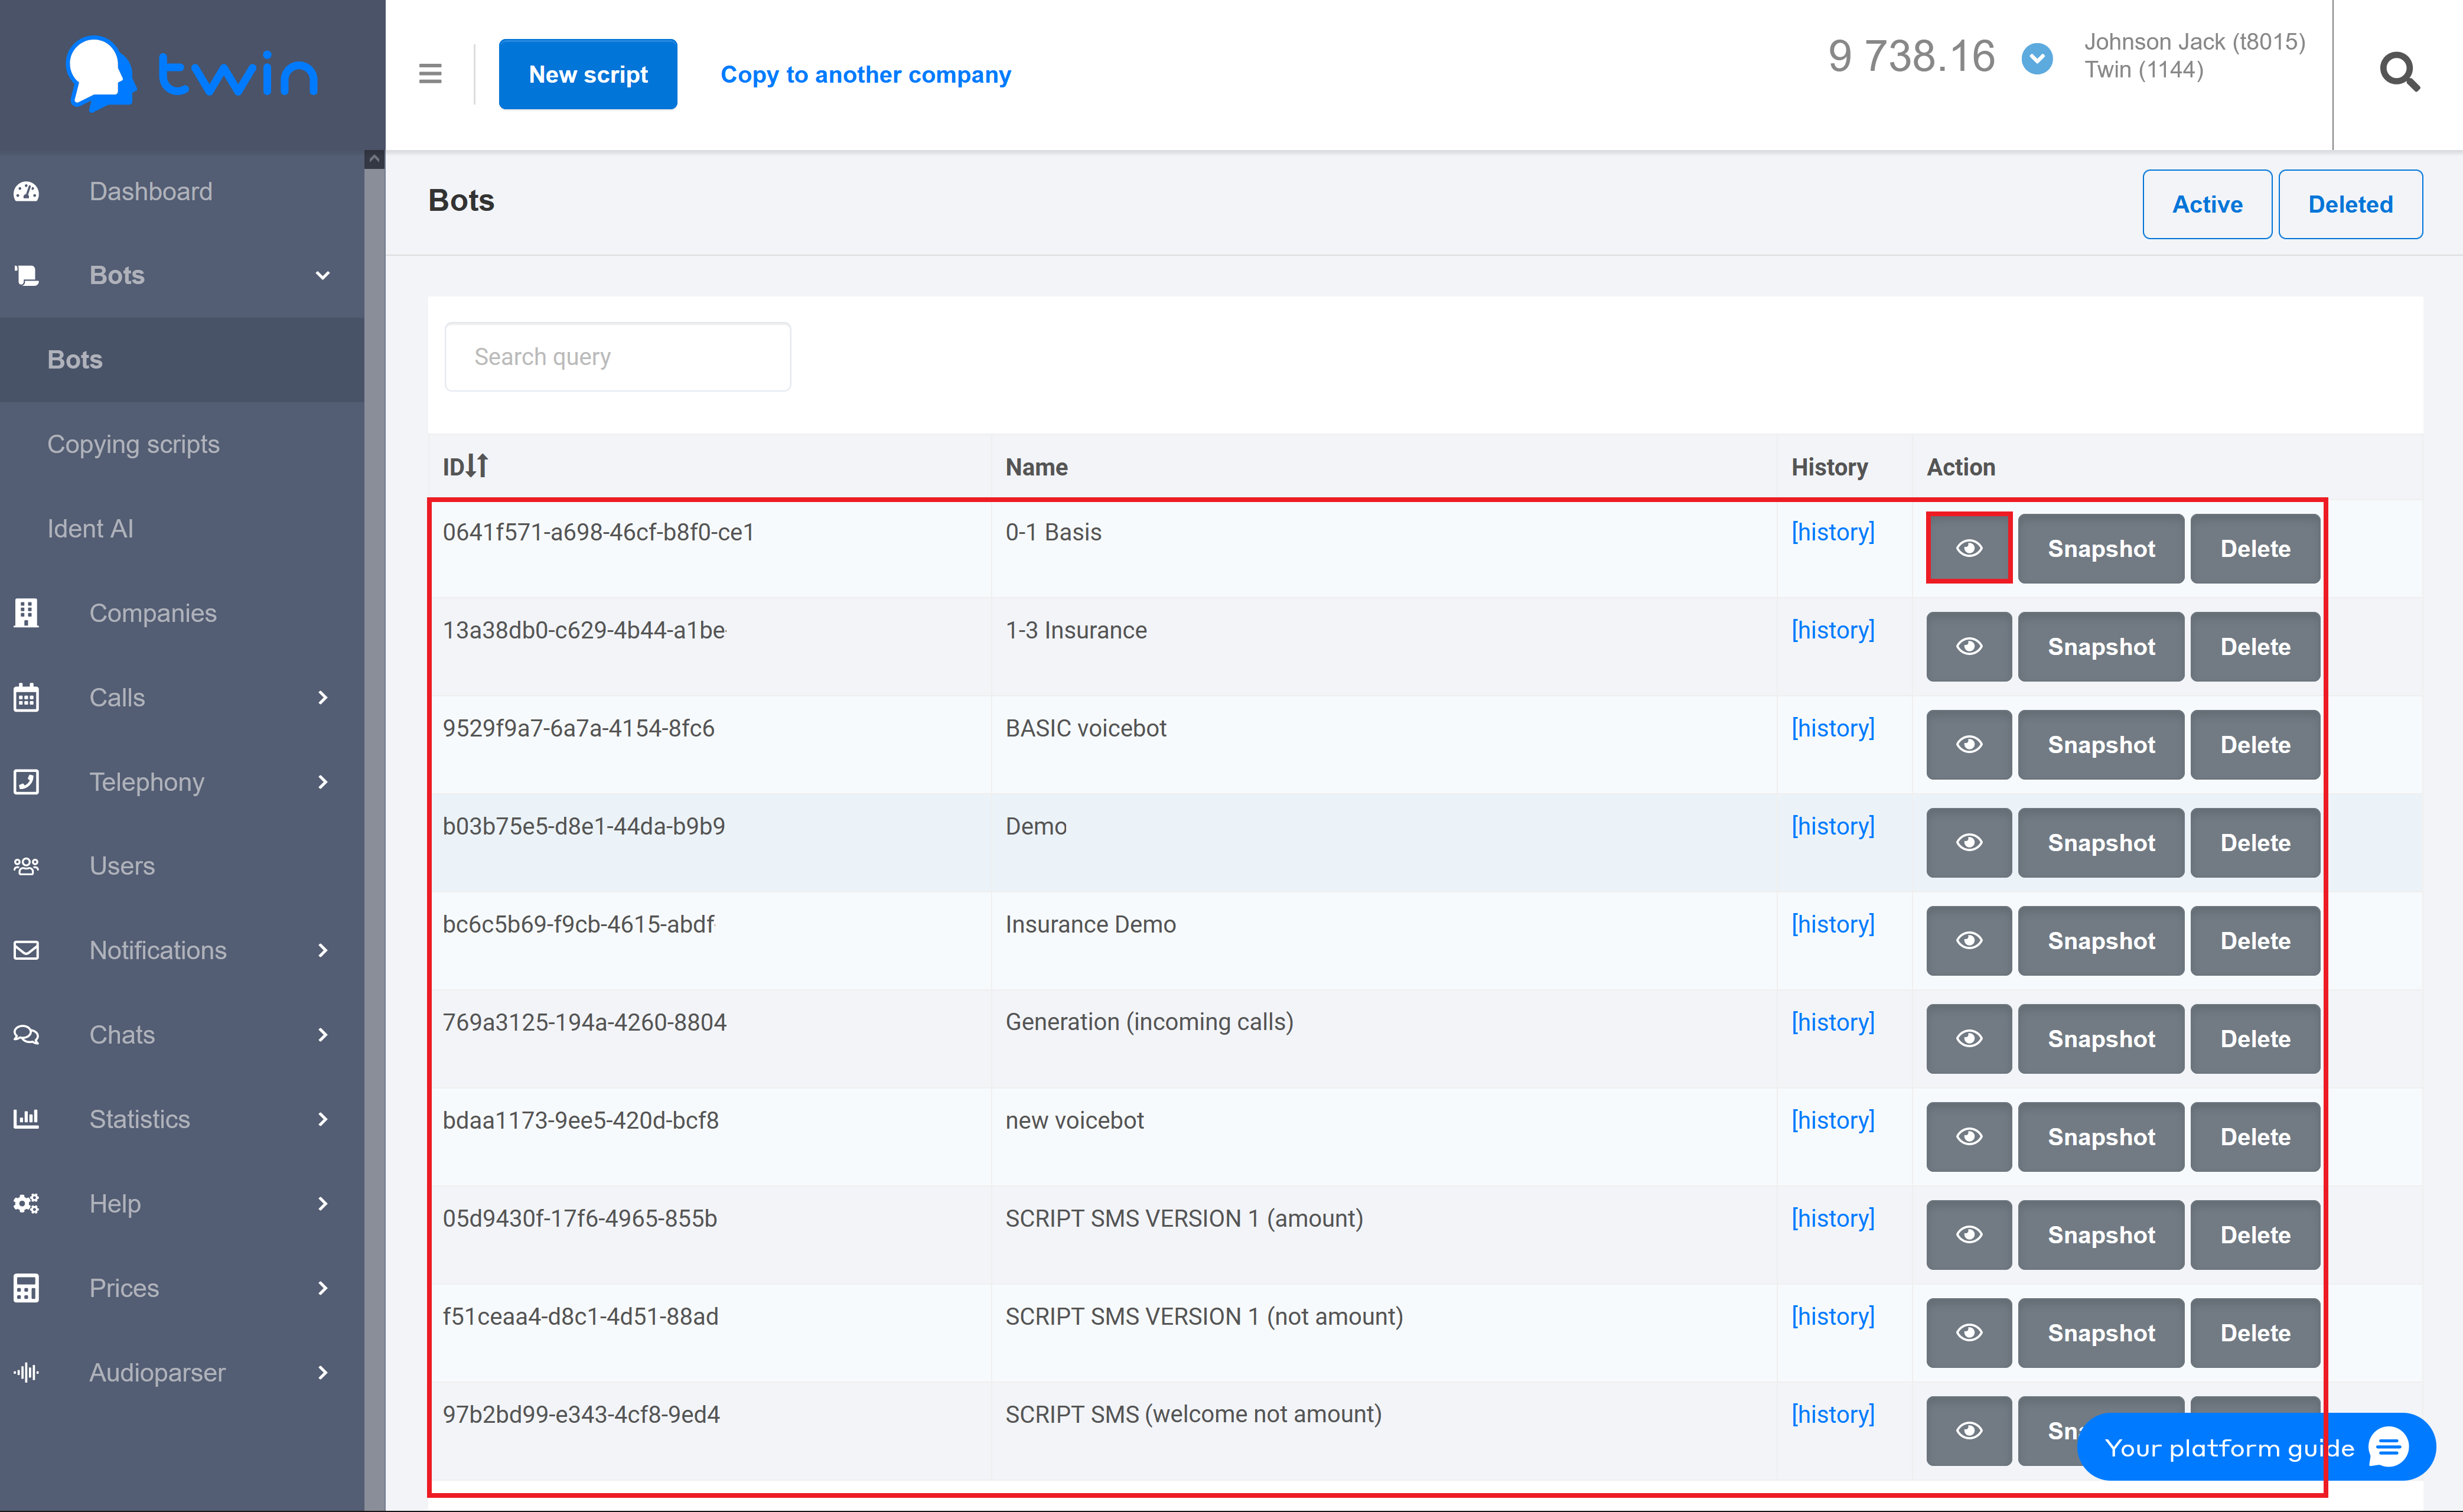
To edit the script find its name on the list and click the ![]() button.
button.
Script editor window
Script editor window
A script is created on the basis of questions and answers. You create questions and define possible answers for them. When a bot has a conversation with a client, it moves from the start to the end of the script changing directions with regard to as how clients answer your questions.
When you create scripts, you use the following elements:
Control elements:
| Name | Element | Description |
|---|---|---|
| Action blocks |
| You use them to create a script |
| Arrow |
| You use it to define directions in a script |
| Hand |
| You use it to move around in the script editor window |
| Cursor |
| You use it to work with an object or select it |
| Map |
| Opens the navigation window that you can use to quickly move between the script blocks |
| Scale |
| Changes the scale in the script editor window |
| Cancel |
| Cancels your last action |
| Redo |
| Repeats undone action |
| Save |
| Saves script |
| Delete |
| Deletes script |
| Manage media |
| Manages all recorded and downloaded media files |
| Last block |
| Brings you to the last added block |
| Clear |
| Returns to the original state |
| Chat |
| Allows you to check the script with a chatbot |
| Microfon |
| Allows you to check the script with a voice bot |


Working in the script editor window you can use the following hotkeys:
Hotkeys:
| Key combination | Action |
|---|---|
Ctrl | Changes active tool to Hand |
Ctrl + S | Saves script |
| Ctrl + Z | Cancels last action |
| Esc | Removes selection |
| Del | Deletes selected element |
Script blocks
Script blocks
Each block or arrow has properties. You can configure them using the panel on the right side of the script editor window. To display properties of a block or arrow click it.
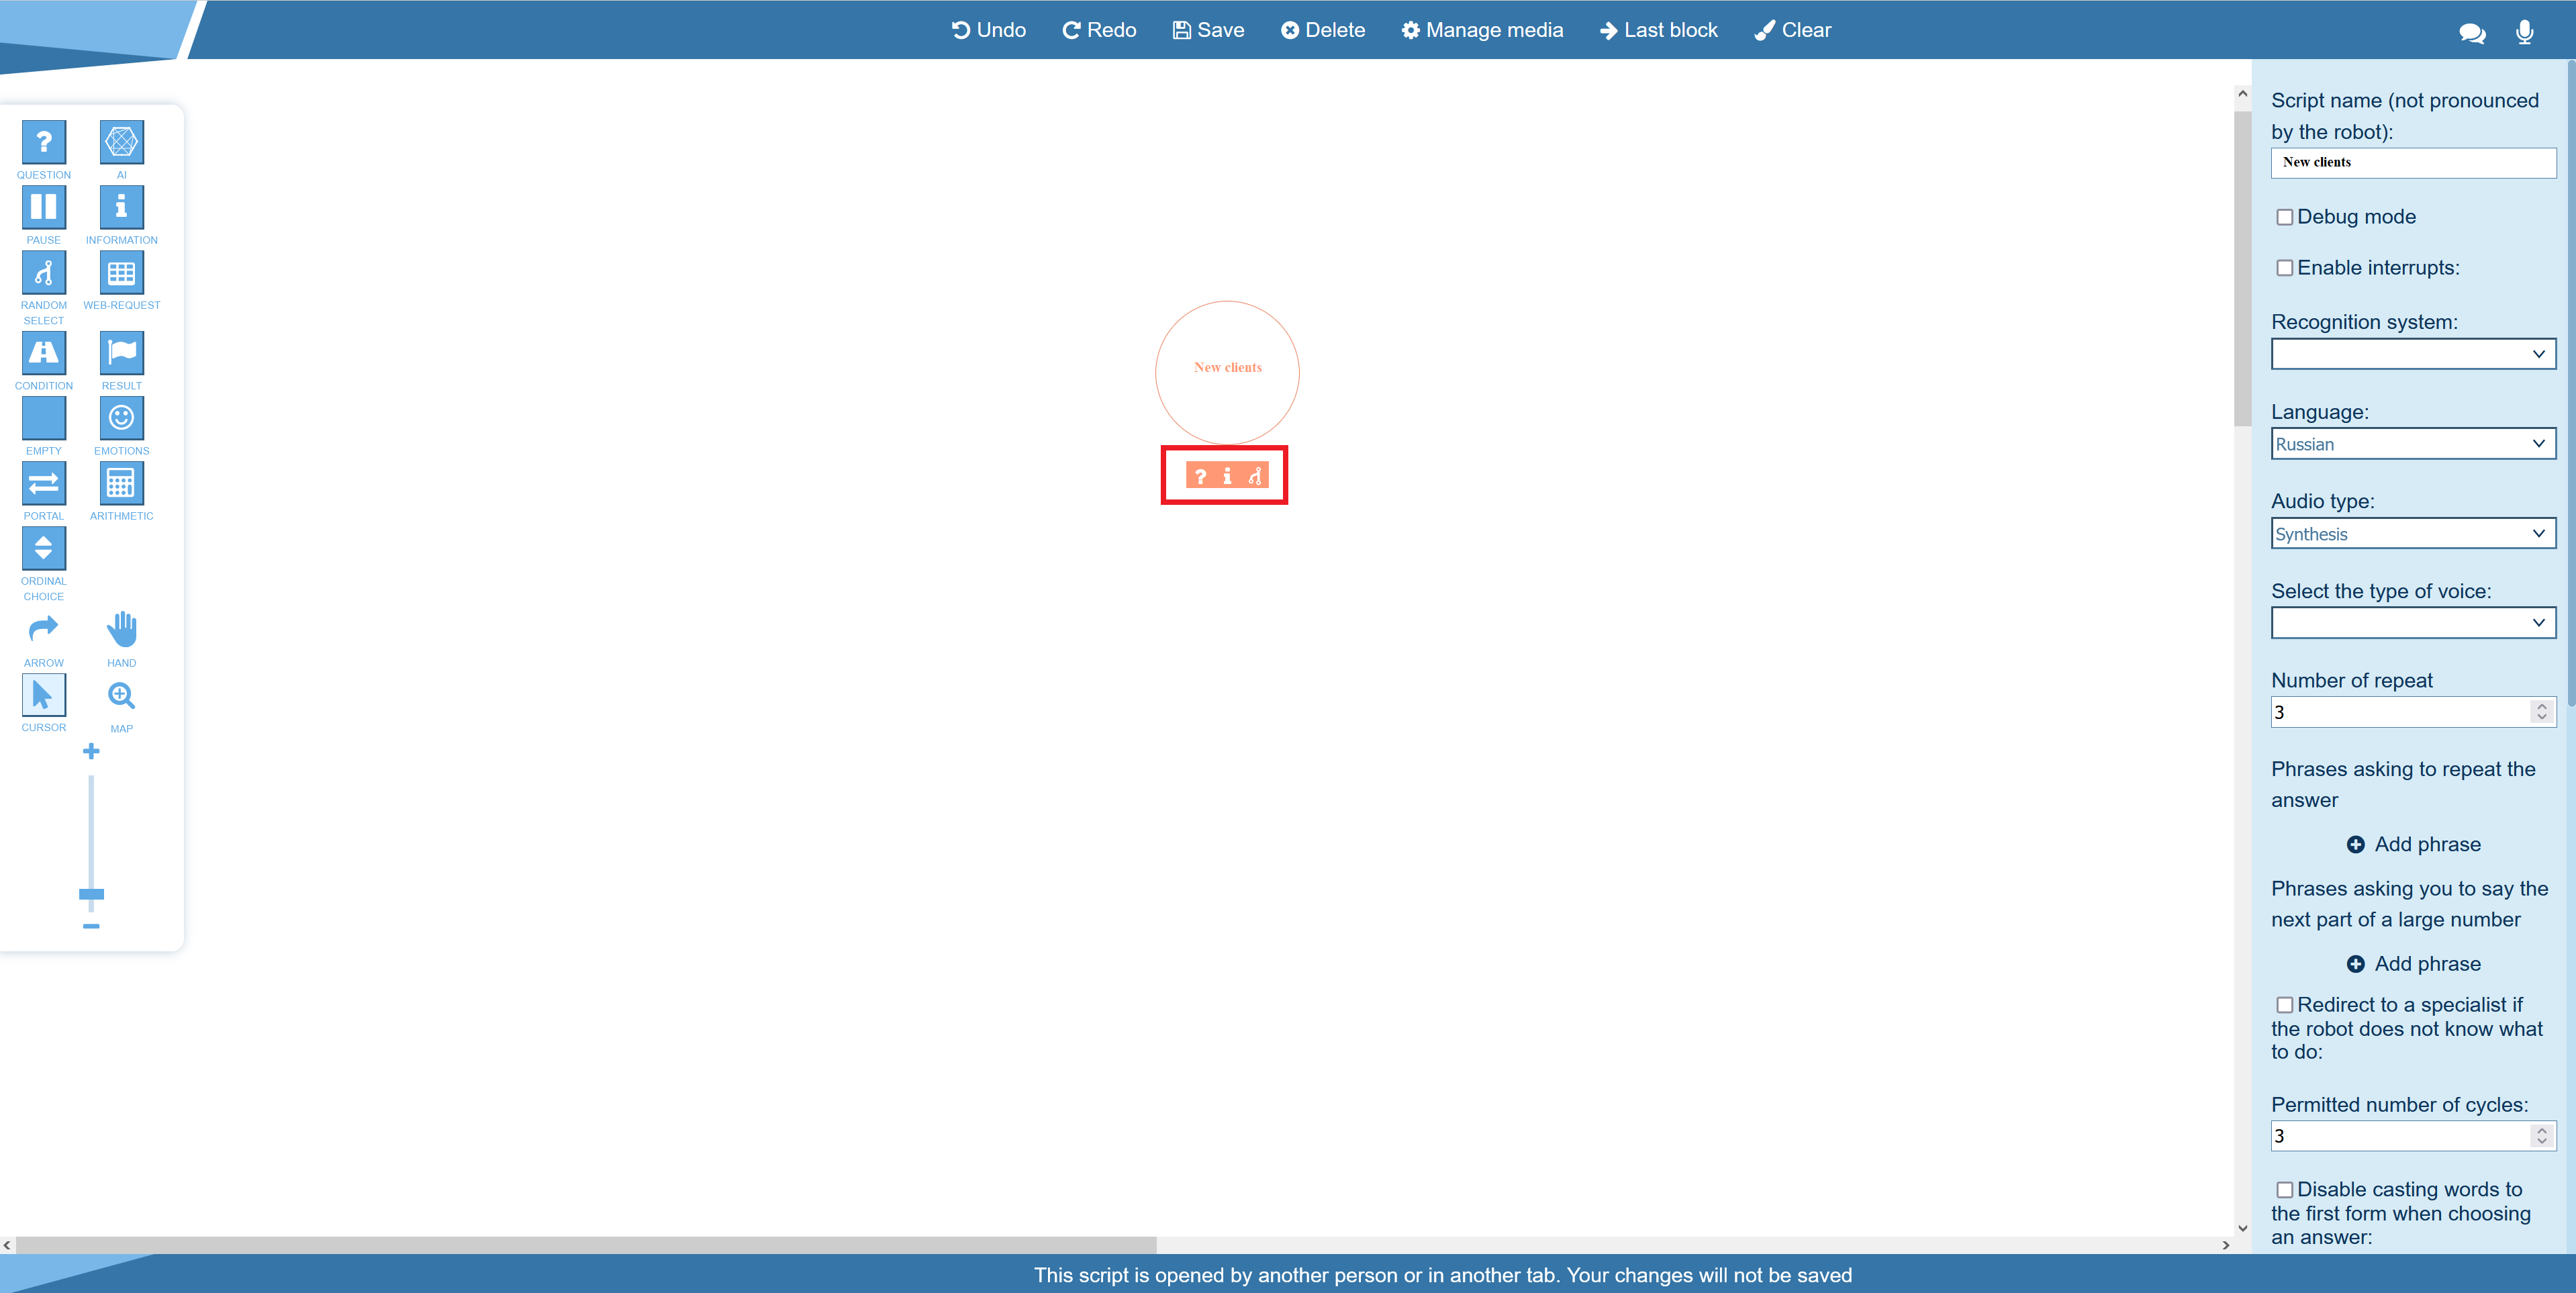
To quickly create blocks in the script editor use the following buttons that are appear under a block after you select it: Question block, Information block and Random selection block. To create a new block drag any of these buttons.
Variables
Variables
You can create variables in two ways:
- Declare a variable in block properties
- Declare a variable in arrow properties
You can declare variables only in the following blocks:
- Question block
- Information block
- Results block
Variables are declared in block and arrow properties.
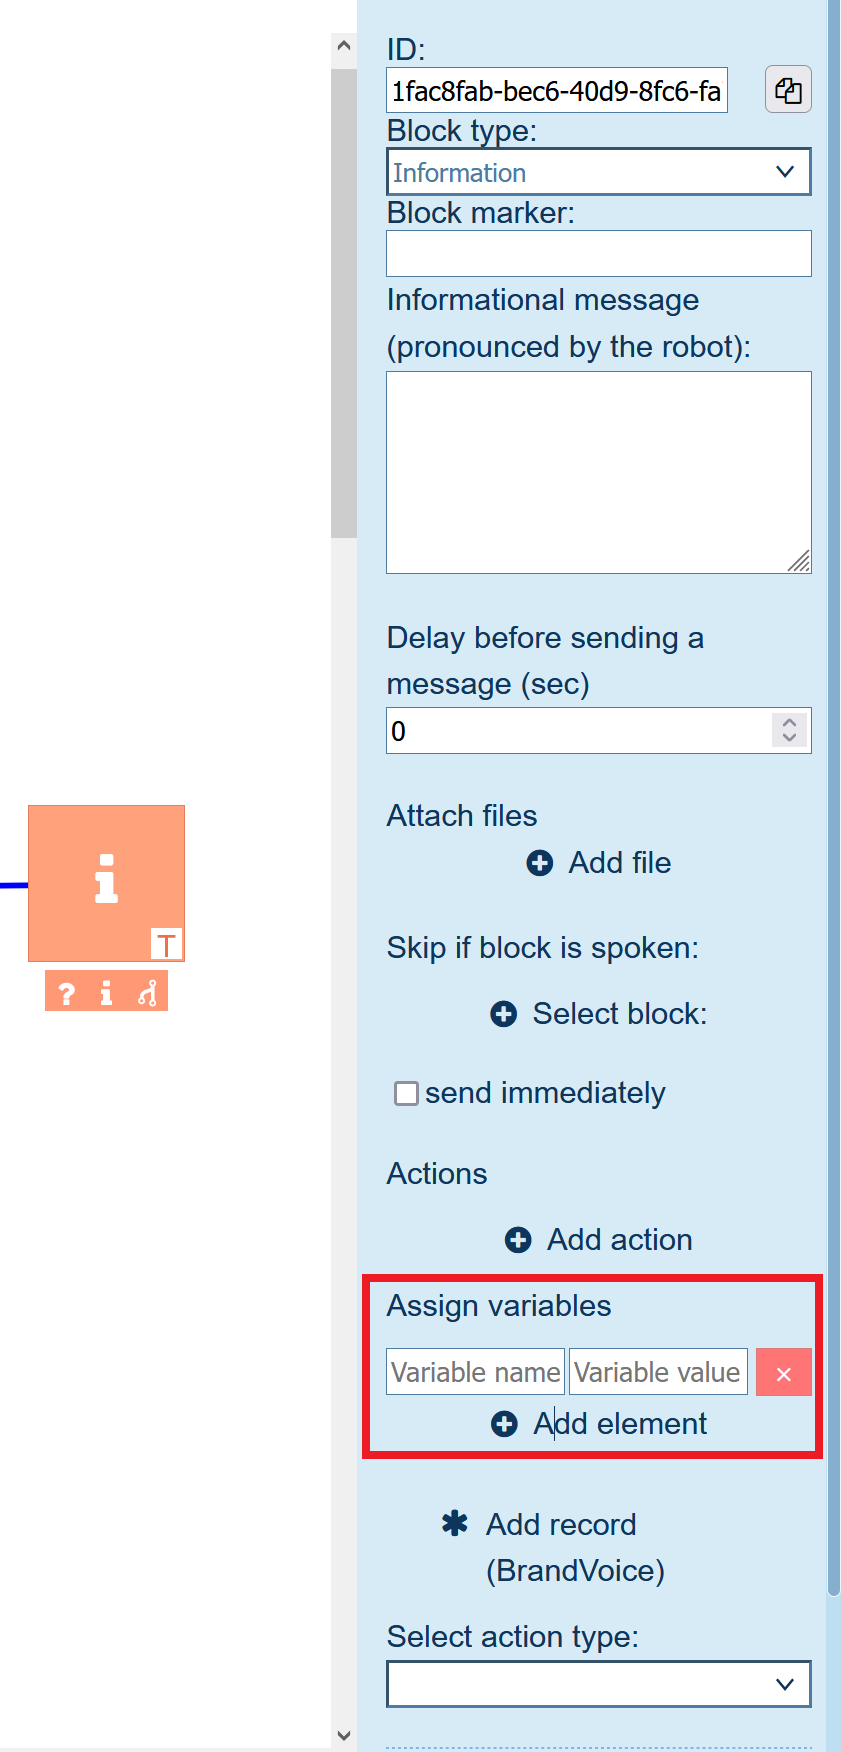
To declare a variable in the properties of a block, do the following:
- Select a block in the script.
- Click Add element.
- In the left field enter variable name.
- In the right field enter variable value.
You can declare variables only in arrows that come from the following blocks:
- Question block
- Pause block
To declare a variable in the properties of an arrow, do the following:
- Select an arrow.
- Select the Save answer checkbox.
- Enter the name of the variable that will store the answer.
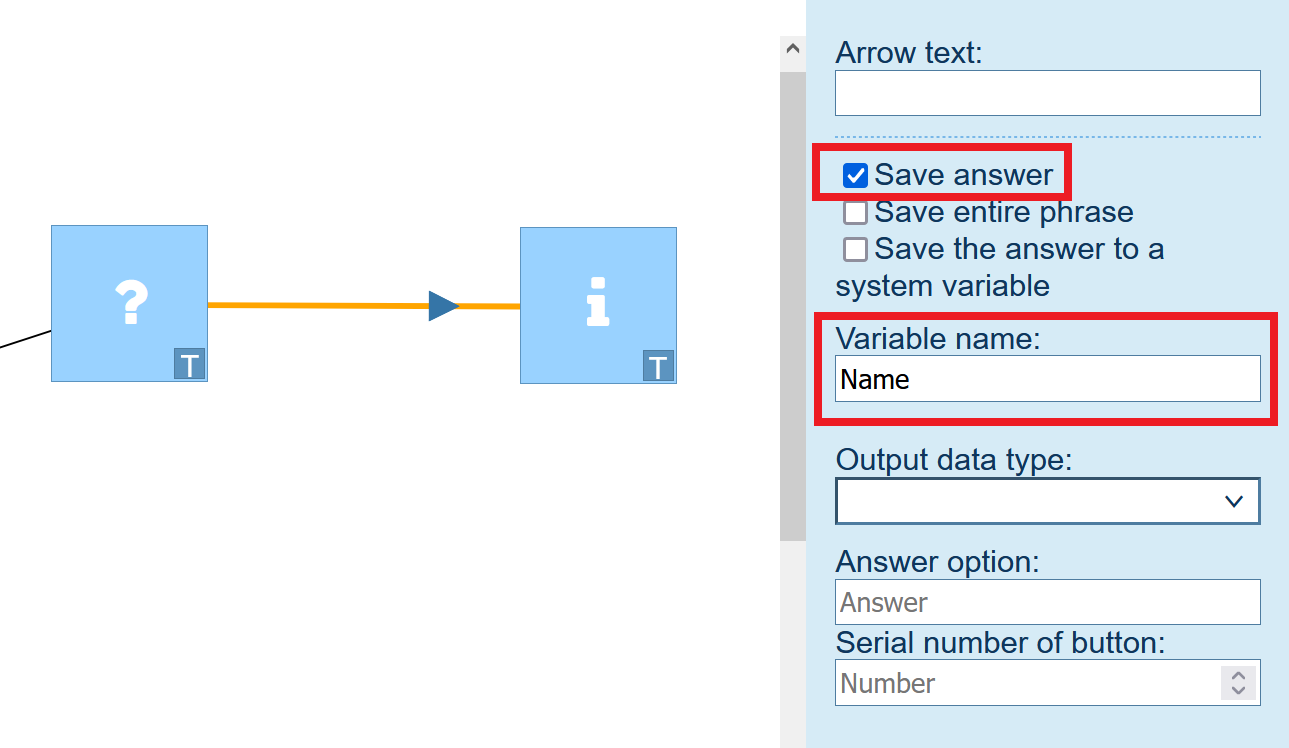
Unlike declaring a variable in a block declaring a variable in an arrow makes it possible to store a client's response rather than a specified value.
After you declare a variable in a block or arrow, you can use it in the script. For this, enter the variable name in curly brackets.

When you declare a variable, you should enter its name without curly brackets.
If you save different values into the same variable, only the last value will be used in the script.
Script elements
Arrow

Description:
Shows the direction in the script and defines the conditions for moving from one block to another. In the Question, Condition, Request to the server and Emotions blocks, the arrow has properties that are different from those it has in other blocks.
Description | GUI element |
|---|---|
1. Arrow text. You can use it as a description. This text can explain you what response you want to get from a client or it can help you to navigate the script. |
|

Starting block

Description:
The starting block marks the beginning of the script. This block has properties that affect the whole script. Using this block you can quickly find the starting point even in scripts with a lot of blocks.
| Description | Image |
|---|---|
1. Script name (not pronounced by the bot) – allows you to quickly find the block in the script editor. 2. Debug mode – enables detailed logging of the bot's actions. This mode is enabled at the request of technical support and used to find and fix errors in the bot. After you enable this mode, you need to repeat a problem dialogue with the client. All errors are logged on the developer's server. Since this mode increases the computational load on the system, it is not recommended to enable this mode without a corresponding instruction. 3. Enable interrupts – enables the bot interruption mode in dialogues. 4. Recognition system – selects the speech recognition system used in dialogues with clients. It is recommended to use the default recognition system and change it only on request from the technical support service. 5. Language – the language used in the speech recognition system. Currently speech recognition works for the following languages:
6. Audio type – type of voice messages of the bot. Possible options:
7. Select the type of voice – type of the bot's voice in dialogues with clients. 8. Number of repeat – defines how many times the bot asks the client again if it does not receive or cannot recognize the answer to its question. If you use this option, you need to add a phrase or several phrases for the bot to voice. 9. Phrases asking to repeat the answer – a phrase that the bot uses to ask the client to repeat the answer if the bot does not receive or cannot recognize the answer to its question. 10. Phrases asking you to say the next part of a large number – the bot will play a specified phrase in a dialogue with the client if the number in the client's response contains fewer characters than expected. 11. Redirect to a specialist if the bot does not know what to do – if the bot does not know what to do, the system will transfer the dialogue to the operator. 12. Permitted number of cycles – the maximum number of times the bot asks the client to repeat the answer to a question. 13. Disable casting words to the first form when choosing an answer – disables the conversion of words to the initial form, which makes it difficult to recognize the client's speech. If this option is not used, then the system converts all words in the client's responses to their initial forms. Nouns are converted to the singular number and the nominative case (for example, a manager). Verbs are converted to the indefinite form (for example, to call). 14. Disable phonetic corrector on calls – disables phonetic corrector. This function corrects small mistakes in the pronunciation of words. 15. Select the default block – the block in the scenario to which the system directs the bot if it does not receive or cannot recognize the client's answer to its question. 16. Response timeout (sec) – a period of time during which the bot waits for the client to answer the question. If the client does not answer the question, or his answer is not suitable for the question, then the system will transfer the bot to the help block (see below). 17. Select help block – the Information block, to which the system will transfer the bot, if the client's response contains one of the following phrases: "Help", "What can you do". 18. Ambient noises – background noise that allows you to create a suitable atmosphere during a dialogue with a client (for example, office, street or airport sounds). 19. Keyword templates – allows you to define keywords at the level of the script. 20. Variables – allows you to define variables and their value types (used only in call scripts). 23. Ignore higher-level keywords – this function allows you to ignore keywords defined at higher levels (above the level of the script) so that only keywords defined at the level of the script and its blocks are used. Platform Keywords – contains a list of keywords that are defined at the level of the Twin platform. Company Keywords – contains a list of keywords that are defined at the company level. 24. New keyword – allows you to define new keywords at the level of the script for the interrupt function to work. |
|

Question block

Description:
This block is used to crate questions for the client.
Exit conditions:
- After the recognition session expires.
- Upon receipt of a response from the client.
| Description | Image |
|---|---|
1. ID – a unique block identifier. 2. Block type – displays the type of the selected block. You can change the type of any block in the script. 3. Block marker – a custom text that can be used in reports as a marker (optional). 4. Question (pronounced by the robot) – text that will be voiced by the bot after the transition to this block. 5. Delay before sending a message (sec) – a period of time after which the message is sent after switching to this block*. 6. Send immediately – allows you to send messages before the queue is completely formed. 7. Assign variables – allows you to define variables and assign values to them. 8. Attach files – allows you to add files to the script. 9. Recognition session duration – a period of time during which the system performs speech recognition in a call. The following values are available for selection:
10. Speech recognition system - allows to select a service for speech recognition
11. Number of repeat – defines how many times the bot repeats a question if it does not receive or cannot recognize the answer to its question. To use this function, you need to add a phrase or phrases that the bot will use. 12. Defining emotions – if this option selected, the system recognizes the client's emotions of the user and saves them to the {detector.emotions} variable. 13. Disable repeat – if this option is selected, the system will not wait for a response from the client, but will transfer it to the operator. 14. Disable return to previous block – if this option is selected, the system will not try to find the answer to the question using other Question blocks on the same arrow. 15. Use user answer – allows you to use the client's response stored in the system variable. 16. Actions – allows you to select one of the predefined actions***. 17. Phrases asking to repeat the answer – text that will be voiced by the bot if it cannot receive the expected response from the client**. 18. Files asking to repeat the answer – allows you to import audio files with phrases that will be voiced by the bot. 19. Disable random repeat phrases – if this option is selected, repeat phrases are determined in the order they are added and not randomly. 20. Add record (BrandVoice) – allows you to upload an audio file from your computer that will be used in hybrid speech synthesis. 21. Select action type – used to save the result of a dialogue with a client. The result is stored in the "Result of the conversation" column of the report. 22. Add record – allows you to upload an audio file from your computer that will be used in hybrid speech synthesis. 23. Record audio – allows you to record audio that will be used in hybrid speech synthesis. 24. Ignore higher-level keywords – this function allows you to ignore a set of keywords defined at higher levels so that only keywords defined in this block will work. 25. New keyword – allows you to define new keywords for the interrupt function to work. * The delay in blocks starts to work only after the first response is received from the user.** In case there is more than one option, then phrases will be voiced in random order.*** Actions include a "Share number" function. This option allows you to display a button with a predefined text to the client. Clicking this button, the client can transfer his phone number (specified in the profile) to the bot. At the moment, this functionality is available only for bots in Telegram. For correct operation, it is necessary that the text on the button matches the text on the button in the arrow coming from the block, and the output data type must be set to "default". |
|

Types:
| Type | Description | Image |
|---|---|---|
| Custom event | Integration functionality for creating custom events (not supported). 1. Button message – text that is displayed on the client's button. 2. Event name – title of the custom event. 3. Data – description of the user event. |
|
| Force jump to block | Allows you to jump to the selected block in the same way as the portal block does (not supported). 1. Force jump to block – selects a block to which the bot jumps. |
|
| Attach WhatsApp template | Allows you to attach a template for WhatsApp. 1. Template ID – unique identifier received from the technical support. 2. Template name – name of the template received from the technical support. 3. Button message – text that is displayed on the client's button. 4. Image link – the URL of the image. 5. Add variable – allows you to add a variable. 6. Button type – selects the type of the button. |
|
| WhatsApp buttons | Allows you to add buttons to a dialogue in WhatsApp. 1. Button type – selects the type of buttons. 2. Header – text that is displayed at the top of the message. 3. Footer – text that is displayed at the bottom of the message. |
|
| Share the number | Allows you to get a number from a client using the button. 1. Button message – text that is displayed on the client's button. |
|


Properties:
| Description | Image |
|---|---|
1. Arrow text – name of the arrow in the script. You can quickly find a necessary arrow by its name in the script. It also helps you to get its purpose. 2. Save answer – allows you to save the client's answer to a variable in order to use it later in script blocks. If this option is selected, then enter the name of the variable in the Variable name field. 3. Save entire phrase – determines how the answer is saved. If this option is used, then the system will save the complete client's response. If this option is not used, then the system will save only a keyword that makes the bot to switch to the direction shown by the arrow. 4. Save the answer to a system variable – allows you to save the client's answer in order to use it later in one of the Question blocks. This is useful when the bot moves from one scenario to another. In this case the bot will not ask client a question it has already asked them. 5. Output data type – this option is used for each decision-making arrow. It defines the type of condition under which the system understands that the dialogue should develop in the direction indicated by this arrow. 6. Answer option* – using this option, you can display possible answers to the client in the form of buttons. If the client clicks on such a button, the dialogue will go in the direction indicated by the arrow associated with the selected button. In some cases, it is more convenient for the client to use buttons than to type a response. 7. Serial number of button* – if there are several answers to the question, then there will be several buttons. This option allows you to define the order in which the buttons are displayed (first, second, third, etc.). The countdown starts from 0. If you do not specify the order in which the buttons are displayed, the system will place them in the random order. * This option is used only for chats |
|

To display button text on Facebook correctly it is recommended to enter no more than 20 characters in the Answer option field.
Types:
| Type | Description | Image |
|---|---|---|
| Default branch | This type of arrow is used if the system does not find a suitable answer in other arrows of this block. 1. Maximum branch weight – determines the accuracy of the answer generated by NLU. 2. Answer option – name of the answer button (for more information, see the description of arrow properties). 3. Serial number of button – determines the order in which the button is displayed (for more information, see the description of arrow properties). |
|
| Keywords | The bot goes in the direction shown with the arrow if the client's answer matches the keyword. 1. Keywords – words or expressions that you expect to receive from the client. 2. Dictionaries – allows you to use a prepared set of keywords. 3. Answer option – name of the answer button (for more information, see the description of arrow properties). 4. Serial number of button – determines the order in which the button is displayed (for more information, see the description of arrow properties). Important It is recommended to use no more than 100 keywords per arrow. If you need to use more keywords, it is recommended to use "intelligent decision making" option with NLU. |
|
| Date/Time/Date and time | The bot goes in the direction shown with the arrow if the date contained in the client's response coincides with the date specified in the arrow properties. 1. Value should be – condition used in the check. For example, to agree on the date of delivery, you can check that the date of delivery is greater than the current date in order to avoid the situation when the delivery takes place on a day in the past. Dates and time are specified in the following format: YYYY-MM-DD (no time) YYYY-MM-DD HH:MM:SS (date and time) 2. Answer option- response that the system expects from the client. The system can work with dates and relative dates. Below goes a list of responses that the system can recognize:
If the year is not specified in the date, then the current year is used. Responses are saved to variables in the following formats: Date: Y-m-d Below goes a list of responses that the system can recognize:
If time is not specified, then the system uses the current time. The system uses the following format to save a value to a variable: H:i. 3. Answer option – name of the answer button (for more information, see the description of the arrow properties). 4. Serial number of button – determines the order in which the button is displayed (for more information, see the description of the arrow properties). |
|
| Number | The bot goes in the direction shown with the arrow if the number contained in the client's response matches the number specified in the arrow properties. 1. Value should be – condition used in the check. For example, when you perform a social survey, the bot may ask the question: "Tell me, how old are you?" and using conditions, you can ask different age groups different questions. The check is performed according to the following rules: {RECOGNIZED} {OPERATOR} {COMPARED} Where: {RECOGNIZED} – number that is recognized in the client's response 2. Answer option – name of the answer button (for more information, see the description of the arrow properties). 3. Serial number of button – determines the order in which the button is displayed (for more information, see the description of the arrow properties). 4. Intelligent definition – using this parameter, the bot recognizes numbers in client’s responses, both in calls and chats. If this option is checked, then the bot recognizes the number in all mentioned cases. * May contain variables enclosed in curly braces. |
|
| Large number | The bot goes in the direction shown with the arrow if the number of voiced characters in the number matches the specified number of characters in the arrow properties. 1. Value should be – condition used in the check. 2. Mask for a large number – mask for a value. For example, for a passport, we can set a mask in the following form: #### ######, where each # symbol is a number. 3. The user is given one attempt – If the system does not recognize the answer or the answer from the client does not match the specified one, the system does not repeat the question. 4. Answer option – value that the system expects to receive from the client. If a client's response contains a number that does not match the specified number, then the bot asks the client to enter necessary numbers until one of them matches the specified number. 5. Answer option – the name of the answer button (see the description in the properties of the arrow). 6. Serial number of button – determines the order in which the button is displayed (for more information, see the description of the arrow properties). If the client's response contains a number that does not match the specified value, the bot will ask the client to enter numbers until one of them matches the specified number. 7. Intelligent definition – using this parameter the bot recognizes numbers in client’s responses, both in calls and chats. If this option is checked, then the bot recognizes the number in all mentioned cases. |
|
| Intelligent Decision Making | The bot goes in the direction shown with the arrow if the specified intent matches the intent in the client's response.* 1. Agent - allows you to choose the agent. 2. Answer option – the name of the answer button (see the description in the properties of the arrow). 3. Serial number of button – determines the order in which the button is displayed (for more information, see the description of the arrow properties). * To work with this type, you need a trained agent. |
|
| Phone number | The bot goes in the direction shown with the arrow if the number of voiced symbols matches the specified number of digits in the phone number.* 1. Value should be – condition used in the check. 2. Answer option – the name of the answer button (see the description in the properties of the arrow). If the client's response contains a number that does not match the specified value, the bot will ask the client to enter numbers until one of them matches the specified number. 3. Serial number of button – determines the order in which the button is displayed (for more information, see the description of the arrow properties). * The Phone number option allows you to track both mobile and city numbers. At the moment, this function works only with the numbers that belong to Russian mobile network carriers.The phone number must contain no more than 11 digits. Otherwise, the bot will not be able to recognize it.When you enter a mobile number, the country code is optional.When you enter a city number, you must specify the country code and city code (for example, 7 and 812). |
|
| Phone number identification error | The bot goes in the direction shown with the arrow if the phone number in the client's response is invalid 1. Answer option – the name of the answer button (see the description in the properties of the arrow). 2. Serial number of button – determines the order in which the button is displayed (for more information, see the description of the arrow properties). |
|
| DTMF signal | This function is used in voice menus. The system allows you to track the client pressing buttons in the range from 0 to 9, as well as buttons with * and # symbols. Depending on which button the client presses the system follows the corresponding arrow (for example, the bot tells the client: “To create a new order, press button 1. To proceed to the current order, press button 2. To end the conversation press button 3). 1. Signal – digit or symbol. 2. Answer option – the name of the answer button (see the description in the properties of the arrow). 3. Serial number of button – determines the order in which the button is displayed (for more information, see the description of the arrow properties). |
|


Pause block

Description:
This block puts the system into waiting for response.
Exit conditions:
- After specified time expires
- After a response from the client is received
| Description | Image |
|---|---|
1. ID – a unique block identifier. 2. Block type – displays the type of the selected block. You can change the type of any block in the script. 3. Block marker – a custom text that can be used in reports as a marker (optional). 4. Text (pronounced by the robot) – text that will be voiced by the bot after the transition to this block. 5. Send immediately – allows you to send messages before the queue is completely formed. 6. Delay before sending a message (sec) – a period of time after which the message is sent after switching to this block*. 7. Maximum time to wait before retry (seconds) – time period after which the bot voices text specified in the Repeat text field in the starting block. 8. Maximum waiting time for the interlocutor's answer (seconds) – time period after which the call is transferred to the operator. 9. Repeat text – repeat options that will be voiced by the bot after the waiting time period expires.** 10. Add record (BrandVoice) – allows you to upload an audio file from your computer for Hybrid synthesis. 11. Select action type – allows to save the result for the report. 12. Add Record – allows you to upload an audio file from your computer for a bot to use. 13. Record audio – allows you to record an audio file for a bot to use. 14. Ignore higher-level keywords – this function allows you to ignore a set keywords defined at higher levels, so that only keywords specified in this block are used. 15. New keyword – allows you to define new keywords for the interrupt function to work. * The delay in blocks starts to work only after the first response is received from the client.** If there is more than one option, then phrases will be voiced in random order. |
|

Information block

Description:
This block is used to voice messages to the client.
Exit Criteria:
- After a message spoken by the system
- Block skip
| Description | Image |
|---|---|
1. ID - a unique block identifier. 2. Block type - displays the type of the selected block. You can change the type of any block in the script. 3. Block marker - a custom text that can be used in reports as a marker (optional). 4. Information message - text that is voiced by the bot after the transition to this block. 5. Delay before sending a message (sec) - period of time after which the message is sent after the transition to this block*. 6. Attach files - allows you to add files to the script. 7. Skip if block is spoken - the system skips the current block if it announces the information block that is selected on this step.** 8. Send immediately - allows you to send messages before the queue is formed. 9. Actions - allows you to select one of the predefined actions. 10. Add element - allows you to create variables and set their values. 11. Add record (BrandVoice) - allows you to upload an audio file from your computer for hybrid speech synthesis. 12. Select action type - allows to capture the result for the report. 13. Add record - allows you to upload an audio file from your computer to use by the bot. 14. Record audio - allows you to record an audio file to use by the bot. * The delay in blocks starts to work only after the first response from the client is received.** It is possible to select only the Information block. |
|

Condition block

Description:
This block allows you to determine the direction of the script on the basis of the state of the dialogue.
| Description | Image |
|---|---|
1. ID - a unique block identifier. 2. Block type - displays the type of the selected block. You can change the type of any block in the script. 3. Block marker - a custom text that can be used in reports as a marker (optional). |
|

Properties:
| Description | Image |
|---|---|
1. Arrow text - this text allows you to navigate the script. 2. Type - type of decision making. |
|

Types:
| Type | Description | Image |
|---|---|---|
| Default | If this type is selected, the bot goes in the direction shown with an arrow if requirements defined in other arrows of the block are not true. |
|
| Condition "And" / "Or" | The bot goes in the direction shown with an arrow if conditions defined in the properties of this arrow are true. 1. Upload file - allows you to import requirements and variables from a file. 2. Conditions - a set of requirements used to make a decision.
Logical operators: "=" - equals "!=" - not equal "<" - less "<=" - less than or equal ">" - more ">=" - greater than or equal "*" - contains "**" - matches 3. Assign variables when selecting a branch - used to set values for variables. The name of the variable is written without curly braces in the left field. The value is written in the right field.* * It is allowed to use variables that will be replaced by their values at the time of assignment. |
|
|


If there are two arrows that define requirements which are true, then the arrow with the a greater number of these requirements is selected.
In case these arrows have the same number of requirements, then the arrow with the type "Condition AND" is selected because it is stricter.
Ordinal choice block

Description:
In this block, the bot chooses arrows on the random basis.
| Description | Image |
|---|---|
1. ID - a unique block identifier. 2. Block type - displays the type of the selected block. You can change the type of any block in the script. 3. Block marker - a custom text that can be used in reports as a marker (optional). |
|

Emotions block

Description:
This block allows you to determine the direction of the script on the basis of client's emotions.
| Description | Image |
|---|---|
1. ID - a unique block identifier. 2. Block type - displays the type of the selected block. You can change the type of any block in the script. 3. Block marker - a custom text that can be used in reports as a marker (optional). |
|

Properties:
| Description | Image |
|---|---|
1. Arrow text - this text allows you to navigate the script. 2. Emotion type - selects the emotion that the bot will expect to detect in the client's response to go in the direction shown with the arrow. |
|

Types:
| Type | Description |
|---|---|
| Positive | The bot will go in the direction shown with the arrow if the {detector.emotions} variable has the positive value |
| Negative | The bot will go in the direction shown with the arrow if the {detector.emotions} variable has the negative value |
| Neutral | The bot will go in the direction shown with the arrow if the {detector.emotions} variable has the neutral value |
Result block

Description:
This block is intended for saving the result of the conversation, as well as for forced transfer to the operator, sending a message and/or notification.
| Description | Image |
|---|---|
1. ID - a unique block identifier. 2. Block type - displays the type of the selected block. You can change the type of any block in the script. 3. Block marker - custom text that can be used in reports as a marker (optional). 4. Fixation description (not pronounced by the robot) – custom text that can be used to describe the operation of the block. Using this text, you can quickly find the necessary block running the search with CTRL+F keyboard shortcuts. 5. Assign variables – allows you to change the value of any variable or create a new variable. 6. Select action type – selects an action for the bot to perform. |
|

Types:
| Type | Description | Image |
|---|---|---|
| No action | The bot does not do anything, and proceeds to the next block (provided there is one). |
|
| Sending email | The bot sends an email. 1. Recipient email - email address of the recipient. 2. Email header - contains the subject of the message. 3. Send transcription - attaches a transcript of a conversation between the bot and the client in the message body. 4. Message text – contains text of the message. |
|
| Sending notification | The bot sends a notification to the client. 1. Select a notification template - a template that will be used by the system to send a notification. 2. Shorten links - short forms of links are used in the message text. 3. Recipient's phone number - the phone number of the recipient of the notification. |
|
Testing messages If you plan to send the result of the conversation to yourself, then it is better to send it via email because it is free. | ||
Sending DTMF signals | Functionality that is used to bypass the IVR menu. 1. Signals - characters from 0 to 9, * and #, used to send a signal to the bot to go to the necessary branch of the IVR menu. |
|
| Redirect to operator | The bot can transfer a client to an operator or switch to a different script. 1. Redirect action (Outgoing calls) - bot ends the call. 2. Redirect action (Incoming calls) – a set of actions that the system uses to forward an incoming call. 3. Text accompaniment - this text will be displayed to a client and operator when the system transfers the dialogue with this client to the operator. 4. Operator group - allows you to transfer dialogues with your clients to different departments of your company or different specialists (for example, to the sales department, accounting, technical support). |
|
1. Redirect action (Outgoing calls) - the call will be transferred to the operator. 2. Redirect action (Incoming calls) – a set of actions that the system uses to forward an incoming call. 3. Text accompaniment - this text will be displayed to a client and operator when the system transfers the dialogue with this client to the operator. 4. Operator group - allows you to transfer dialogues with your clients to different departments of your company or different specialists (for example, to the sales department, accounting, technical support). |
| |
1. Redirect action (Outgoing calls) - uses the forwarding settings from the call task. 2. Redirect action (Incoming calls) – a set of actions that the system uses to forward an incoming call. 3. Text accompaniment - this text will be displayed to a client and operator when the system transfers the dialogue with this client to the operator. 4. Operator group - allows you to transfer dialogues with your clients to different departments of your company or different specialists (for example, to the sales department, accounting, technical support). |
| |
1. Redirect action (Outgoing calls) - the dialing plan that the system will use to forward the call.* 2. Redirect action (Incoming calls) – select a dialing plan from the dropdown list. 3. Enter phone number – phone number to which you want to forward calls. 4. Redirect action (Incoming calls) – a set of actions that the system uses to forward an incoming call. 5. Text accompaniment - this text will be displayed to a client and operator when the system transfers the dialogue with this client to the operator. 6. Operator group - allows you to transfer dialogues with your clients to different departments of your company or different specialists (for example, to the sales department, accounting, technical support). * The dialing plan is created in the "Telephony" section |
| |
1. Redirect action (Outgoing calls) - uses the call forwarding settings from the translation plan.* 2. Redirect action (Outgoing calls) - drop-down list with call forwarding directions. 3. Redirect action (Incoming calls) – a set of actions that the system uses to forward an incoming call (similar to outgoing calls). 4. Text accompaniment - this text will be displayed to a client and operator when the system transfers the dialogue with this client to the operator. 5. Operator group - allows you to transfer dialogues with your clients to different departments of your company or different specialists (for example, to the sales department, accounting, technical support). * The dialing plan is created in the "Telephony" section |
| |
1. Redirect action (Outgoing calls) - transfers calls to the specified number. 2. Number - phone number to which calls are transferred. 3. Accompanying headers – header text used in transfers. 4. Redirect action (Incoming calls) – a set of actions that the system uses to forward an incoming call (similar to outgoing calls). 5. Text accompaniment - this text will be displayed to a client and operator when the system transfers the dialogue with this client to the operator. 6. Operator group - allows you to transfer dialogues with your clients to different departments of your company or different specialists (for example, to the sales department, accounting, technical support). |
| |
1. Redirect action (Outgoing calls) - switches to the selected script. 2. Redirect action (Outgoing calls) - selects the script. 3. Redirect action (Incoming calls) – a set of actions that the system uses to forward an incoming call (similar to outgoing calls). 4. Text accompaniment - this text will be displayed to a client and operator when the system transfers the dialogue with this client to the operator. 5. Operator group - allows you to transfer dialogues with your clients to different departments of your company or different specialists (for example, to the sales department, accounting, technical support). |
| |
| Call back | 1. Date and time for call back - creates a new call task for a specific time. This field uses a variable of the Date type, which is declared in the start block. |
|
| Client identification | The bot will send the client ID to the selected client. 1. Recipient's phone number – the phone number of the client. 2. Recipient's email - the client's email address. 3. Client ID - a value that allows you to identify the client. This can be a phone number, email or ID. |
|
| Arbitrary result | It is used to save your own variables. 1. Add element - allows you to create variables and assign values to them. |
|
| Cancel recall | Cancels recall. |
|


Web-request block

Description:
This block allows the bot to interact with an external or internal CRM system during a dialogue with the user and exchange information about the client via the API. The bot can interact with the CRM system to search for and obtain information about the client (place of residence, residential address, profession) and save new information about the client (for example, pets, hobbies, interests, etc.) that it receives during the dialogue. This block also allows the bot to use network services that are available through the API (for example, a calculator, unit converter, weather forecast, program guide, etc.).
Example:
There is an incoming call from a client. The bot identifies the phone number and answers the call. Using the Web-request block, the bot accesses the corporate CRM system, which stores client data, complete information on the entire range of products, as well as information on all orders. Using the client's phone number, the bot receives information about the client and realizes that the client has an active order. The bot addresses the client by name and before the client starts to speak, the bot asks whether the client wants to know the status of their order. After an affirmative answer, the bot provides information about the current status of the order.
For more information on how the Web-request block works, it is recommended to read about the syntax of the JSON format.
| Description | Image |
|---|---|
1. ID - a unique block identifier. 2. Block type - displays the type of the selected block. You can change the type of any block in the script. 3. Block marker - a custom text that can be used in reports as a marker (optional). 4. Message asking you to wait - a text asking you to wait, that will be voiced by the bot. This text can be used to fill in a pause during which the system makes a request to the API of a third-party service or CRM system. 5. Send immediately - allows you to send messages before the queue is formed completely. 6. Delay before sending a message - the period of time after which the message will be sent after the bot switches to this block*. 7. Add record (BrandVoice) - allows you to upload an audio file from your computer and use it in hybrid speech synthesis. 8. How often to say still wait (in sec) - the period of time after which the bot will repeat the message (see step 4) until it receives a response from the server. 9. Message asking you to wait a little longer - a phrase asking you to wait, which will be voiced by the bot until it receives a response from a third-party service or CRM system. 10. Callback URL - the URL of the page that the bot will open after the request is complete. This parameter is optional. You can use it for notification that the request is complete (for example, to display a page with a standard phrase or an image). 11. Authorization type – type of user authorization for access to data on the server. Possible values for this parameter are described below. 12. Select request type – type of request to the server. Possible values for this parameter are described below. 13. URL - the address of the page that the bot works with. It contains query parameters and variables. In the address bar, you can specify a variable that the bot will use to transfer information to the service that it accesses. 14. Cookie - when sending requests to certain methods, you may need to pass a cookie. The required value is contained in the response, that you get after you send a request to the method for the first time. 15. Add element - when sending requests to certain methods, you may also need to pass headers. The required header values are contained in the response, that you get after you send a request to these methods for the first time. 16. Forced asynchronous mode - the ability of the bot to continue the dialogue with a client while it sends a request to the server. * Delay in blocks starts to work only after the bot receives the first response from the client. |
|

Types of requests:
| Тип | Description | Image |
|---|---|---|
| GET | Used to receive data from the server. With this type of request, you can get information about an order, product, user, etc. 1. URL - the address of the page the bot works with. 2. Cookie - cookie value (if required by a third-party service). 3. Add element - adds the header value (if required by a third-party service). 4. Forced asynchronous mode - enables the bot to continue the dialogue with the client while it sends requests to the server. |
|
| POST | Used to send data to the server. With this type of request, you can save information about orders, add products, update user data, and so on. 1. URL - the address of the page the bot works with. 2. Cookie - cookie value (if required by a third-party service). 3. Add element - adds the header value (if required by a third-party service). 4. Forced asynchronous mode - enables the bot to continue the dialogue with the client while it sends requests to the server. 5. Select the content type - type of content to be used in the request. Possible values:
{
"first_name" : "John"
}
6. Add element - allows you to set the order in which you define a key and its value. For example: if you need to send data in the request body, then you need to enter the first_name key in the left field, and its value John in the right field. 7. Variable name with attachments - allows you to send an attached file in the request. |
|
| Delete | Used to delete data on the server. The request requires the ID of the resource. Using this type of request, you can delete information about orders, products, etc. 1. URL - the address of the page the bot works with. 2. Cookie - cookie value (if required by a third-party service). 3. Add element - adds the header value (if required by a third-party service). 4. Forced asynchronous mode - enables the bot to continue the dialogue with the client while it sends requests to the server. |
|
| Put | Used to update data on the server. The request requires the ID of the resource. Using this type of request, you can save information about orders, create new products, update user data, etc. 1. URL - the address of the page the bot works with. 2. Cookie - cookie value (if required by a third-party service). 3. Add element - adds the header value (if required by a third-party service). 4. Forced asynchronous mode - enables the bot to continue the dialogue with the client while it sends requests to the server. 5. Select the content type - type of content to be used in the request. Possible values:
6. Add element - allows you to set the order in which you define a key and its value. For example: if you need to send data in the request body, then you need to enter the first_name key in the left field, and its value John in the right field. {
"first_name" : "John"
}
7. Variable name with attachments - allows you to send an attached file in the request. |
|


Types of authorization:
| Type | Description | Image |
|---|---|---|
| None | This type is used if authorization is not required to work with the page (for example, if the service is located in a secure zone). 1. Select request type - one of the request types described above. 2. URL - the address of the page the bot works with. 3. Cookie - cookie value (if required by a third-party service). 4. Add element - adds the header value (if required by a third-party service). 5. Forced asynchronous mode - enables the bot to continue the dialogue with the client while it sends requests to the server. |
|
Login/Password | This type is used if you need to perform authorization by login and password to work with the page. 1. User name - login. 2. Password - password. 3. Select request type - one of the request types described above. 4. URL - the address of the page the bot works with. 5. Cookie - cookie value (if required by a third-party service). 6. Add element - adds the header value (if required by a third-party service). 7. Forced asynchronous mode - enables the bot to continue the dialogue with the client while it sends requests to the server. |
|
| Header | This type is used if you need to use a header to work with the page. In this case, you need: 1. Authorization type - the authorization scheme that the bot will use to work with the page. 2. Key value - the name of the key. 3. Select request type - one of the request types described above. 4. URL - the address of the page the bot works with. 5. Cookie - cookie value (if required by a third-party service). 6. Add element - adds the header value (if required by a third-party service). 7. Forced asynchronous mode - enables the bot to continue the dialogue with the client while it sends requests to the server. |
|


Properties:
| Description | Image |
|---|---|
1. Arrow text - additional text that helps you navigate the script. 2. Type - the type of decision making. The transition to the next block of the script is performed according to the result of a request (successful or not successful) or by default. |
|

Types:
| Type | Description | Image | |
|---|---|---|---|
| By default | This type is used to go in the direction that the arrow shows, if conditions defined in other arrows of this block are not met. |
| |
| Result | Success | The bot will go in the direction that the arrow shows if the response code from the server matches the one specified in the properties of the arrow, and if the defined conditions are met. The result of the response from the server is stored in the result variable. 1. Success of request - determines the success of the request. 2. Upload file – allows you to import conditions and variables from a file. 3. Response code - the code that the system expects to receive after the request is complete.* 4. Conditions - a set of conditions used to make a decision. 5. Add element – creates a variable that will store the value contained in the response from the server. For example, we receive the following response: {
"success": true,
"data": {
"booking_days": {
"6": [
2,
3,
4,
5,
6,
7,
8,
9,
10,
11,
12,
13,
14,
15,
16,
17,
18,
19,
20,
21,
22,
23,
24,
25,
26,
27,
28,
29,
30
],
"7": [
1,
2,
3,
4
]
},
"booking_dates": [
"2022-06-02",
"2022-06-03",
"2022-06-04",
"2022-06-05",
"2022-06-06",
"2022-06-07",
"2022-06-08",
"2022-06-09",
"2022-06-10",
"2022-06-11",
"2022-06-12",
"2022-06-13",
"2022-06-14",
"2022-06-15",
"2022-06-16",
"2022-06-17",
"2022-06-18",
"2022-06-19",
"2022-06-20",
"2022-06-21",
"2022-06-22",
"2022-06-23",
"2022-06-24",
"2022-06-25",
"2022-06-26",
"2022-06-27",
"2022-06-28",
"2022-06-29",
"2022-06-30",
"2022-07-01",
"2022-07-02",
"2022-07-03",
"2022-07-04"
],
"working_days": {
"6": [
2,
3,
4,
5,
6,
7,
8,
9,
10,
11,
12,
13,
14,
15,
16,
17,
18,
19,
20,
21,
22,
23,
24,
25,
26,
27,
28,
29,
30
],
"7": [
1,
2,
3
]
},
"working_dates": [
"2022-06-02",
"2022-06-03",
"2022-06-04",
"2022-06-05",
"2022-06-06",
"2022-06-07",
"2022-06-08",
"2022-06-09",
"2022-06-10",
"2022-06-11",
"2022-06-12",
"2022-06-13",
"2022-06-14",
"2022-06-15",
"2022-06-16",
"2022-06-17",
"2022-06-18",
"2022-06-19",
"2022-06-20",
"2022-06-21",
"2022-06-22",
"2022-06-23",
"2022-06-24",
"2022-06-25",
"2022-06-26",
"2022-06-27",
"2022-06-28",
"2022-06-29",
"2022-06-30",
"2022-07-01",
"2022-07-02",
"2022-07-03"
]
},
"meta": []
}
To store the 2nd array element 6 (value 3) from the Where:
To store the 3rd array element 7 (value 3) from the Where:
To store the 2nd array element from the Where:
|
|
| Failed | The bot will go in the direction that the arrow shows if the response from the server is not received. |
| |


Arithmetic block

Description:
This block is used to perform arithmetic operations with numbers and variables.
Types:
| Description | Image |
|---|---|
1. ID - a unique block identifier. 2. Block type - displays the type of the selected block. You can change the type of any block in the script. 3. Block marker - a custom text that can be used in reports as a marker (optional). 4. Type – defines the type of arithmetic operation block. 5. Add operation – buttons for adding arithmetic operations to the working area where you create an arithmetic expression.* 6. Add variable – adds a variable to the working area. 7. Save result to variable – saves calculation results to the specified variable (required field). |
|
1. Offset from date – allows you to define an offset from the specified date. The offset is specified in seconds. You can add and subtract dates. 2. Save the result to a variable – allows you to save the date with the specified offset into a variable in the following format "YYYY-MM-DD HH:MM:SS". |
|
1. AST expression (only for experienced users) - allows you to enter an ATS expression. 2. BPL expression - allows you to enter a BPL expression that you can convert to an AST expression. At the end of each line of this block, you must enter the ";" symbol. 3. Convert BPL to AST – converts BPL expression to AST expression. BPL expressions work only with widgets, instant messengers and incoming calls. |
|


*In addition to simple arithmetic expressions, you can use enable rounding the calculation results. For this, you need to specify the expression in the following form: math.round({var},2), where {var} is a variable, number or arithmetic expression and 2 is the rounding accuracy (number of symbols after a comma).
Examples:
math.round(1/3,2) defines the following: 1 will be divided by 3 and the result will be written with accuracy of 2 symbols after a comma - 0.33.
math.round(1.6666666,0) defines the following: 1.6666666 will be rounded to an integer - 2.
Important!
One block supports one arithmetic expression per line. If sequential calculations are required, then you need to use multiple blocks.
A block must always have one incoming and one outgoing arrow.
Ordinal choice block

Description:
This block is used to sequentially navigate branches that come from this block within one session.
Example: on the first visit to the ordinal choice block, a bot is transferred to branch with number "1". On the next visit to this block, the bot is transferred to branch with number 2, etc.
| Description | Image |
|---|---|
1. ID - a unique block identifier. 2. Block type - displays the type of the selected block. You can change the type of any block in the script. 3. Block marker - a custom text that can be used in reports as a marker (optional). |
|

| Description | Image |
|---|---|
1. Arrow text is a custom user-defined block of text that can be used to describe the purpose of the arrow. You can quickly find this text in the script using the CTRL+ F keyboard shortcuts. 2. Output data type – type of data stored in a variable. This parameter is necessary only for voice calls. 2. Sequence number - the number of block visits on the basis of which the bot selects a branch. |
|

Testing messages
Arrows must be numbered beginning with "1". If there is no arrow with the number of the current block visit then the bot will be transferred to the operator.
Portal block

Description:
The Portal block is used for the same purpose as an arrow. It connects blocks in a script.
| Description | Image |
|---|---|
1. ID - a unique block identifier. 2. Block type - displays the type of the selected block. You can change the type of any block in the script. 3. Block marker - a custom text that can be used in reports as a marker (optional). 4. Teleport note - custom user-defined text that can be used to describe the purpose of the block. You can quickly find this text in the script using the CTRL+ F keyboard shortcuts. 5. Send to block - block to which the bot will be sent. |
|

Empty block

Description:
The empty block is used to create more structured block designs. You can also draw more than one arrow from this block to other blocks in the script.
| Description | Image |
|---|---|
1. ID - a unique block identifier. 2. Block type - displays the type of the selected block. You can change the type of any block in the script. 3. Block marker - a custom text that can be used in reports as a marker (optional). |
|

AI block

Description:
The AI block is used for integrations with third-party neural networks.
| Description | Image |
|---|---|
1. ID - a unique block identifier. 2. Block type - displays the type of the selected block. You can change the type of any block in the script. 3. Block marker - a custom text that can be used in reports as a marker (optional). 4. Model - neural network model. 5. Type - type of neural network. 6. Add record - allows you to upload an audio file from your computer so that a bot can play it in a conversation with a client. 7. Record audio - allows you to record an audio file so that a bot can play it in a conversation with a client. |
|
